EXTERIOR PANELS / TRIM ROOF RACK INSTALLATION
CAUTION / NOTICE / HINT
- HINT:
- ·
Use the same procedure for the RH and LH sides.
·The procedure listed below is for the LH side.
·If the roof rack leg is left on the vehicle side, perform procedures 1 through 7. (except Off Road Package)
·If removing together with the roof rack leg, perform procedures 1 through 3 and procedures 8 through 10 and procedure 12. (except Off Road Package)
PROCEDURE

 63454F
1.INSTALL REAR ROOF RACK RETAINER LH
for Panoramic Moon Roof:
Attach the guide and install the 2 rear roof rack retainers LH.
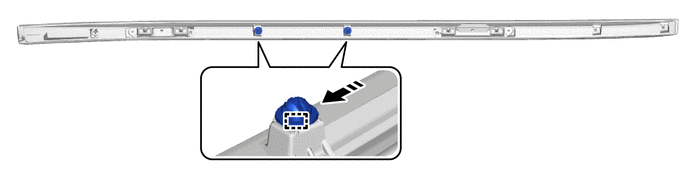

|
Install in this Direction | - | - |
63453F
2.INSTALL FRONT ROOF RACK RETAINER LH (except Off Road Package)
except Panoramic Moon Roof:
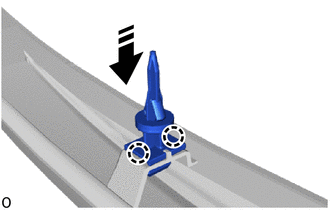
|
|
Install in this Direction |
Attach the claw and install a new front roof rack retainer LH as shown in the illustration.
for Panoramic Moon Roof:
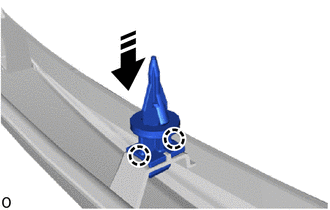
|
|
Install in this Direction |
Attach the claw and install a new front roof rack retainer LH as shown in the illustration.
62436A
3.INSTALL FRONT ROOF SIDE RAIL PAD LH (except Off Road Package)
- HINT:
-
When installing the front roof side rail pad LH, heat the front roof side garnish sub-assembly LH and front roof side rail pad LH using a heat light.
- Standard Value:
Part Temperature Front Roof Side Garnish Sub-assembly LH 20 to 30°C (68 to 86°F) Front Roof Side Rail Pad LH 20 to 30°C (68 to 86°F)
- CAUTION:
-
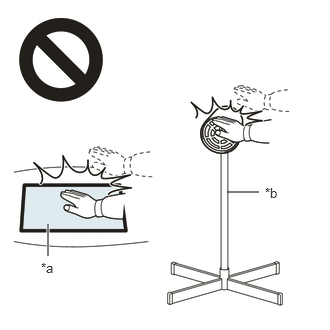 2.365,2 2.698,2 false 0.5,2.333 0.5,2.667 true 0.427,2.708 0.74,2.865 0.313,0.156 10 false *a 2.76,1.927 3.073,2.083 0.313,0.156 10 false *b
*a Heated Part *b Heat Light
- ·
Do not touch the heat light and heated parts.
·Touching the heat light may result in burns.
·Touching heated parts for a long time may result in burns.
- NOTICE:
-
Do not heat front roof side garnish sub-assembly LH and front roof side rail pad LH excessively.
When reusing the front roof side garnish sub-assembly LH:
Using a heat light, heat the front roof side garnish sub-assembly LH surface.
Remove any remaining double-sided tape from the front roof side garnish sub-assembly LH.
Wipe off any tape adhesive residue with cleaner.
- NOTICE:
- ·
Installing the front roof side rail pad LH with some double-sided tape remaining may cause poor adhesion. Perform this procedure until the tape is sufficiently removed.
·Make sure to use a cloth when removing. Using a screwdriver, etc., may cause damage and poor adhesion.
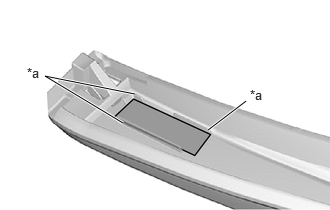
| *a | Rib |

|
Primer |
Apply primer to the front roof side garnish sub-assembly LH on the installation area of the front roof side rail pad LH using a brush or felt.
- NOTICE:
- ·
Replace the brush or felt if it is dirty or has become hardened.
·Keep any painted surface free from primer.
·If the primer contacts a painted surface, it may leave light primer marks. Therefore, use protective tape when using liquid primer.
·Do not touch surfaces to which primer has been applied until the front roof side rail pad LH has been attached.
Let the primer dry sufficiently.
- NOTICE:
-
Do not touch applied surfaces until the primer is dry.
- Recommended drying time:
10 minutes or more (at 23°C (73°F))
Using a heat light, heat the front roof side garnish sub-assembly LH and a new front roof side rail pad LH.
- NOTICE:
-
Do not heat front roof side garnish sub-assembly LH and front roof side rail pad LH excessively.
Remove the release paper from the front roof side rail pad LH.
- NOTICE:
-
After removing the peeling paper, do not touch the surface of the tape with your fingers or cotton work gloves.
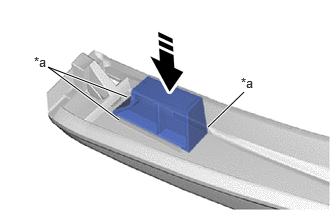
| *a | Rib |
|
|
Install in this Direction |
Install the front roof side rail pad LH in the position shown in the illustration.
- NOTICE:
-
The application strength of the front roof side rail pad LH will weaken if reapplied. If reapplication is necessary, be sure to replace it with a new one.
- HINT:
-
Apply pressure so that it does not lift up from the front roof side garnish sub-assembly LH.
75506B
4.INSTALL FRONT ROOF SIDE GARNISH SUB-ASSEMBLY LH (except Off Road Package)
- HINT:
- ·
Perform this procedure only if the roof rack leg is left on the vehicle.
·When installing the front roof side garnish sub-assembly LH, heat the front roof side garnish sub-assembly LH and vehicle body using a heat light.
- Standard Value:
Part Temperature Vehicle Body 40 to 60°C (104 to 140°F) Front Roof Side Garnish Sub-assembly LH 20 to 30°C (68 to 86°F)
- CAUTION:
-
2.365,2 2.698,2 false 0.5,2.333 0.5,2.667 true 0.427,2.708 0.74,2.865 0.313,0.156 10 false *a 2.76,1.927 3.073,2.083 0.313,0.156 10 false *b
*a Heated Part *b Heat Light
- ·
Do not touch the heat light and heated parts.
·Touching the heat light may result in burns.
·Touching heated parts for a long time may result in burns.
- NOTICE:
-
Do not heat the front roof side garnish sub-assembly LH and vehicle body excessively.
When reusing the vehicle body:
Using a heat light, heat the vehicle body surface.
Remove any remaining double-sided tape from the vehicle body.
Wipe off any tape adhesive residue with cleaner.
- NOTICE:
- ·
Installing the front roof side garnish sub-assembly LH with some double-sided tape remaining may cause poor adhesion. Perform this procedure until the tape is sufficiently removed.
·Make sure to use a cloth when removing. Using a screwdriver, etc., may cause damage and poor adhesion.
Using a heat light, heat the vehicle body and front roof side garnish sub-assembly LH tip front roof side rail pad LH.
- NOTICE:
-
Do not heat vehicle body and front roof side rail pad LH excessively.
Remove the release paper from the front roof side rail pad LH.
- NOTICE:
-
After removing the peeling paper, do not touch the surface of the tape with your fingers or cotton work gloves.
except Panoramic Moon Roof:
Attach the clip, guide and front roof rack retainer LH, and then install the front roof side garnish sub-assembly LH.
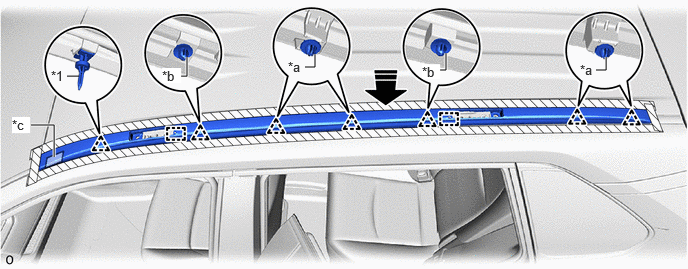
| *1 | Front Roof Rack Retainer LH | - | - |
| *a | Clip<A> | *b | Clip<B> |
| *c | Double-sided Tape of the Front Roof Side Rail Pad LH | - | - |
|
|
Install in this Direction | - | - |
- NOTICE:
-
If the front roof side garnish sub-assembly LH has been removed, replace the clip<A> with a new one.
Attach the double-sided tape of the front roof side rail pad LH.
- NOTICE:
-
The application strength of the front roof side rail pad LH will weaken if reapplied. If reapplication is necessary, be sure to replace it with a new one.
- HINT:
-
Apply pressure so that it does not lift up from the vehicle body.
for Panoramic Moon Roof:
Attach the guide and clip and front roof rack retainer LH, rear roof rack retainer LH, and then install the front roof side garnish sub-assembly LH.
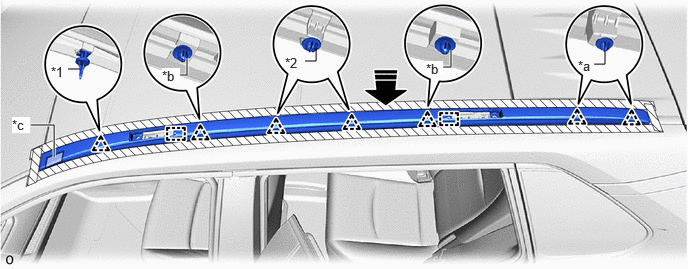
| *1 | Front Roof Rack Retainer LH | *2 | Rear Roof Rack Retainer LH |
| *a | Clip<A> | *b | Clip<B> |
| *c | Double-sided Tape of the Front Roof Side Rail Pad LH | - | - |
|
|
Install in this Direction | - | - |
- NOTICE:
-
If the front roof side garnish sub-assembly LH has been removed, replace the clip<A> with a new one.
Attach the double-sided tape of the front roof side rail pad LH.
- NOTICE:
-
The application strength of the front roof side rail pad LH will weaken if reapplied. If reapplication is necessary, be sure to replace it with a new one.
- HINT:
-
Apply pressure so that it does not lift up from the vehicle body.
Install the 2 bolts.
- Torque:
- 5.5 N*m (56 kgf*cm, 49 in.*lbf)
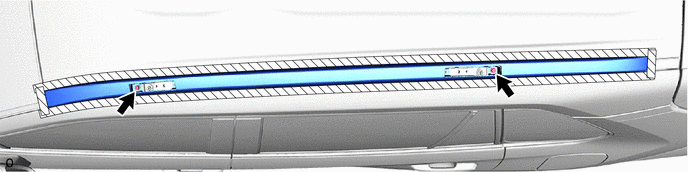
Remove the protective tape.
74610U
5.INSTALL ASSIST GRIP ASSEMBLY (except Off Road Package)
- HINT:
-
Perform this procedure only if the roof rack leg is left on the vehicle.
-
Click hereVehicle Interior>INTERIOR PANELS / TRIM>ROOF HEADLINING>INSTALLATION
75634
6.INSTALL NO. 2 ROOF SIDE GARNISH LID LH (except Off Road Package)
- HINT:
-
Perform this procedure only if the roof rack leg is left on the vehicle.
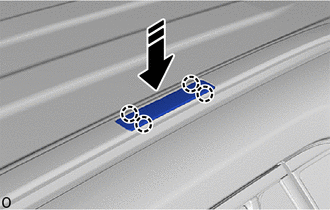
|
|
Install in this Direction |
w/o Roof Carrier:
Attach the claw and install the No. 2 roof side garnish lid LH as shown in the illustration.
75632A
7.INSTALL NO. 1 ROOF SIDE GARNISH LID LH (except Off Road Package)
- HINT:
-
Perform this procedure only if the roof rack leg is left on the vehicle.
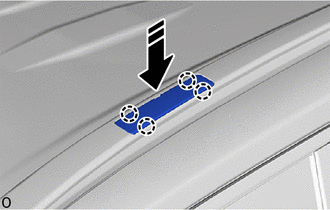
|
|
Install in this Direction |
w/o Roof Carrier:
Attach the claw and install the No. 1 roof side garnish lid LH as shown in the illustration.
63437D
8.INSTALL NO. 2 ROOF CARRIER SEAL LH (except Off Road Package)
- HINT:
- ·
Perform this procedure only if removing together with the roof rack leg.
·When installing the No. 2 roof carrier seal LH, heat the No. 2 roof carrier seal LH and front roof side garnish sub-assembly LH using a heat light.
- Standard Value:
Part Temperature Front Roof Side Garnish Sub-assembly LH 20 to 30°C (68 to 86°F) No. 2 roof carrier seal LH 20 to 30°C (68 to 86°F)
- CAUTION:
-
2.365,2 2.698,2 false 0.5,2.333 0.5,2.667 true 0.427,2.708 0.74,2.865 0.313,0.156 10 false *a 2.76,1.927 3.073,2.083 0.313,0.156 10 false *b
*a Heated Part *b Heat Light
- ·
Do not touch the heat light and heated parts.
·Touching the heat light may result in burns.
·Touching heated parts for a long time may result in burns.
- NOTICE:
-
Do not heat the No. 2 roof carrier seal LH and front roof side garnish sub-assembly LH excessively.
When reusing the front roof side garnish sub-assembly LH:
Using a heat light, heat the front roof side garnish sub-assembly LH surface.
Remove any remaining double-sided tape from the front roof side garnish sub-assembly LH.
Wipe off any tape adhesive residue with cleaner.
- NOTICE:
- ·
Installing the No. 2 roof carrier seal LH with some double-sided tape remaining may cause poor adhesion. Perform this procedure until the tape is sufficiently removed.
·Make sure to use a cloth when removing. Using a screwdriver, etc., may cause damage and poor adhesion.
Using a heat light, heat the front roof side garnish sub-assembly LH and a new No. 2 roof carrier seal LH.
Remove the release paper from the No. 2 roof carrier seal LH.
- NOTICE:
-
After removing the peeling paper, do not touch the surface of the tape with your fingers or cotton work gloves.
Install the 2 No. 2 roof carrier seals LH in the position shown in the illustration.
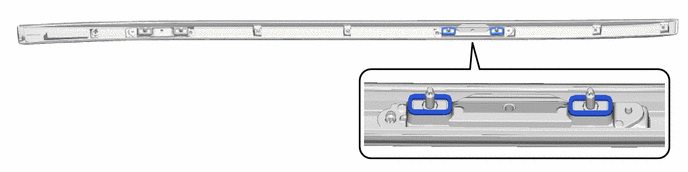
- NOTICE:
-
The application strength of the No. 2 roof carrier seal LH will weaken if reapplied. If reapplication is necessary, be sure to replace it with a new one.
- HINT:
-
Apply pressure so that it does not lift up from the front roof side garnish sub-assembly LH.
63436B
9.INSTALL NO. 1 ROOF CARRIER SEAL LH (except Off Road Package)
- HINT:
- ·
Perform this procedure only if removing together with the roof rack leg.
·When installing the No. 1 roof carrier seal LH, heat the No. 1 roof carrier seal LH and front roof side garnish sub-assembly LH using a heat light.
- Standard Value:
Part Temperature Front Roof Side Garnish Sub-assembly LH 20 to 30°C (68 to 86°F) No. 1 roof carrier seal LH 20 to 30°C (68 to 86°F)
- CAUTION:
-
2.365,2 2.698,2 false 0.5,2.333 0.5,2.667 true 0.427,2.708 0.74,2.865 0.313,0.156 10 false *a 2.76,1.927 3.073,2.083 0.313,0.156 10 false *b
*a Heated Part *b Heat Light
- ·
Do not touch the heat light and heated parts.
·Touching the heat light may result in burns.
·Touching heated parts for a long time may result in burns.
- NOTICE:
-
Do not heat the No. 1 roof carrier seal LH and front roof side garnish sub-assembly LH excessively.
When reusing the front roof side garnish sub-assembly LH:
Using a heat light, heat the front roof side garnish sub-assembly LH surface.
Remove any remaining double-sided tape from the front roof side garnish sub-assembly LH.
Wipe off any tape adhesive residue with cleaner.
- NOTICE:
- ·
Installing the No. 1 roof carrier seal LH with some double-sided tape remaining may cause poor adhesion. Perform this procedure until the tape is sufficiently removed.
·Make sure to use a cloth when removing. Using a screwdriver, etc., may cause damage and poor adhesion.
Using a heat light, heat the front roof side garnish sub-assembly LH and a new No. 1 roof carrier seal LH.
Remove the release paper from the No. 1 roof carrier seal LH.
- NOTICE:
-
After removing the peeling paper, do not touch the surface of the tape with your fingers or cotton work gloves.
Install the 2 No. 1 roof carrier seals LH in the position shown in the illustration.
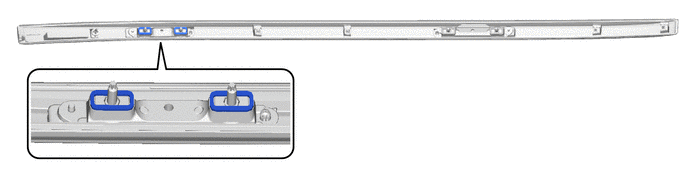
- NOTICE:
-
The application strength of the No. 1 roof carrier seal LH will weaken if reapplied. If reapplication is necessary, be sure to replace it with a new one.
- HINT:
-
Apply pressure so that it does not lift up from the front roof side garnish sub-assembly LH.
62404
10.INSTALL ROOF SIDE RAIL GARNISH SUB-ASSEMBLY LH (except Off Road Package)
- HINT:
- ·
Perform this procedure only if removing together with the roof rack leg.
·When installing the roof side rail garnish sub-assembly LH, heat the vehicle body and roof side rail garnish sub-assembly LH using a heat light.
- Standard:
Item Temperature Vehicle Body 40 to 60°C (104 to 140°F) Roof Side Rail Garnish Sub-assembly LH 20 to 30°C (68 to 86°F)
- CAUTION:
- ·
2.365,2 2.698,2 false 0.5,2.333 0.5,2.667 true 0.427,2.708 0.74,2.865 0.313,0.156 10 false *a 2.76,1.927 3.073,2.083 0.313,0.156 10 false *b
*a Heated Part *b Heat Light
Do not touch the heat light and heated parts.
·Touching the heat light may result in burns.
·Touching heated parts for a long time may result in burns.
- NOTICE:
-
Do not heat vehicle body and roof side rail garnish sub-assembly LH excessively.
Clean the vehicle body surface.
Using a heat light, heat the vehicle body surface.
Remove any remaining double-sided tape from the vehicle body.
Wipe off any tape adhesive residue with cleaner.
- NOTICE:
- ·
Installing the roof side rail garnish sub-assembly LH with some double-sided tape remaining may cause poor adhesion. Perform this procedure until sufficiently removed it.
·Make sure to use a cloth when removing. Using a screwdriver, etc., may cause damage and poor adhesion.
Using a heat light, heat the vehicle body and roof side rail garnish sub-assembly LH tip front roof side rail pad LH.
- NOTICE:
-
Do not heat vehicle body and front roof side rail pad LH excessively.
Remove the release paper from the front roof side rail pad LH.
- NOTICE:
-
After removing the peeling paper, do not touch the surface of the tape with your fingers or cotton work gloves.
except Panoramic Moon Roof:
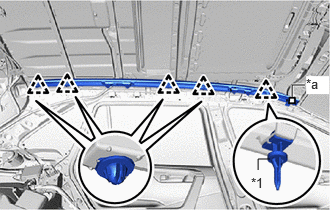
| *1 | Front Roof Rack Retainer LH |
| *a | Double-sided Tape of the Front Roof Side Rail Pad LH |
Attach the clip and front roof rack retainer LH and install the roof side rail garnish sub-assembly LH.
- NOTICE:
-
If the roof side rail garnish sub-assembly LH has been removed, replace the clip with a new one.
Attach the double-sided tape of the front roof side rail pad LH.
- NOTICE:
-
The application strength of the front roof side rail pad LH will weaken if reapplied. If reapplication is necessary, be sure to replace it with a new one.
- HINT:
-
Apply pressure so that it does not lift up from the vehicle body.
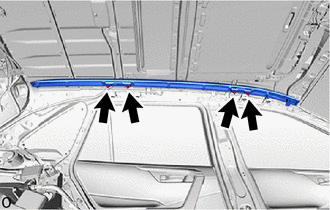
Install the 4 nuts.
- Torque:
- 26 N*m (265 kgf*cm, 19 ft.*lbf)
for Panoramic Moon Roof:
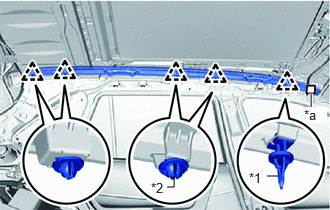
| *1 | Front Roof Rack Retainer LH |
| *2 | Rear Roof Rack Retainer LH |
| *a | Double-sided Tape of the Front Roof Side Rail Pad LH |
Attach the clip and front roof rack retainer LH and rear roof rack retainer LH and install the roof side rail garnish sub-assembly LH.
- NOTICE:
-
If the roof side rail garnish sub-assembly LH has been removed, replace the clip with a new one.
Attach the double-sided tape of the front roof side rail pad LH.
- NOTICE:
-
The application strength of the front roof side rail pad LH will weaken if reapplied. If reapplication is necessary, be sure to replace it with a new one.
- HINT:
-
Apply pressure so that it does not lift up from the vehicle body.
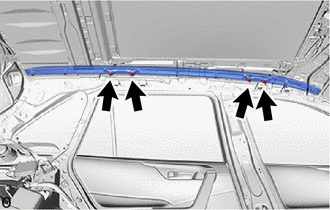
Install the 4 nuts.
- Torque:
- 26 N*m (265 kgf*cm, 19 ft.*lbf)
Remove the protective tape.
62404
11.INSTALL ROOF SIDE RAIL GARNISH SUB-ASSEMBLY LH (for Off Road Package)
- HINT:
-
When installing the roof side rail garnish sub-assembly LH, heat the vehicle body and roof side rail garnish sub-assembly LH using a heat light.
- Standard:
Item Temperature Vehicle Body 40 to 60°C (104 to 140°F) Roof Side Rail Garnish Sub-assembly LH 20 to 30°C (68 to 86°F)
- CAUTION:
- ·
2.365,2 2.698,2 false 0.5,2.333 0.5,2.667 true 0.427,2.708 0.74,2.865 0.313,0.156 10 false *a 2.76,1.927 3.073,2.083 0.313,0.156 10 false *b
*a Heated Part *b Heat Light
Do not touch the heat light and heated parts.
·Touching the heat light may result in burns.
·Touching heated parts for a long time may result in burns.
- NOTICE:
-
Do not heat vehicle body and roof side rail garnish sub-assembly LH excessively.
Clean the vehicle body surface.
Using a heat light, heat the vehicle body surface.
Remove any remaining double-sided tape from the vehicle body.
Wipe off any tape adhesive residue with cleaner.
- NOTICE:
- ·
Installing the roof side rail garnish sub-assembly LH with some double-sided tape remaining may cause poor adhesion. Perform this procedure until sufficiently removed it.
·Make sure to use a cloth when removing. Using a screwdriver, etc., may cause damage and poor adhesion.
Using a heat light, heat the vehicle body and roof side rail garnish sub-assembly LH.
- NOTICE:
-
Do not heat vehicle body and roof side rail garnish sub-assembly LH excessively.
Remove the release paper from the roof side rail garnish sub-assembly LH.
- NOTICE:
-
After removing the peeling paper, do not touch the surface of the tape with your fingers or cotton work gloves.
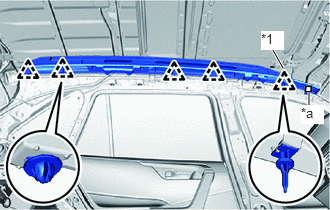
| *1 | Retainer |
| *a | Double-sided Tape |
Attach the clip and retainer and install the roof side rail garnish sub-assembly LH.
Attach the double-sided tape of the roof side rail garnish sub-assembly LH.
- NOTICE:
-
The application strength of the roof side rail garnish sub-assembly LH will weaken if reapplied. If reapplication is necessary, be sure to replace it with a new one.
- HINT:
-
Apply pressure so that it does not lift up from the vehicle body.
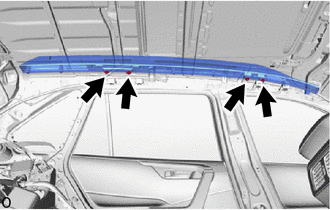
Install the 4 nuts.
- Torque:
- 26 N*m (265 kgf*cm, 19 ft.*lbf)
Remove the protective tape.
12.INSTALL ROOF HEADLINING ASSEMBLY
- HINT:
-
Perform this procedure only if removing together with the roof rack leg.
-
Click hereVehicle Interior>INTERIOR PANELS / TRIM>ROOF HEADLINING>INSTALLATION
13.INSTALL ROOF CARRIER (w/ Roof Carrier)