SUPPLEMENTAL RESTRAINT SYSTEMS AIRBAG SYSTEM(w/o Occupant Classification System) B166D Lost Communication with Front Door Pressure Sensor RH B166E Front Door Pressure Sensor RH Initialization Incomplete
DESCRIPTION
The side collision sensor RH circuit consists of the airbag sensor assembly, side airbag pressure sensor RH and No. 2 side airbag sensor assembly RH*.
The side airbag pressure sensor RH detects impacts to the vehicle and sends signals to the airbag sensor assembly to determine if the SRS should be deployed.
These DTCs are stored when a malfunction is detected in the circuit for the side collision sensor RH circuit.
*: w/ Rear Airbag Sensor
| DTC No. | Detection Item | DTC Detection Condition | Trouble Area | Warning Indicate | Test Mode / Check Mode |
|---|---|---|---|---|---|
| B166D | Lost Communication with Front Door Pressure Sensor RH | One of the following conditions is met:
·
The airbag sensor assembly detects a line short circuit signal, open circuit signal, short circuit to ground signal or short circuit to B+ signal in the circuit for the side collision sensor RH for 2 seconds. ·
A side airbag pressure sensor RH malfunction. ·
A No. 2 side airbag sensor assembly RH malfunction*. ·
An airbag sensor assembly malfunction. |
·
Floor wire ·
Front door wire RH ·
Side airbag pressure sensor RH ·
No. 2 side airbag sensor assembly RH* ·
Airbag sensor assembly |
Comes on | Not applicable |
| B166E | Front Door Pressure Sensor RH Initialization Incomplete | One of the following conditions is met:
·
The airbag sensor assembly detects a line short circuit signal, open circuit signal, short circuit to ground signal or short circuit to B+ signal in the circuit for the side collision sensor RH for 2 seconds. ·
A side airbag pressure sensor RH malfunction. ·
A No. 2 side airbag sensor assembly RH malfunction*. ·
An airbag sensor assembly malfunction. |
·
Floor wire ·
Front door wire RH ·
Side airbag pressure sensor RH ·
No. 2 side airbag sensor assembly RH* ·
Airbag sensor assembly |
Comes on | Not applicable |
*: w/ Rear Airbag Sensor
WIRING DIAGRAM
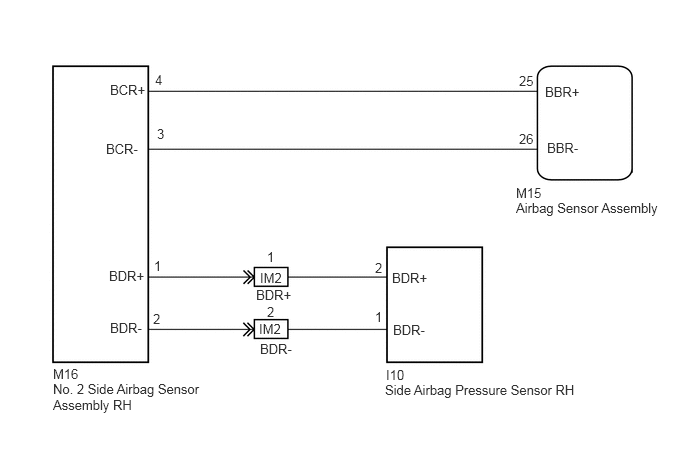
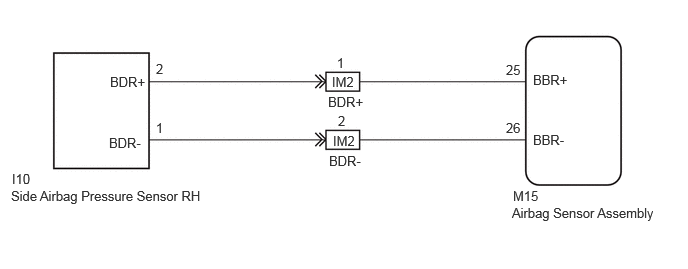
CAUTION / NOTICE / HINT
- NOTICE:
- ·
When disconnecting the cable from the negative (-) auxiliary battery terminal while performing repairs, some systems need to be initialized after the cable is reconnected.
Click hereGeneral>INTRODUCTION>REPAIR INSTRUCTION>INITIALIZATION
·After replacing the airbag sensor assembly, refer to initialization.
Click hereGeneral>INTRODUCTION>REPAIR INSTRUCTION>INITIALIZATION
PROCEDURE
- Result:
Proceed to w/ Rear Airbag Sensor w/o Rear Airbag Sensor
w/ Rear Airbag Sensor
w/o Rear Airbag Sensor
Turn the ignition switch off.
Disconnect the cable from the negative (-) auxiliary battery terminal, and wait for at least 90 seconds.
Check that the connectors are properly connected to the No. 2 side airbag sensor assembly RH and side airbag pressure sensor RH.
- Result:
Proceed to The connectors are properly connected The connectors are not properly connected
The connectors are properly connected
The connectors are not properly connected
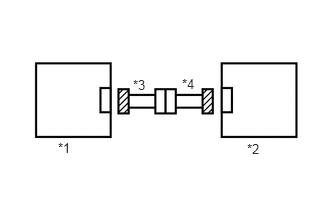
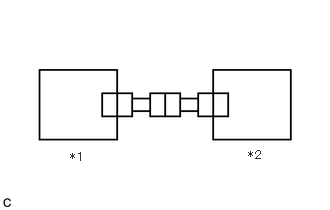
| *1 | Side Airbag Pressure Sensor RH |
| *2 | No. 2 Side Airbag Sensor Assembly RH |
| *3 | Front Door Wire RH |
| *4 | Floor Wire |
Disconnect the connectors from the No. 2 side airbag sensor assembly RH and side airbag pressure sensor RH.
Check that the connectors (on the No. 2 side airbag sensor assembly RH side and side airbag pressure sensor RH side) are not damaged.
- Result:
Proceed to The connectors are not deformed or damaged The connectors are deformed or damaged
The connectors are not deformed or damaged
The connectors are deformed or damaged
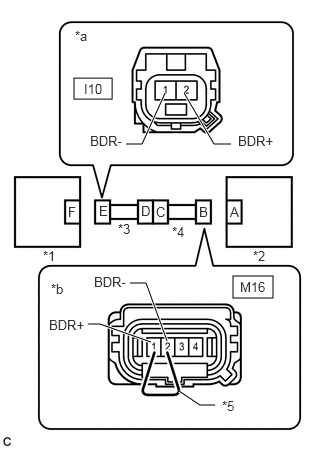
| *1 | Side Airbag Pressure Sensor RH |
| *2 | No. 2 Side Airbag Sensor Assembly RH |
| *3 | Front Door Wire RH |
| *4 | Floor Wire |
| *5 | Service Wire |
| *a | Front view of wire harness connector
(to Side Airbag Pressure Sensor RH) |
| *b | Front view of wire harness connector
(to No. 2 Side Airbag Sensor Assembly RH) |
Connect the cable to the negative (-) auxiliary battery terminal, and wait for at least 2 seconds.
Turn the ignition switch to ON.
Measure the voltage according to the value(s) in the table below.
- Standard Voltage:
Tester Connection Switch Condition Specified Condition I10-2 (BDR+) - Body ground Ignition switch ON Below 1 V I10-1 (BDR-) - Body ground Ignition switch ON Below 1 V
Turn the ignition switch off.
Disconnect the cable from the negative (-) auxiliary battery terminal, and wait for at least 90 seconds.
Using a service wire, connect terminals 1 (BDR+) and 2 (BDR-) of connector B.
- NOTICE:
-
Do not forcibly insert the service wire into the terminals of the connector when connecting a service wire.
Measure the resistance according to the value(s) in the table below.
- Standard Resistance:
Tester Connection Condition Specified Condition I10-2 (BDR+) - I10-1 (BDR-) Always Below 1 Ω
Disconnect the service wire from connector B.
Measure the resistance according to the value(s) in the table below.
- Standard Resistance:
Tester Connection Condition Specified Condition I10-2 (BDR+) - I10-1 (BDR-) Always 1 MΩ or higher I10-2 (BDR+) - Body ground Always 1 MΩ or higher I10-1 (BDR-) - Body ground Always 1 MΩ or higher
- Result:
Proceed to OK NG
OK
NG
| *1 | Side Airbag Pressure Sensor LH |
| *2 | No. 2 Side Airbag Sensor Assembly RH |
Connect the connector to the No. 2 side airbag sensor assembly RH.
Interchange the side airbag pressure sensor RH with LH and connect the connectors to them.
Connect the cable to the negative (-) auxiliary battery terminal, and wait for at least 2 seconds.
Turn the ignition switch to ON, and wait for at least 60 seconds.
Clear the DTCs stored in memory.
- Body Electrical > SRS Airbag > Clear DTCs
- 50002 188
Turn the ignition switch off.
Turn the ignition switch to ON, and wait for at least 60 seconds.
Check for DTCs.
- Body Electrical > SRS Airbag > Trouble Codes
- 50001 188
- Result:
Proceed to DTC B166D or B166E is output DTC B167B or B167C is output DTCs B166D, B166E, B167B and B167C are not output
- HINT:
-
Codes other than DTC B166D, B166E, B167B and B167C may be output at this time, but they are not related to this check.
Turn the ignition switch off.
Disconnect the cable from the negative (-) auxiliary battery terminal, and wait for at least 90 seconds.
Return the side airbag pressure sensor LH and RH to their original positions and connect the connectors to them.
DTC B166D or B166E is output
DTC B167B or B167C is output
Click hereVehicle Interior>SUPPLEMENTAL RESTRAINT SYSTEMS>SIDE AIRBAG SENSOR (for Front Door)>REMOVAL
DTCs B166D, B166E, B167B and B167C are not output
Click hereGeneral>INTRODUCTION>HOW TO TROUBLESHOOT ECU CONTROLLED SYSTEMS>HOW TO PROCEED WITH TROUBLESHOOTING
Interchange the No. 2 side airbag sensor assembly RH with LH and connect the connectors to them.
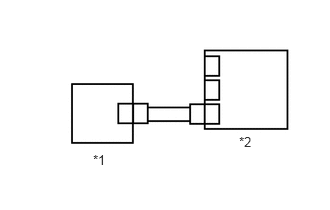
| *1 | No. 2 Side Airbag Sensor Assembly LH |
| *2 | Airbag Sensor Assembly |
Connect the cable to the negative (-) auxiliary battery terminal, and wait for at least 2 seconds.
Turn the ignition switch to ON, and wait for at least 60 seconds.
Clear the DTCs stored in memory.
- Body Electrical > SRS Airbag > Clear DTCs
- 50002 188
Turn the ignition switch off.
Turn the ignition switch to ON, and wait for at least 60 seconds.
Check for DTCs.
- Body Electrical > SRS Airbag > Trouble Codes
- 50001 188
- Result:
Proceed to DTC B166D or B166E is output DTC B167B or B167C is output DTCs B166D, B166E, B167B and B167C are not output
- HINT:
-
Codes other than DTC B166D, B166E, B167B and B167C may be output at this time, but they are not related to this check.
Turn the ignition switch off.
Disconnect the cable from the negative (-) auxiliary battery terminal, and wait for at least 90 seconds.
Return the No. 2 side airbag sensor assembly LH and RH to their original positions and connect the connectors to them.
DTC B166D or B166E is output
DTC B167B or B167C is output
DTCs B166D, B166E, B167B and B167C are not output
Click hereGeneral>INTRODUCTION>HOW TO TROUBLESHOOT ECU CONTROLLED SYSTEMS>HOW TO PROCEED WITH TROUBLESHOOTING
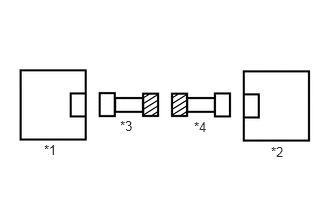
| *1 | Side Airbag Pressure Sensor RH |
| *2 | No. 2 Side Airbag Sensor Assembly RH |
| *3 | Front Door Wire RH |
| *4 | Floor Wire |
Disconnect the floor wire connector from the front door wire RH.
Check that the connectors (on the floor wire side and front door wire RH side) are not damaged.
- Result:
Proceed to The connector is not deformed or damaged The connector is deformed or damaged
The connector is not deformed or damaged
The connector is deformed or damaged
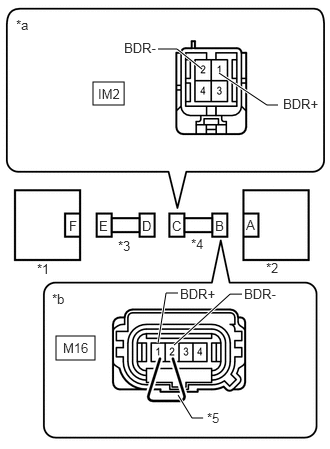
| *1 | Side Airbag Pressure Sensor RH |
| *2 | No. 2 Side Airbag Sensor Assembly RH |
| *3 | Front Door Wire RH |
| *4 | Floor Wire |
| *5 | Service Wire |
| *a | Front view of wire harness connector
(to Front Door Wire RH) |
| *b | Front view of wire harness connector
(to No. 2 Side Airbag Sensor Assembly RH) |
Connect the cable to the negative (-) auxiliary battery terminal, and wait for at least 2 seconds.
Turn the ignition switch to ON.
Measure the voltage according to the value(s) in the table below.
- Standard Voltage:
Tester Connection Switch Condition Specified Condition IM2-1 (BDR+) - Body ground Ignition switch ON Below 1 V IM2-2 (BDR-) - Body ground Ignition switch ON Below 1 V
Turn the ignition switch off.
Disconnect the cable from the negative (-) auxiliary battery terminal, and wait for at least 90 seconds.
Using a service wire, connect terminals 1 (BDR+) and 2 (BDR-) of connector B.
- NOTICE:
-
Do not forcibly insert the service wire into the terminals of the connector when connecting a service wire.
Measure the resistance according to the value(s) in the table below.
- Standard Resistance:
Tester Connection Condition Specified Condition IM2-1 (BDR+) - IM2-2 (BDR-) Always Below 1 Ω
Disconnect the service wire from connector B.
Measure the resistance according to the value(s) in the table below.
- Standard Resistance:
Tester Connection Condition Specified Condition IM2-1 (BDR+) - IM2-2 (BDR-) Always 1 MΩ or higher IM2-1 (BDR+) - Body ground Always 1 MΩ or higher IM2-2 (BDR-) - Body ground Always 1 MΩ or higher
- Result:
Proceed to OK NG
OK
NG
Turn the ignition switch off.
Disconnect the cable from the negative (-) auxiliary battery terminal, and wait for at least 90 seconds.
Check that the connectors are properly connected to the airbag sensor assembly and side airbag pressure sensor RH.
- Result:
Proceed to The connectors are properly connected The connectors are not properly connected
The connectors are properly connected
The connectors are not properly connected
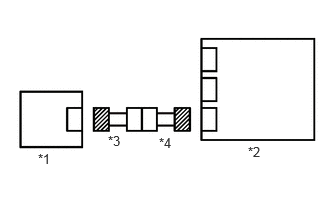
| *1 | Side Airbag Pressure Sensor RH |
| *2 | Airbag Sensor Assembly |
| *3 | Front Door Wire RH |
| *4 | Floor Wire |
Disconnect the connectors from the airbag sensor assembly and side airbag pressure sensor RH.
Check that the connectors (on the airbag sensor assembly side and side airbag pressure sensor RH side) are not damaged.
- Result:
Proceed to The connectors are not deformed or damaged The connectors are deformed or damaged
The connectors are not deformed or damaged
The connectors are deformed or damaged
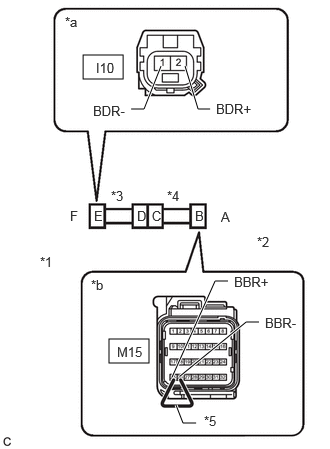
| *1 | Side Airbag Pressure Sensor RH |
| *2 | Airbag Sensor Assembly |
| *3 | Front Door Wire RH |
| *4 | Floor Wire |
| *5 | Service Wire |
| *a | Front view of wire harness connector
(to Side Airbag Pressure Sensor RH) |
| *b | Front view of wire harness connector
(to Airbag Sensor Assembly) |
Connect the cable to the negative (-) auxiliary battery terminal, and wait for at least 2 seconds.
Turn the ignition switch to ON.
Measure the voltage according to the value(s) in the table below.
- Standard Voltage:
Tester Connection Switch Condition Specified Condition I10-2 (BDR+) - Body ground Ignition switch ON Below 1 V I10-1 (BDR-) - Body ground Ignition switch ON Below 1 V
Turn the ignition switch off.
Disconnect the cable from the negative (-) auxiliary battery terminal, and wait for at least 90 seconds.
Using a service wire, connect terminals 25 (BBR+) and 26 (BBR-) of connector B.
- NOTICE:
-
Do not forcibly insert the service wire into the terminals of the connector when connecting a service wire.
Measure the resistance according to the value(s) in the table below.
- Standard Resistance:
Tester Connection Condition Specified Condition I10-2 (BDR+) - I10-1 (BDR-) Always Below 1 Ω
Disconnect the service wire from connector B.
Measure the resistance according to the value(s) in the table below.
- Standard Resistance:
Tester Connection Condition Specified Condition I10-2 (BDR+) - I10-1 (BDR-) Always 1 MΩ or higher I10-2 (BDR+) - Body ground Always 1 MΩ or higher I10-1 (BDR-) - Body ground Always 1 MΩ or higher
- Result:
Proceed to OK NG
OK
NG
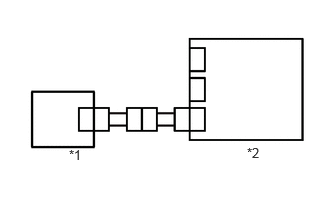
| *1 | Side Airbag Pressure Sensor LH |
| *2 | Airbag Sensor Assembly |
Connect the connector to the airbag sensor assembly.
Interchange the side airbag pressure sensor RH with LH and connect the connectors to them.
Connect the cable to the negative (-) auxiliary battery terminal, and wait for at least 2 seconds.
Turn the ignition switch to ON, and wait for at least 60 seconds.
Clear the DTCs stored in memory.
- Body Electrical > SRS Airbag > Clear DTCs
- 50002 188
Turn the ignition switch off.
Turn the ignition switch to ON, and wait for at least 60 seconds.
Check for DTCs.
- Body Electrical > SRS Airbag > Trouble Codes
- 50001 188
- Result:
Proceed to DTC B166D or B166E is output DTC B167B or B167C is output DTCs B166D, B166E, B167B and B167C are not output
- HINT:
-
Codes other than DTC B166D, B166E, B167B and B167C may be output at this time, but they are not related to this check.
Turn the ignition switch off.
Disconnect the cable from the negative (-) auxiliary battery terminal, and wait for at least 90 seconds.
Return the side airbag pressure sensor LH and RH to their original positions and connect the connectors to them.
DTC B166D or B166E is output
DTC B167B or B167C is output
Click hereVehicle Interior>SUPPLEMENTAL RESTRAINT SYSTEMS>SIDE AIRBAG SENSOR (for Front Door)>REMOVAL
DTCs B166D, B166E, B167B and B167C are not output
Click hereGeneral>INTRODUCTION>HOW TO TROUBLESHOOT ECU CONTROLLED SYSTEMS>HOW TO PROCEED WITH TROUBLESHOOTING
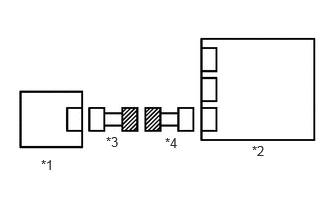
| *1 | Side Airbag Pressure Sensor RH |
| *2 | Airbag Sensor Assembly |
| *3 | Front Door Wire RH |
| *4 | Floor Wire |
Disconnect the floor wire connector from the front door wire RH.
Check that the connectors (on the floor wire side and front door wire RH side) are not damaged.
- Result:
Proceed to The connector is not deformed or damaged The connector is deformed or damaged
The connector is not deformed or damaged
The connector is deformed or damaged
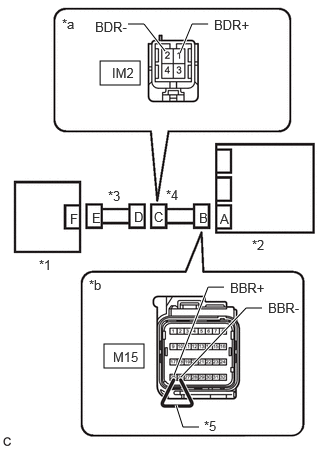
| *1 | Side Airbag Pressure Sensor RH |
| *2 | Airbag Sensor Assembly |
| *3 | Front Door Wire RH |
| *4 | Floor Wire |
| *5 | Service Wire |
| *a | Front view of wire harness connector
(to Front Door Wire RH) |
| *b | Front view of wire harness connector
(to Airbag Sensor Assembly) |
Connect the cable to the negative (-) auxiliary battery terminal, and wait for at least 2 seconds.
Turn the ignition switch to ON.
Measure the voltage according to the value(s) in the table below.
- Standard Voltage:
Tester Connection Switch Condition Specified Condition IM2-1 (BDR+) - Body ground Ignition switch ON Below 1 V IM2-2 (BDR-) - Body ground Ignition switch ON Below 1 V
Turn the ignition switch off.
Disconnect the cable from the negative (-) auxiliary battery terminal, and wait for at least 90 seconds.
Using a service wire, connect terminals 25 (BBR+) and 26 (BBR-) of connector B.
- NOTICE:
-
Do not forcibly insert the service wire into the terminals of the connector when connecting a service wire.
Measure the resistance according to the value(s) in the table below.
- Standard Resistance:
Tester Connection Condition Specified Condition IM2-1 (BDR+) - IM2-2 (BDR-) Always Below 1 Ω
Disconnect the service wire from connector B.
Measure the resistance according to the value(s) in the table below.
- Standard Resistance:
Tester Connection Condition Specified Condition IM2-1 (BDR+) - IM2-2 (BDR-) Always 1 MΩ or higher IM2-1 (BDR+) - Body ground Always 1 MΩ or higher IM2-2 (BDR-) - Body ground Always 1 MΩ or higher
- Result:
Proceed to OK NG
OK
NG