



- A/F sensor
- A/F sensor heater
- A/F sensor circuit
- HO2 sensor
- HO2 sensor heater
- HO2 sensor circuit
- Injector
- Fuel pressure
- Gas leak from exhaust system (Air-fuel ratio extremely rich or lean)
DTC P2237 Oxygen (A/F) Sensor Pumping Current Circuit / Open (Bank 1 Sensor 1) |
DTC P2238 Oxygen (A/F) Sensor Pumping Current Circuit Low (Bank 1 Sensor 1) |
DTC P2239 Oxygen (A/F) Sensor Pumping Current Circuit High (Bank 1 Sensor 1) |
DTC P2240 Oxygen (A/F) Sensor Pumping Current Circuit / Open (Bank 2 Sensor 1) |
DTC P2241 Oxygen (A/F) Sensor Pumping Current Circuit Low (Bank 2 Sensor 1) |
DTC P2242 Oxygen (A/F) Sensor Pumping Current Circuit High (Bank 2 Sensor 1) |
DTC P2252 Oxygen (A/F) Sensor Reference Ground Circuit Low (Bank 1 Sensor 1) |
DTC P2253 Oxygen (A/F) Sensor Reference Ground Circuit High (Bank 1 Sensor 1) |
DTC P2255 Oxygen (A/F) Sensor Reference Ground Circuit Low (Bank 2 Sensor 1) |
DTC P2256 Oxygen (A/F) Sensor Reference Ground Circuit High (Bank 2 Sensor 1) |
| DTC No. | DTC Detection Condition | Trouble Area |
| P2237 P2240 | Open in the circuit between terminals AF+ and AF- of the A/F sensor while engine is running (2 trip detection logic) |
|
| P2238 P2241 |
(2 trip detection logic): (a) AF+ voltage 0.5 V or less (b) (AF+) - (AF-) = 0.1 V or less
(2 trip detection logic) |
|
| P2239 P2242 | AF+ voltage more than 4.5 V for 5.0 seconds or more (2 trip detection logic) |
|
| P2252 P2255 | AF- voltage 0.5 V or less for 5.0 seconds or more (2 trip detection logic) |
|
| P2253 P2256 | AF- voltage more than 4.5 V for 5.0 seconds or more (2 trip detection logic) |
|
| Related DTCs | P2237: A/F sensor (for bank 1) open circuit between AF+ and AF- P2238: A/F sensor (for bank 1) short circuit between AF+ and AF- P2238: A/F sensor (for bank 1) short circuit between AF+ and GND P2238: A/F sensor (for bank 1) low impedance P2239: A/F sensor (for bank 1) short circuit between AF+ and +B P2240: A/F sensor (for bank 2) open circuit between AF+ and AF- P2241: A/F sensor (for bank 2) short circuit between AF+ and AF- P2241: A/F sensor (for bank 2) short circuit between AF+ and GND P2241: A/F sensor (for bank 1) low impedance P2242: A/F sensor (for bank 2) short circuit between AF+ and +B P2252: A/F sensor (for bank 1) short circuit between AF- and GND P2253: A/F sensor (for bank 1) short circuit between AF- and +B P2255: A/F sensor (for bank 2) short circuit between AF- and GND P2256: A/F sensor (for bank 2) short circuit between AF- and +B |
| Required Sensors/Components (Main) | A/F sensor |
| Required Sensors/Components (Related) | Engine Coolant Temperature (ECT) sensor, Crankshaft position sensor |
| Frequency of Operation | Continuous |
| Duration | 10 seconds: A/F sensor open circuit between AF+ and AF- and Low impedance 5 seconds: Other |
| MIL Operation | 2 driving cycles |
| Sequence of Operation | None |
| Monitor runs whenever following DTCs not present | P0016, P0018 (VVT System - Misalignment) P0031, P0032, P0051, P0052 (Air Fuel Ratio Sensor Heater) P0102, P0103 (Mass Air Flow Sensor) P0110, P0112, P0113 (Intake Air Temperature Sensor) P0115, P0117, P0118 (Engine Coolant Temperature Sensor) P0125 (Insufficient Coolant Temperature for Closed Loop Fuel Control) P0120, P0121, P0122, P0123, P0220, P0222, P0223, P2135 (Throttle Position Sensor) P0128 (Thermostat) P0171, P0172, P0174, P0175 (Fuel System) P0300 - P0308 (Misfire) P0335 (Crankshaft Position Sensor) P1340 (Camshaft Position Sensor) P0412, P0415, P0418, P0419, P1613, P1614 (Secondary Air Injection System Control) P2440, P2441, P2442, P2443, P2444, P2445, P2446, P2447 (Secondary Air Injection System) P0500 (Vehicle Speed Sensor) P0505 (IAC Valve) |
| Monitor runs whenever following DTCs not present | None |
| Battery voltage | 11 V or more |
| Engine | Running |
| Estimated sensor temperature | 450 to 550°C (842 to 1022°F) for P2237 and P2240 |
| Engine coolant temperature | 0°C (32°F) or higher |
| Estimated sensor temperature | 700 to 800°C (1292 to 1472°F) for P2238 and P2241 |
| Fuel cut | Not executed |
| Battery voltage | 11 V or higher |
| Ignition switch | ON |
| Timing after ignition switch is OFF to ON | 5 seconds or more |
| A/F sensor admittance | Below 0.002 1/Ω |
| When one of following conditions is met: | Condition 1, 2 or 3 |
| 1. Sensor admittance | Less than 0.022 1/Ω |
| 2. AF+ voltage | 0.5 V or less |
| 3. Difference of AF+ and AF- | 0.1 V or less |
| AF+ voltage | More than 4.5 V |
| AF- voltage | 0.5 V or less |
| AF- voltage | More than 4.5 V |
| Tester Display (Sensor) | Injection Volume | Status | Voltage |
| AFS Voltage B1 S1 (A/F) | +25% | Rich | Less than 3.1 |
| -12.5% | Lean | More than 3.4 | |
| O2S B1 S2 (HO2) | +25% | Rich | More than 0.55 |
| -12.5% | Lean | Less than 0.4 | |
| AFS Voltage B2 S1 (A/F) | +25% | Rich | Less than 3.1 |
| -12.5% | Lean | More than 3.4 | |
| O2S B2 S2 (HO2) | +25% | Rich | More than 0.55 |
| -12.5% | Lean | Less than 0.4 |
| Case | A/F Sensor (Sensor 1) Output Voltage | HO2 Sensor (Sensor 2) Output Voltage | Main Suspected Trouble Area |
| 1 | | | - |
| 2 | | |
|
| 3 | | |
|
| 4 | | |
|
| 1.CHECK HARNESS AND CONNECTOR (A/F SENSOR - ECM) |
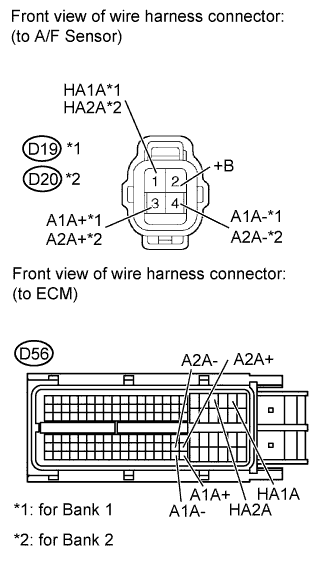 |
Disconnect the A/F sensor connector.
Turn the ignition switch to ON.
Measure the voltage according to the value(s) in the table below.
| Tester Connection | Switch Condition | Specified Condition |
| D19-2 (+B) - Body ground | Ignition switch ON | 11 to 14 V |
| D20-2 (+B) - Body ground | Ignition switch ON | 11 to 14 V |
Turn the ignition switch off.
Disconnect the ECM connector.
Measure the resistance according to the value(s) in the table below.
| Tester Connection | Condition | Specified Condition |
| D19-1 (HA1A) - D56-22 (HA1A) | Always | Below 1 Ω |
| D19-3 (A1A+) - D56-126 (A1A+) | Always | Below 1 Ω |
| D19-4 (A1A-) - D56-125 (A1A-) | Always | Below 1 Ω |
| D20-1 (HA2A) - D56-20 (HA2A) | Always | Below 1 Ω |
| D20-3 (A2A+) - D56-103 (A2A+) | Always | Below 1 Ω |
| D20-4 (A2A-) - D56-102 (A2A-) | Always | Below 1 Ω |
| D19-1 (HA1A) or D56-22 (HA1A) - Body ground | Always | 10 kΩ or higher |
| D19-3 (A1A+) or D56-126 (A1A+) - Body ground | Always | 10 kΩ or higher |
| D19-4 (A1A-) or D56-125 (A1A-) - Body ground | Always | 10 kΩ or higher |
| D20-1 (HA2A) or D56-20 (HA2A) - Body ground | Always | 10 kΩ or higher |
| D20-3 (A2A+) or D56-103 (A2A+) - Body ground | Always | 10 kΩ or higher |
| D20-4 (A2A-) or D56-102 (A2A-) - Body ground | Always | 10 kΩ or higher |
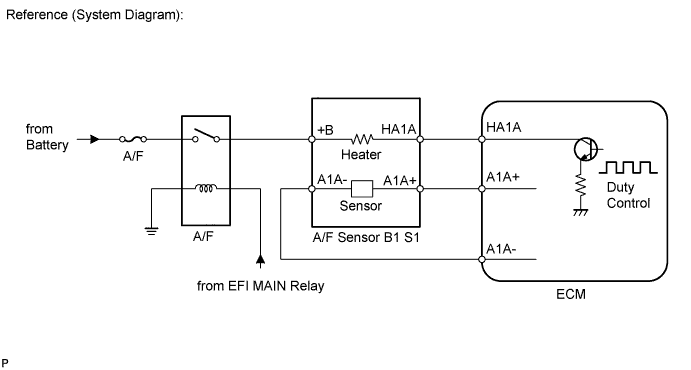
|
| ||||
| OK | |
 |
| 2.REPLACE AIR FUEL RATIO SENSOR |
Replace the air fuel ratio sensor (Click here).
| NEXT | |
|
| 3.PERFORM CONFIRMATION DRIVING PATTERN |
Drive the vehicle referring to the Confirmation Driving Pattern on the DTC P2195 .
| NEXT | |
|
| 4.CHECK WHETHER DTC OUTPUT RECURS |
Connect the Techstream to the DLC3.
Turn the ignition switch to ON.
Turn the Techstream ON.
Enter the following menus: Powertrain / Engine / Trouble Codes / Pending.
Read pending DTCs.
| Result | Proceed to |
| No DTC is output | A |
| P2237, P2238, P2239, P2240, P2241, P2242, P2252, P2253, P2255 or P2256 is output | B |
|
| ||||
| A | ||
 | ||
| ||
