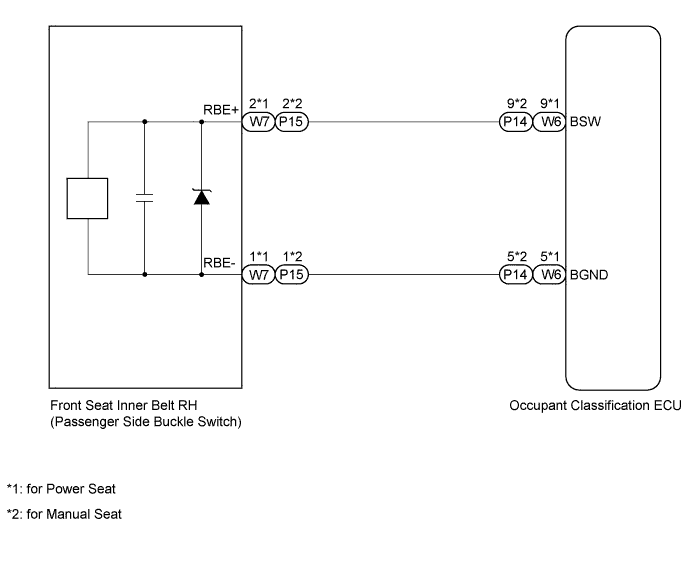
DTC B1771 Passenger Side Buckle Switch Circuit Malfunction |
| DTC Code | DTC Detection Condition | Trouble Area |
| B1771 | One of following conditions is met:
|
|
| 1.CHECK FOR DTC |
Turn the ignition switch to ON, and wait for at least 60 seconds.
Clear the DTCs stored in the memory (Click here).
Turn the ignition switch off.
Turn the ignition switch to ON, and wait for at least 60 seconds.
Check for DTCs (Click here).
|
| ||||
| OK | ||
 | ||
| ||
| 2.CHECK CONNECTION OF CONNECTOR |
Turn the ignition switch off.
Disconnect the cable from the negative (-) battery terminal, and wait for at least 90 seconds.
Check that the connectors are properly connected to the occupant classification ECU and the front seat inner belt RH.
|
| ||||
| OK | |
 |
| 3.CHECK CONNECTOR |
Disconnect the connectors from the occupant classification ECU and the front seat inner belt RH.
Check that the connectors (on the occupant classification ECU side and front seat inner belt RH side) are not damaged (Click here).
| Result | Proceed to |
| OK | A |
| NG (w/ Power seat) | B |
| NG (w/ Manual seat) | C |
|
| ||||
|
| ||||
| A | |
|
| 4.CHECK HARNESS AND CONNECTOR (OCCUPANT CLASSIFICATION ECU - FRONT SEAT INNER BELT RH) |
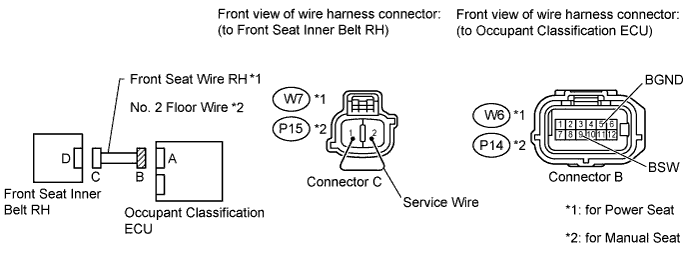
Connect the cable to the negative (-) battery terminal, and wait for at least 2 seconds.
Turn the ignition switch to ON, and wait for at least 60 seconds.
Measure the voltage according to the value(s) in the table below.
| Tester Connection | Switch Condition | Specified Condition |
| W6-9 (BSW) - Body ground | Ignition switch ON | Below 1 V |
| W6-5 (BGND) - Body ground |
| Tester Connection | Switch Condition | Specified Condition |
| P14-9 (BSW) - Body ground | Ignition switch ON | Below 1 V |
| P14-5 (BGND) - Body ground |
Turn the ignition switch off.
Disconnect the cable from the negative (-) battery terminal, and wait for at least 90 seconds.
Using a service wire, connect terminals 1 (RBE-) and 2 (RBE+) of connector C.
Measure the resistance according to the value(s) in the table below.
| Tester Connection | Condition | Specified Condition |
| W6-9 (BSW) - W6-5 (BGND) | Always | Below 1 Ω |
| Tester Connection | Condition | Specified Condition |
| P14-9 (BSW) - P14-5 (BGND) | Always | Below 1 Ω |
Disconnect the service wire from connector C.
Measure the resistance according to the value(s) in the table below.
| Tester Connection | Condition | Specified Condition |
| W6-9 (BSW) - Body ground | Always | 1 MΩ or higher |
| W6-5 (BGND) - Body ground | ||
| W6-9 (BSW) - W6-5 (BGND) |
| Tester Connection | Condition | Specified Condition |
| P14-9 (BSW) - Body ground | Always | 1 MΩ or higher |
| P14-5 (BGND) - Body ground | ||
| P14-9 (BSW) - P14-5 (BGND) |
| Result | Proceed to |
| OK | A |
| NG (w/ Power seat) | B |
| NG (w/ Manual seat) | C |
|
| ||||
|
| ||||
| A | |
|
| 5.CHECK FOR DTC |
Connect the connectors to the occupant classification ECU and the front seat inner belt RH.
Connect the cable to the negative (-) battery terminal, and wait for at least 2 seconds.
Turn the ignition switch to ON, and wait for at least 60 seconds.
Clear the DTCs stored in the memory (Click here).
Turn the ignition switch off.
Turn the ignition switch to ON, and wait for at least 60 seconds.
Check for DTCs (Click here).
|
| ||||
| OK | ||
| ||
| ||
| 6.REPLACE FRONT SEAT INNER BELT ASSEMBLY RH (PASSENGER SIDE BUCKLE SWITCH) |
Turn the ignition switch off.
Disconnect the cable from the negative (-) battery terminal, and wait for at least 90 seconds.
Replace the front seat inner belt RH (Click here).
Connect the cable to the negative (-) battery terminal, and wait for at least 2 seconds.
| NEXT | |
|
| 7.CHECK FOR DTC |
Turn the ignition switch to ON, and wait for at least 60 seconds.
Clear the DTCs stored in the memory (Click here).
Turn the ignition switch off.
Turn the ignition switch to ON, and wait for at least 60 seconds.
Check for DTCs (Click here).
|
| ||||
| OK | ||
| ||
| ||
| 8.REPLACE OCCUPANT CLASSIFICATION ECU |
Turn the ignition switch off.
Disconnect the cable from the negative (-) battery terminal, and wait for at least 90 seconds.
Replace the occupant classification ECU.
Connect the cable to the negative (-) battery terminal, and wait for at least 2 seconds.
Turn the ignition switch to ON, and wait for at least 60 seconds.
Clear the DTCs stored in the memory (Click here).
| NEXT | |
|
| 9.PERFORM ZERO POINT CALIBRATION |
Connect the Techstream to the DLC3.
Turn the ignition switch to ON, and wait for at least 60 seconds.
Using the Techstream, perform the zero point calibration (Click here).
| NEXT | |
|
| 10.PERFORM SENSITIVITY CHECK |
Using the Techstream, perform the sensitivity check (Click here).
| NEXT | ||
| ||
| ||

