 |
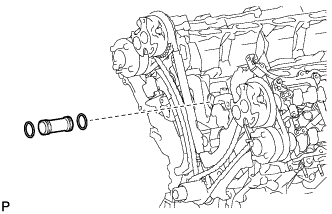
Apply soapy water to 2 new O-rings and install them to the inlet pipe.
OIL PUMP > INSTALLATION |
| 1. INSTALL WATER INLET PIPE |
|
Apply soapy water to 2 new O-rings and install them to the inlet pipe.
Install the inlet pipe to the No. 1 heat exchanger cover.
| 2. INSTALL TIMING CHAIN COVER SUB-ASSEMBLY |
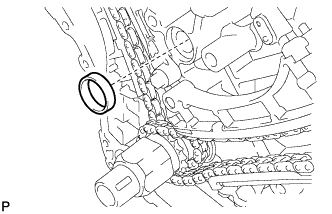 |
Apply a light coat of engine oil to a new oil pump gasket.
Install the oil pump gasket.
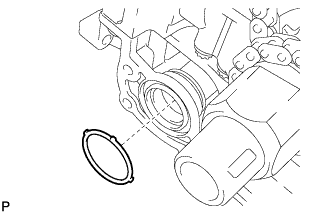 |
Apply a light coat of engine oil to a new O-ring.
Install the O-ring.
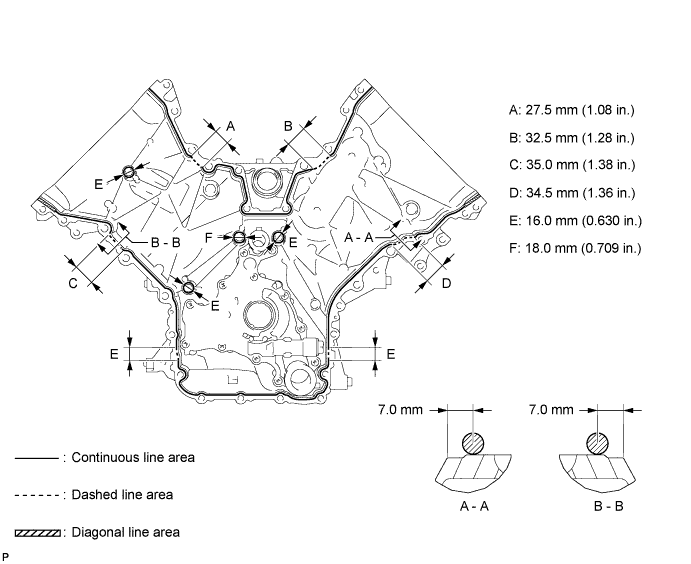
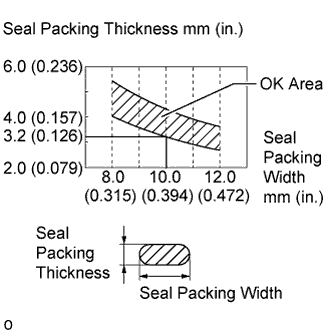
Apply seal packing in a continuous line to the timing chain cover as shown in the following illustration.
 |
| Area | Seal Packing Diameter | Application Position from Inside Edge of Cover |
| Continuous line area | 3.0 to 4.0 mm (0.118 to 0.157 in.) | 2.5 mm (0.0984 in.) |
| Dashed line area | 6.4 mm (0.252 in.) or more, or within OK area shown in illustration | 7.0 mm (0.276 in.) |
| Diagonal line area | 3.0 to 4.0 mm (0.118 to 0.157 in.) | 5.5 mm (0.217 in.) |
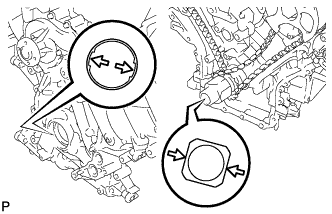 |
Align the oil pump drive rotor spline and crankshaft as shown in the illustration. Install the spline and chain cover to the crankshaft.
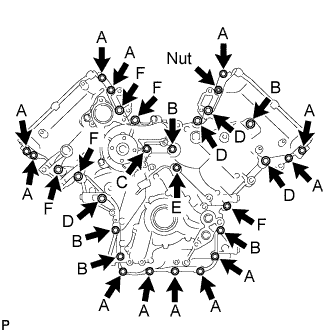 |
Temporarily install the timing chain cover with the 28 bolts and nut.
| Item | Length | Thread Diameter |
| Bolt A | 25 mm (0.984 in.) | 8 mm (0.315 in.) |
| Bolt B | 55 mm (2.17 in.) | 8 mm (0.315 in.) |
| Bolt C | 70 mm (2.76 in.) | 8 mm (0.315 in.) |
| Bolt D | 35 mm (1.38 in.) | 10 mm (0.394 in.) |
| Bolt E | 55 mm (2.17 in.) | 10 mm (0.394 in.) |
| Bolt F | 80 mm (3.15 in.) | 10 mm (0.394 in.) |
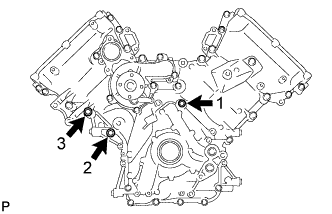 |
Tighten the 3 bolts in several steps in the sequence shown in the illustration.
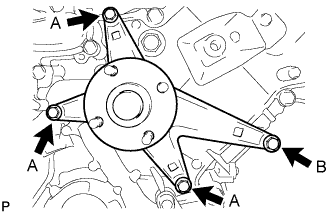 |
Temporarily install the fluid coupling bracket with the 4 bolts.
| Item | Length | Thread Diameter |
| Bolt A | 70 mm (2.76 in.) | 8 mm (0.315 in.) |
| Bolt B | 80 mm (3.15 in.) | 10 mm (0.394 in.) |
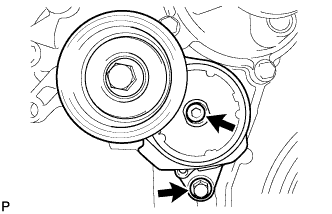 |
Temporarily install the belt tensioner with the standard bolt and 6 mm hexagon wrench bolt.
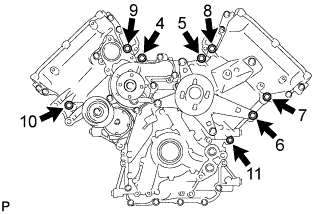 |
Tighten the 8 bolts labeled 4 to 11 in several steps in the sequence shown in the illustration.
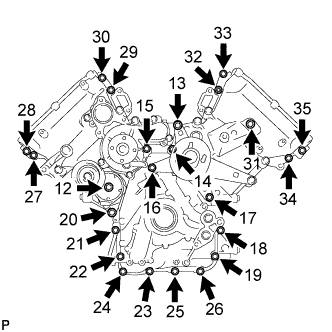 |
Tighten the 23 bolts and nut labeled 12 to 35 in several steps in the sequence shown in the illustration.
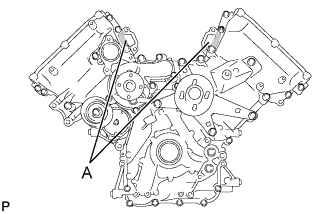 |
| 3. INSTALL CYLINDER HEAD COVER SUB-ASSEMBLY LH |
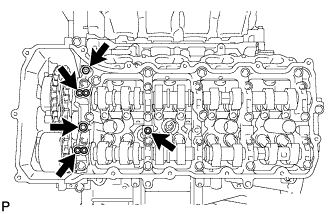 |
Install 5 new O-rings to the camshaft bearing caps (No. 2, No. 3).
Install the gasket to the cylinder head cover.
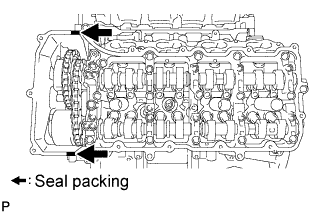 |
Apply seal packing as shown in the illustration.
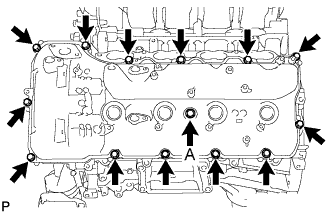 |
Install the cylinder head cover washer with a new seal and the 14 bolts.
| 4. INSTALL CYLINDER HEAD COVER SUB-ASSEMBLY |
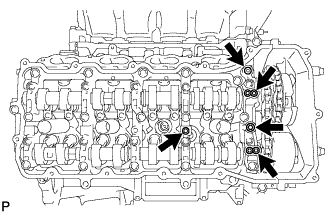 |
Install 5 new O-rings to the camshaft bearing caps. (No. 1, No. 3).
Install the gasket to the cylinder head cover.
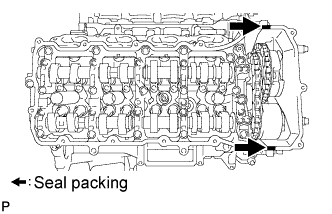 |
Apply seal packing as shown in the illustration.
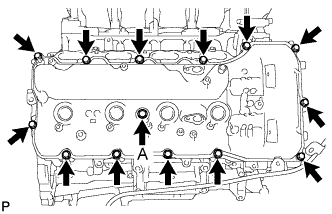 |
Install the cylinder head cover washer with a new seal and the 14 bolts.
| 5. INSTALL RADIO SETTING CONDENSER (for Bank 2) |
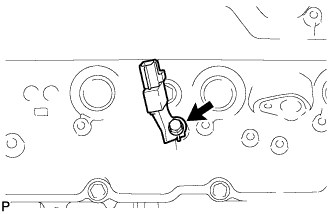 |
Install the noise filter to the cylinder head cover with the bolt.
| 6. INSTALL IGNITION COIL ASSEMBLY |
Install the 8 ignition coils with the 8 bolts.
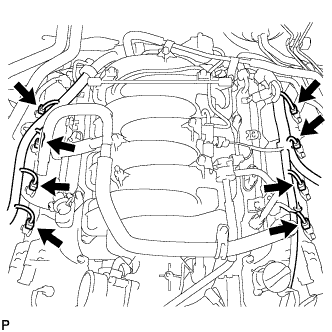 |
Connect the 8 ignition coil connectors.
| 7. INSTALL CRANKSHAFT TIMING GEAR KEY |
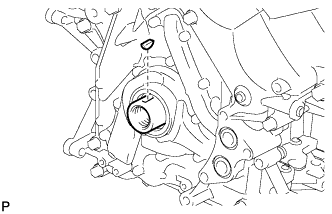 |
Install the crankshaft timing gear key to the crankshaft.
| 8. INSTALL CRANKSHAFT PULLEY |
Align the pulley set key with the key groove of the pulley, and slide on the pulley.
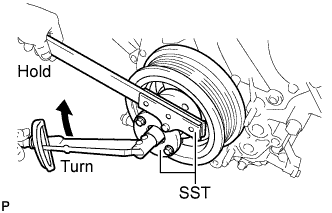 |
Using SST, install the pulley set bolt.
| 9. CONNECT WIRE HARNESS CLAMP BRACKET |
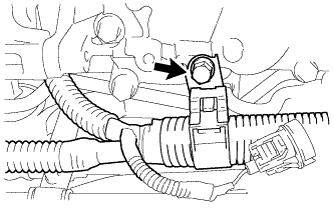 |
Connect the bracket to the timing chain cover with the bolt.
| 10. INSTALL NO. 1 IDLER PULLEY SUB-ASSEMBLY |
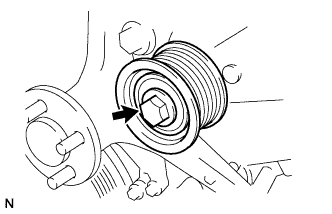 |
Install the idler pulley with the bolt.
| 11. INSTALL WATER PUMP PULLEY |
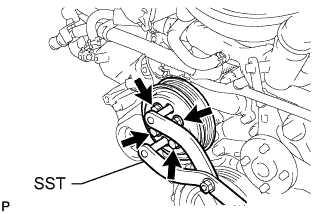 |
Temporarily install the pulley with the 4 bolts.
Using SST, hold the pulley and tighten the 4 bolts.
| 12. INSTALL WATER INLET HOUSING |
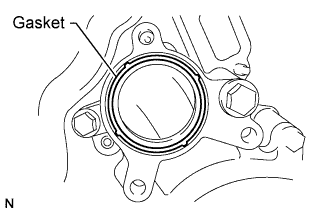 |
Install a new gasket to the water pump.
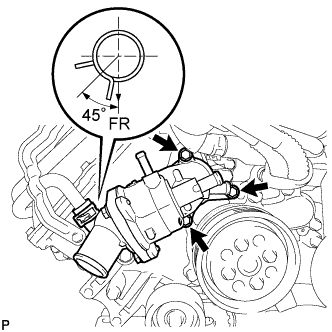 |
Connect the No. 3 water by-pass hose to the water inlet housing.
Install the water inlet housing with the 3 bolts.
| 13. INSTALL AIR PIPE SUB-ASSEMBLY |
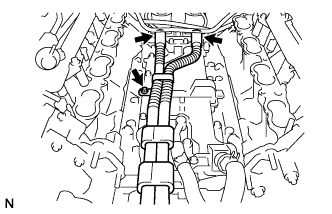 |
Connect the 2 hoses.
Install the air tube with the bolt.
| 14. INSTALL NO. 1 ENGINE COVER |
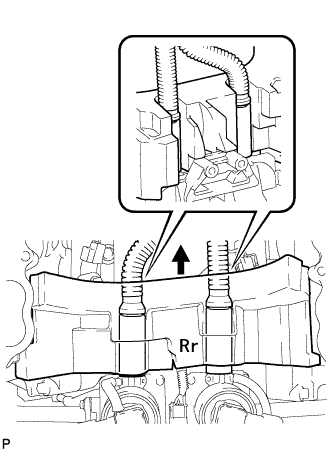 |
Install the No. 1 engine cover.
| 15. INSTALL NO. 2 CYLINDER HEAD COVER |
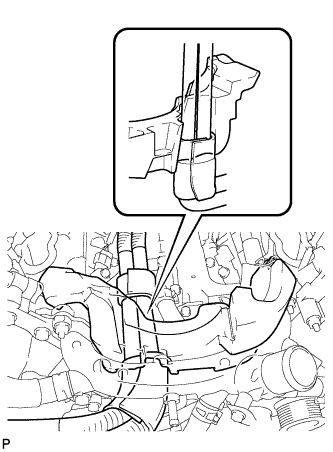 |
Install the No. 2 cylinder head cover.
| 16. INSTALL FRONT WATER BY-PASS JOINT |
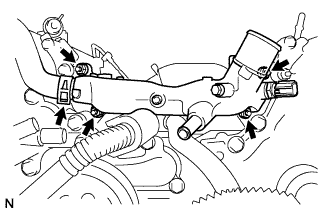 |
Install 2 new gaskets and the water by-pass joint with the 4 nuts.
Connect the No. 2 water by-pass hose to the water by-pass joint.
| 17. INSTALL NO. 1 WATER BY-PASS PIPE |
Install the No. 1 water by-pass pipe with the 2 bolts.
| 18. INSTALL WATER BY-PASS PIPE SUB-ASSEMBLY |
Connect the 2 hoses.
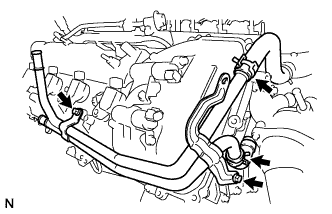 |
Install the water by-pass pipe with the 2 bolts.
| 19. INSTALL AIR PIPE SUB-ASSEMBLY |
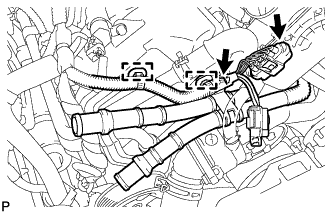 |
Install the air pipe with the bolt.
Connect the connector and install the wire harness with the 2 clamps.
| 20. INSTALL NO. 1 WATER BY-PASS HOSE |
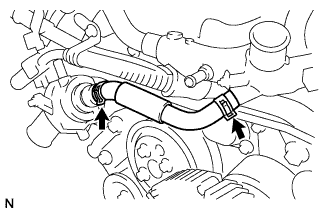 |
Install the No. 1 water by-pass hose by connecting the hose to the water inlet housing and front water by-pass joint.
| 21. INSTALL GENERATOR ASSEMBLY |
Remove the generator assembly (Click here).
| 22. INSTALL ENGINE OIL LEVEL DIPSTICK GUIDE |
Apply a light coat of engine oil to a new O-ring.
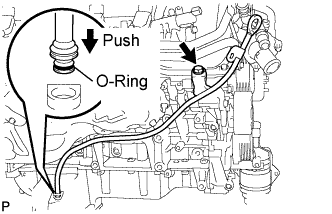 |
Install the O-ring to the guide.
Install the dipstick guide with the bolt.
Connect the wire harness clamp.
Install the dipstick.
| 23. INSTALL ENGINE OIL COOLER (w/ Trailer Towing System) |
Install the engine oil cooler (Click here).
| 24. INSTALL OIL FILTER BRACKET (w/o Trailer Towing System) |
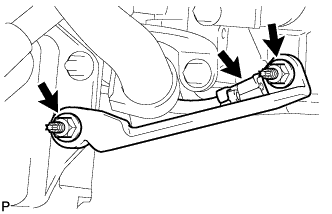 |
Connect the ground wire to the cylinder block.
Install the oil cooler bracket with the 2 nuts.
| 25. INSTALL OIL PRESSURE SENDER GAUGE ASSEMBLY (w/o Trailer Towing System) |
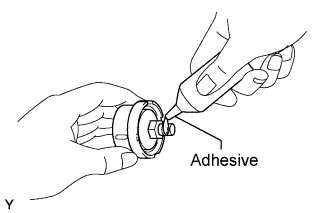 |
Apply adhesive to 2 or 3 threads of the oil pressure sender gauge.
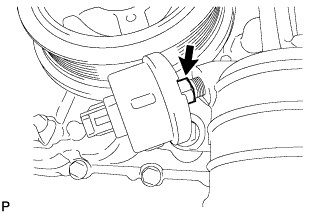 |
Install the oil pressure sender gauge.
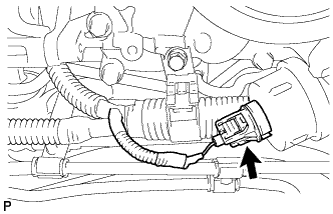 |
Connect the sender gauge connector.
| 26. INSTALL OIL FILTER ELEMENT |
Install the oil filter element (Click here).
| 27. INSTALL NO. 2 FUEL TUBE SUB-ASSEMBLY |
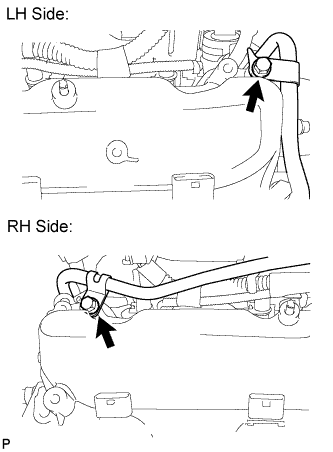 |
Connect the fuel tube with the 2 bolts.
| 28. INSTALL COOLER COMPRESSOR ASSEMBLY |
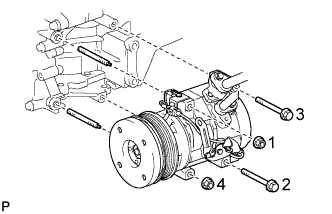 |
Install the cooler compressor with the 2 stud bolts.
Install the 2 bolts and 2 nuts.
Tighten the bolts and nuts in the order shown in the illustration to install the cooler compressor.
| 29. CONNECT NO. 2 AIR INJECTION SYSTEM HOSE |
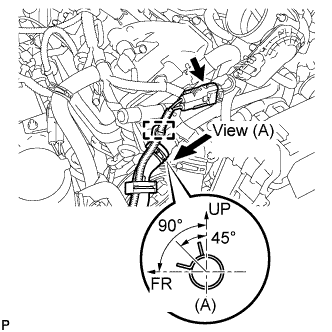 |
Connect the No. 2 air injection hose.
Attach the wire harness clamp.
Connect the air pump connector.
| 30. CONNECT NO. 3 AIR INJECTION SYSTEM HOSE |
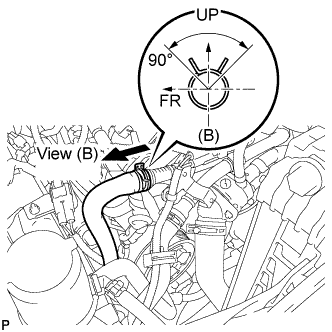 |
Connect the No. 3 air injection hose.
| 31. INSTALL INTAKE MANIFOLD |
Install the intake manifold (Click here).
| 32. INSTALL NO. 2 ENGINE WIRE |
| 33. INSTALL ENGINE WIRE |
| 34. CONNECT OUTLET HEATER WATER HOSE C |
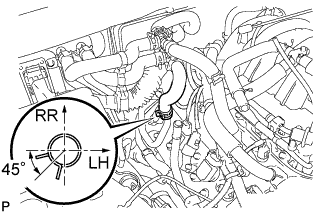 |
Connect the outlet heater water hose to the No. 1 water by-pass pipe.
| 35. CONNECT INLET HEATER WATER HOSE C |
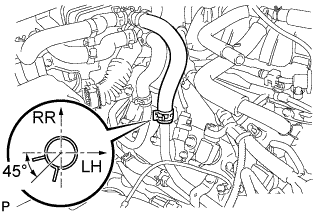 |
Connect the inlet heater water hose to the water by-pass pipe.
| 36. INSTALL AIR CLEANER HOSE ASSEMBLY |
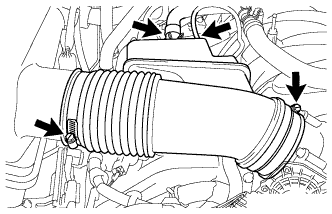 |
Install the air cleaner hose with the 2 clamps.
Connect the vacuum hose.
Connect the ventilation hose.
| 37. INSTALL AIR CLEANER ASSEMBLY |
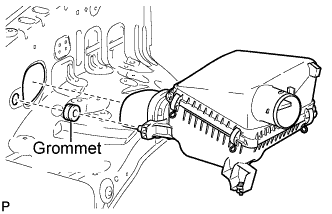 |
Attach grommet to air cleaner before mounting the air cleaner.
Insert the air cleaner into the fender apron hole, and fully insert pin to grommet.
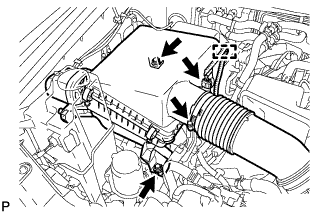 |
Install the air cleaner with the 2 bolts.
Connect the connector and install the clamp and wire harness.
Connect the air cleaner hose and tighten the clamp.
| 38. INSTALL RADIATOR ASSEMBLY |
Install the radiator (Click here).
| 39. ADD ENGINE OIL |
Add fresh oil.
| Oil Grade | Oil Viscosity (SAE) |
| ILSAC multigrade engine oil | 0W-20 5W-20 (0W-20 is best choice for fuel economy and good starting in cold weather.) |
| Item | Specified Condition |
| Drain and refill with oil filter change | 7.0 liters (7.4 US qts., 6.2 Imp. qts.) |
| Drain and refill without oil filter change | 6.6 liters (7.0 US qts., 5.8 Imp. qts.) |
| Dry fill | 8.4 liters (8.9 US qts., 7.4 Imp. qts.) |
Install the oil filler cap.
| 40. INSPECT FOR OIL LEAK |
Start the engine. Make sure that there are no oil leaks from the area that was worked on.
| 41. CHECK ENGINE OIL LEVEL |
Warm up the engine, and then stop the engine and wait for 5 minutes.
Check that the engine oil level is between the low level and full level marks on the dipstick.
If low, check for leakage and add oil up to the full level mark.