Home › Engine / Hybrid System ยท 2UZ-FE › ENGINE MECHANICAL › CYLINDER HEAD GASKET

CYLINDER HEAD GASKET > INSTALLATION

for Preparation Click here


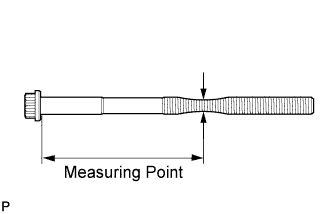
1. INSPECT CYLINDER HEAD SET BOLT


    A142747E02
  1. Using a vernier caliper, measure the thread outside diameter of the bolt.

    Measuring Point:
    Item
    Specified Condition
    Intake side
    82 mm (3.23 in.)
    Exhaust side
    86 mm (3.39 in.)

    Standard outside diameter:
    9.810 to 9.960 mm (0.386 to 0.392 in.)

    Minimum outside diameter:
    9.700 mm (0.382 in.)

    If the outside diameter is less than the minimum, replace the set bolt.

    HINT:
    If a visual check reveals no excessively thin areas, check the center of the bolt (see illustration) and find the area that has the lowest diameter.
2. INSPECT CYLINDER HEAD LH (for Bank 1)


    A107611E04
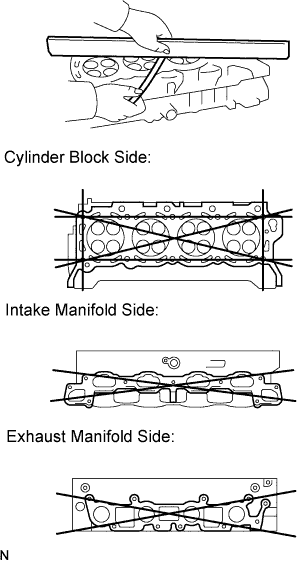
  1. Using a precision straightedge and feeler gauge, measure the surfaces contacting the cylinder block and manifolds for warpage.

    Maximum Warpage:
    Item
    Specified Condition
    Cylinder block side
    0.10 mm (0.00394 in.)
    Intake manifold side
    0.10 mm (0.00394 in.)
    Exhaust manifold side
    0.10 mm (0.00394 in.)

    1. If the warpage is greater than the maximum, replace the cylinder head.


    A053866E01
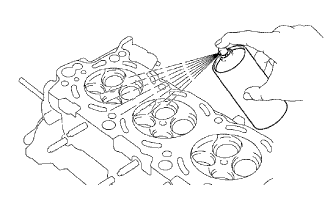
  1. Using a dye penetrant, check the combustion chamber, intake ports, exhaust ports and cylinder block surface for cracks.
    If the cylinder head is cracked, replace it.


3. INSTALL NO. 2 CYLINDER HEAD GASKET


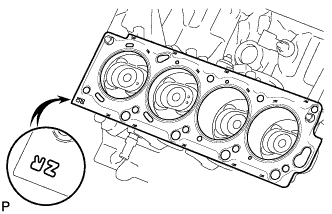
    A160768
  1. Clean the cylinder block and cylinder head with solvent.

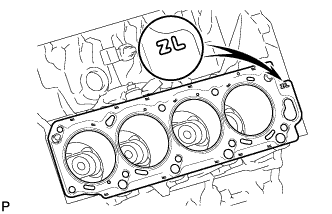
  1. Place a new cylinder head gasket in position on the cylinder block.

    HINT:
    A mark is placed on the rear side of the cylinder head gasket to distinguish the LH and RH sides, a "2R" mark for the RH side and a "2L" mark for the LH side.

    NOTICE:
    Be careful of the installation direction.


4. INSTALL CYLINDER HEAD LH


    G039657E01
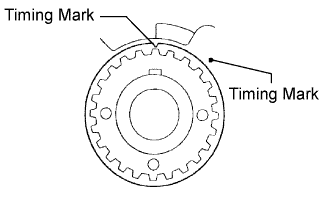
  1. Check that the timing mark of the crankshaft timing pulley is in the position shown in the illustration, and that the piston is below the TDC of compression.

  1. Install the cylinder head with the exhaust manifold to the cylinder block.

    NOTICE:
    Ensure that no oil is on the mounting surface of the cylinder head.

  1. Apply a light coat of engine oil to the threads and under the heads of the cylinder head bolts.

  1. Set the plate washer to the cylinder head bolt.


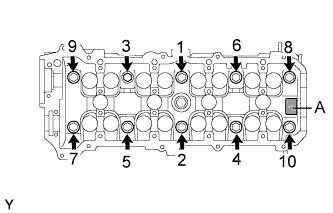
    A115101E04
  1. Install and uniformly tighten the 10 cylinder head bolts and plate washers in the sequence shown in the illustration.

    Torque:
    40 N*m{ 408 kgf*cm , 30 ft.*lbf }

    If any one of the cylinder head bolts does not meet the torque specification, replace the cylinder head bolt.

    HINT:
    The cylinder head bolts are tightened in 3 progressive steps.

    NOTICE:
    Do not drop the plate washer for the cylinder head bolt into portion A of the cylinder head. If dropped into portion A, the plate washer will pass through the cylinder head and cylinder block into the oil pan.


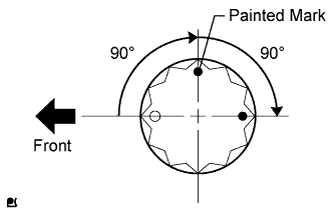
    A115112E02
  1. Mark the cylinder head bolt head with paint as shown in the illustration.

  1. Further tighten the cylinder head bolts 90° and then an additional 90° as shown in the illustration.

  1. Check that the painted marks are now facing rearward.


5. INSTALL CYLINDER HEAD GASKET (for Bank 2)


    A160769
  1. Clean the cylinder block and cylinder head with solvent.

  1. Place a new cylinder head gasket in position on the cylinder block.

    HINT:
    A mark is placed on the rear side of the cylinder head gasket to distinguish the LH and RH sides, a "2R" mark for the RH side and a "2L" mark for the LH side.

    NOTICE:
    Be careful of the installation direction.


6. INSTALL CYLINDER HEAD SUB-ASSEMBLY (for Bank 2)


    G039657E01
  1. Check that the timing mark of the crankshaft timing pulley is in the position shown in the illustration, and that the piston is below the TDC of compression.

  1. Install the cylinder head with the exhaust manifold to the cylinder block.

    NOTICE:
    Ensure that no oil is on the mounting surface of the cylinder head.

  1. Apply a light coat of engine oil to the threads and under the heads of the cylinder head bolts.

  1. Set the plate washer to the cylinder head bolt.


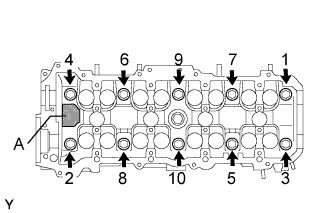
    A115100E03
  1. Install and uniformly tighten the 10 cylinder head bolts and plate washers in the sequence shown in the illustration.

    Torque:
    40 N*m{ 408 kgf*cm , 30 ft.*lbf }

    If any one of the cylinder head bolts does not meet the torque specification, replace the cylinder head bolt.

    HINT:
    The cylinder head bolts are tightened in 3 progressive steps.

    NOTICE:
    Do not drop the plate washer for the cylinder head bolt into portion A of the cylinder head. If dropped into portion A, the plate washer will pass through the cylinder head and cylinder block into the oil pan.


    A115112E02
  1. Mark the cylinder head bolt head with paint as shown in the illustration.

  1. Further tighten the cylinder head bolts 90° and then an additional 90° as shown in the illustration.

  1. Check that the painted marks are now facing rearward.


7. INSTALL VALVE LIFTER
  1. Apply a light coat of engine oil to the valve lifters and shims.

  1. Install the valve lifters and shims to the cylinder head.

  1. Check that the valve lifter rotates smoothly by hand.


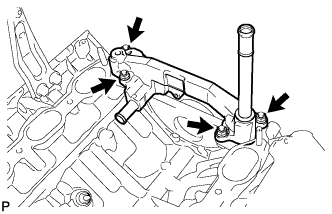
8. INSTALL REAR WATER BY-PASS JOINT


A160761
  1. Install 2 new gaskets and the water by-pass joint with the 4 nuts and connect the air hose.

    Torque:
    18 N*m{ 184 kgf*cm , 13 ft.*lbf }


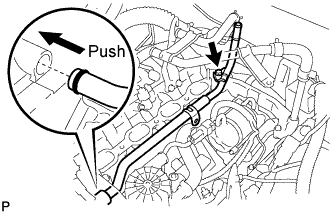
9. INSTALL WATER BY-PASS PIPE SUB-ASSEMBLY


A160760E02
  1. Apply soapy water to a new O-ring and install it to the water by-pass pipe.

  1. Push in the water by-pass pipe end into the pipe hole of the water pump.

  1. Install the water by-pass pipe with the bolt.

    Torque:
    18 N*m{ 184 kgf*cm , 13 ft.*lbf }


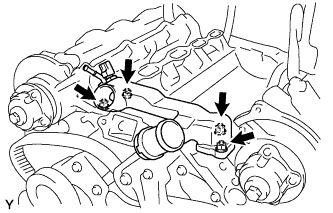
10. INSTALL FRONT WATER BY-PASS JOINT


A115096
  1. Install 2 new gaskets and the water by-pass joint with the 4 nuts.

    Torque:
    18 N*m{ 184 kgf*cm , 13 ft.*lbf }


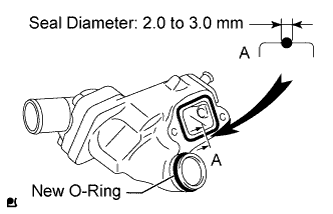
11. INSTALL INLET WATER HOUSING


    A122971E03
  1. Apply seal packing in a continuous line to the places shown in the illustration.

    Seal packing:
    Toyota Genuine Seal Packing Black, Three Bond 1215B or equivalent

    Standard seal diameter:
    2.0 to 3.0 mm (0.0787 to 0.118 in.)

    NOTICE:
    1. Remove any oil from the contact surface.
    2. Install the water pump within 3 minutes after applying seal packing.

  1. Apply soapy water to a new O-ring and install it to the water inlet housing.


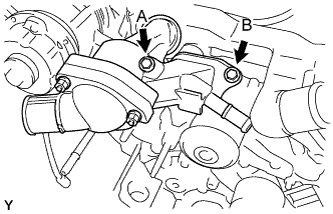
    A122972E01
  1. Temporarily install the water inlet housing with the 2 bolts. Uniformly tighten the bolts in several steps.

    Torque:
    18 N*m{ 184 kgf*cm , 13 ft.*lbf }

    Bolt Length:
    Item
    Length
    Bolt A
    77 mm (3.03 in.)
    Bolt B
    22 mm (0.866 in.)

  1. Connect the water by-pass hose to the water inlet housing.


12. INSTALL INTAKE MANIFOLD


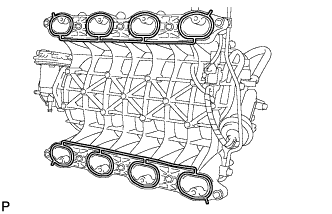
    A156181
  1. Place 2 new gaskets on the intake manifold assembly.

  1. Place the intake manifold assembly on the cylinder heads.


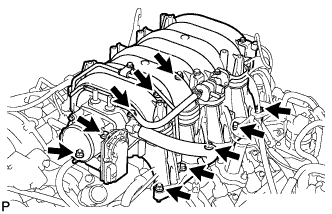
    A156172
  1. Install and uniformly tighten the 6 bolts and 4 nuts in several steps.

    Torque:
    18 N*m{ 184 kgf*cm , 13 ft.*lbf }


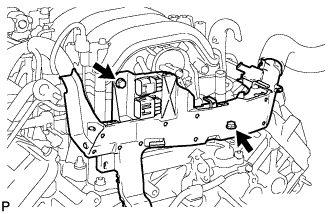
    A156173
  1. Install the engine wire protector with the 2 bolts.

    Torque:
    8.2 N*m{ 83 kgf*cm , 72 in.*lbf }

  1. Connect the 8 injector connectors.


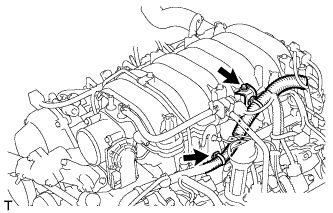
    A163553
  1. Connect the 2 wire clamps.


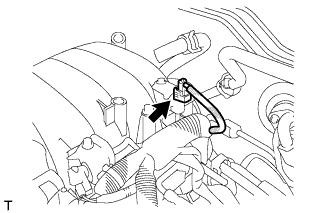
    A166384
  1. Connect the vacuum switching valve assembly (for ACIS) connector.


    A166385
  1. Install the wire harness bracket to the intake manifold assembly with the bolt.

    Torque:
    8.2 N*m{ 83 kgf*cm , 72 in.*lbf }


    1. Connect the wire harness clamp to the engine hanger.


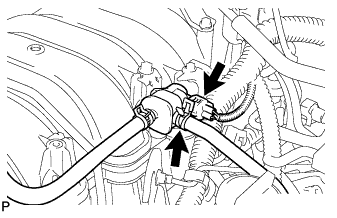
    A156171
  1. Connect the purge line hose to the purge VSV.

  1. Connect the purge VSV connector.


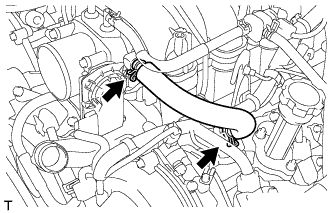
    A166383
  1. Install the No. 1 ventilation hose with the 2 clamps.


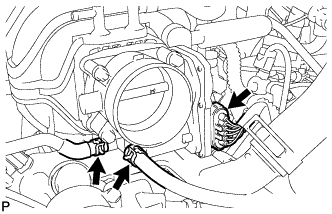
    A156170
  1. Connect the 2 water by-pass hoses to the throttle body assembly.

  1. Connect the throttle body assembly connector.


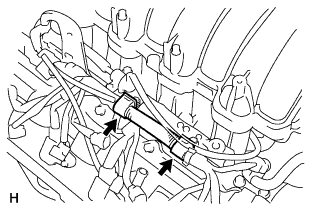
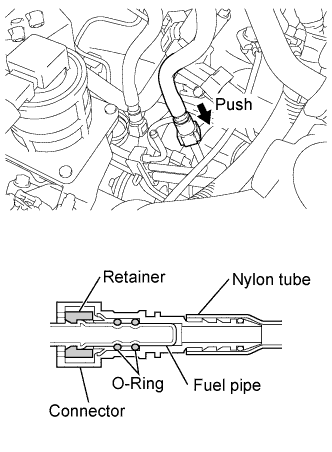
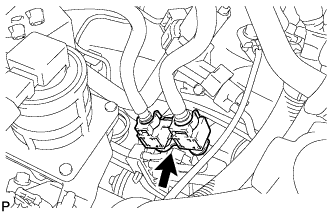
13. CONNECT NO. 2 FUEL PIPE SUB-ASSEMBLY


A160926
  1. Connect the No. 2 fuel pipe sub-assembly (Click here).

    HINT:
    Push the parts together firmly until a "click" sound is heard.

    NOTICE:
    1. Before installing the tube connectors to the pipes, check if there is any damage or foreign matter in the connectors.
    2. After the connection, check if the connectors and pipes are securely connected by trying to pull them apart.


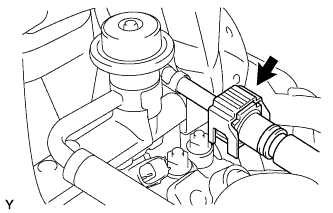
14. CONNECT NO. 1 FUEL PIPE SUB-ASSEMBLY


A187100E02
  1. Connect the No. 1 fuel pipe sub-assembly.

    HINT:
    Push the parts together firmly until a "click" sound is heard.

    NOTICE:
    1. Before installing the tube connectors to the pipes, check if there is any damage or foreign matter in the connectors.
    2. After the connection, check if the connectors and pipes are securely connected by trying to pull them apart.


15. INSTALL EFI FUEL PIPE CLAMP


A185283
  1. Install the fuel pipe clamp.


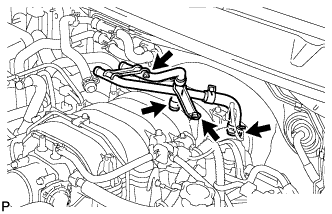
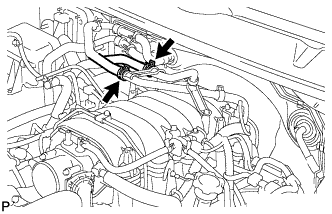
16. INSTALL NO. 3 WATER BY-PASS PIPE


    A156177
  1. Connect the 2 water hoses to the No. 2 water by-pass pipe.

  1. Install the No. 2 water by-pass pipe with the 2 bolts.

    Torque:
    10 N*m{ 102 kgf*cm , 7 ft.*lbf }


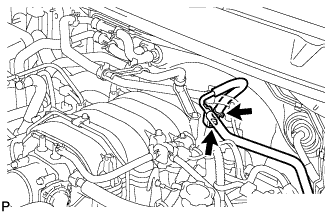
    A156176
  1. Connect the 2 water hoses to the No. 2 water by-pass pipe.


17. REMOVE VACUUM HOSE ASSEMBLY


    A156175
  1. Connect the vacuum hose assembly to the intake manifold assembly.

  1. Install the vacuum hose assembly with the bolt.

    Torque:
    8.0 N*m{ 82 kgf*cm , 71 in.*lbf }


18. INSTALL CAMSHAFT
  1. Install the camshaft (Click here).


19. INSTALL FRONT NO. 2 EXHAUST PIPE ASSEMBLY


    A185632
  1. Install a new gasket and the front No. 2 exhaust pipe assembly to the exhaust manifold LH with 3 new nuts.

    Torque:
    54 N*m{ 551 kgf*cm , 40 ft.*lbf }

  1. Install a new gasket and the front No. 2 exhaust pipe assembly to the front No. 3 exhaust pipe sub-assembly with the 2 bolts and 2 nuts.

    Torque:
    48 N*m{ 489 kgf*cm , 35 ft.*lbf }

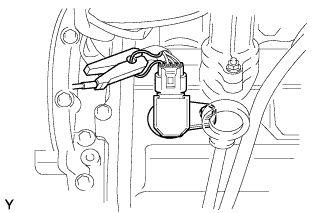
  1. Connect the air fuel ratio sensor connector.

  1. Connect the heated oxygen sensor connector.


20. INSTALL FRONT EXHAUST PIPE ASSEMBLY


    A185633
  1. Install a new gasket and the front exhaust pipe assembly to the exhaust manifold RH with 3 new nuts.

    Torque:
    54 N*m{ 551 kgf*cm , 40 ft.*lbf }

  1. Install a new gasket and the front exhaust pipe assembly to the center exhaust pipe assembly with the 2 bolts.

    Torque:
    48 N*m{ 489 kgf*cm , 35 ft.*lbf }

  1. Connect the air fuel ratio sensor connector.

  1. Connect the heated oxygen sensor connector and 2 clamps.


21. INSTALL OUTER COWL TOP PANEL SUB-ASSEMBLY
  1. Disconnect the washer hose.

  1. Separate the washer hose grommet from the front cowl top outer panel sub-assembly.

  1. Separate the wire harness clamp from the front cowl top outer panel sub-assembly.


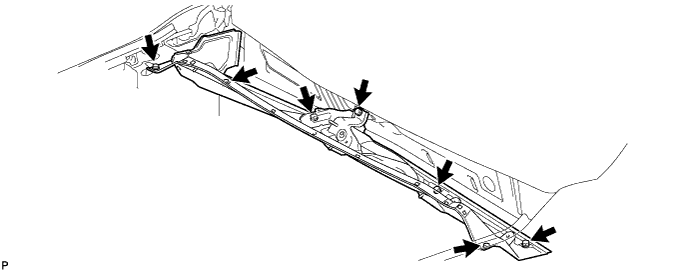
  1. Remove the 7 bolts and front cowl top outer panel sub-assembly.


    A151796


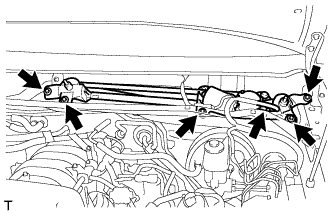
22. INSTALL FRONT WIPER MOTOR AND LINK ASSEMBLY


    E161316
  1. Install the wiper motor and link assembly with the 4 bolts and nut.

    Torque:
    7.0 N*m{ 71 kgf*cm , 62 in.*lbf }

  1. Connect the connector.


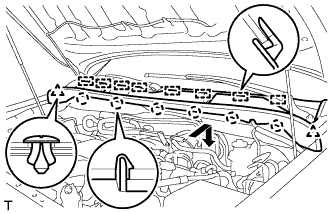
23. INSTALL COWL TOP VENTILATOR LOUVER SUB-ASSEMBLY


    E161314
  1. Engage the 6 claws and 8 guides and install the cowl top ventilator louver sub-assembly.

  1. Install the 2 clips.


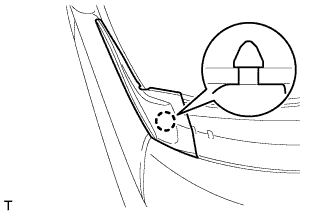
24. INSTALL FRONT FENDER TO COWL SIDE SEAL RH


    E161313
  1. Engage the claw and install the front fender to cowl side seal.


25. INSTALL FRONT FENDER TO COWL SIDE SEAL LH

HINT:
Use the same procedure for both sides.


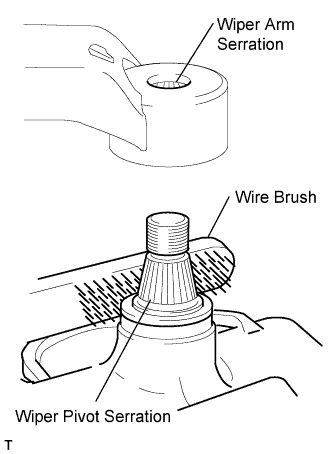
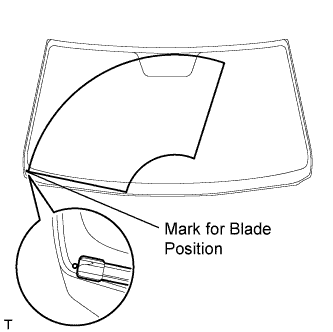
26. INSTALL FRONT WIPER ARM AND BLADE ASSEMBLY RH


    E146308E02
  1. Clean any metal powder off the serrated part of the wiper arm with a round wire brush or the equivalent (when reinstalling).

  1. Clean the wiper pivot serrations with a wire brush.

  1. Operate the wiper, and then stop the wiper motor in the automatic stop position.


    E161321E01
  1. Align the blade tip with the mark on the glass, as shown in the illustration.

    HINT:
    Hold down the wiper arm hinge with your hand while tightening the nut.

  1. Tighten the nut on the front wiper arm and blade.

    Torque:
    20 N*m{ 204 kgf*cm , 15 ft.*lbf }

  1. Operate the front wipers while spraying washer fluid on the windshield glass. Make sure that the front wipers function properly and there is no interference with the vehicle body.


27. INSTALL FRONT WIPER ARM AND BLADE ASSEMBLY LH


    E146308E02
  1. Clean any metal powder off the serrated part of the wiper arm with a round wire brush or the equivalent (when reinstalling).

  1. Clean the wiper pivot serrations with a wire brush.

  1. Operate the wiper, and then stop the wiper motor in the automatic stop position.


    E161322E01
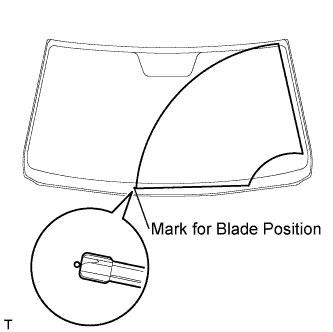
  1. Align the blade tip with the mark on the glass, as shown in the illustration.

    HINT:
    Hold down the wiper arm hinge with your hand while tightening the nut.

  1. Tighten the nut on the front wiper arm and blade.

    Torque:
    20 N*m{ 204 kgf*cm , 15 ft.*lbf }

  1. Operate the front wipers while spraying washer fluid on the windshield glass. Make sure that the front wipers function properly and there is no interference with the vehicle body.


28. CONNECT CABLE TO NEGATIVE BATTERY TERMINAL

Torque:
5.4 N*m{ 55 kgf*cm , 48 in.*lbf }

NOTICE:
When disconnecting the cable, some system need to be initialized after the cable is reconnected (Click here).


29. INSPECT FOR OIL LEAK
  1. Start the engine. Make sure that there are no oil leaks from the area that was worked on.


30. INSPECT FOR COOLANT LEAK

CAUTION:
Do not remove the radiator cap while the engine and radiator are still hot. Pressurized, hot engine coolant and steam may be released and cause serious burns.


    A162054
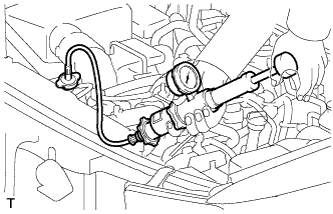
  1. Fill the radiator with coolant and attach a radiator cap tester.
  1. Warm up the engine.

  1. Using the radiator cap tester, increase the pressure inside the radiator to 118 kPa (1.2 kgf/cm2, 17 psi), and check that the pressure does not drop. If the pressure drops, check the hoses, radiator and water pump for leaks. If no external leaks are found, check the heater core, cylinder block and head.


31. INSPECT FOR FUEL LEAK
  1. Connect the Techstream to the DLC3.

  1. Turn the ignition switch to ON and turn the Techstream ON.

    NOTICE:
    Do not start the engine.

  1. Techstream:
    Enter the following menus: Powertrain / Engine and ECT / Active Test / Control the Fuel Pump / Speed.

  1. Check that there are no fuel leaks after doing maintenance anywhere on the fuel system.


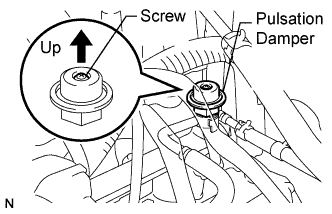
    A133618E01
  1. Check that the pulsation damper screw rises up when the fuel pump operates.
    If the operation is not as specified, check the following parts:

    1. Fusible link
    2. Fuses
    3. Circuit opening relay
    4. Fuel pump
    5. ECM
    6. Wiring connections
    If no malfunctions are found in the aforementioned components, replace the pulsation damper.
  1. Turn the ignition switch off.

  1. Disconnect the Techstream from the DLC3.


32. INSPECT EXHAUST GAS LEAK


33. CHECK ENGINE OIL LEVEL
  1. Warm up the engine, and then stop the engine and wait for 5 minutes.

  1. Check that the engine oil level is between the low level and full level marks on the dipstick.
    If low, check for leakage and add oil up to the full level mark.

    NOTICE:
    Do not fill engine oil above the full level mark.


34. INSPECT IGNITION TIMING
  1. Warm up and stop the engine.

    1. Allow the engine to warm up to a normal operating temperature.

  1. When using the Techstream:

    1. Connect the Techstream to the DLC3.

    2. Start the engine and idle it.

    3. Push the Techstream main switch ON.

    4. Enter the following menus: Powertrain / Engine / Data List / IGN Advance.

      Standard ignition timing:
      5 to 15° BTDC at idling (transmission in neutral position and A/C switch OFF)

      HINT:
      Refer to the Techstream operator's manual for further details.

    5. Disconnect the Techstream from the DLC3.


    A123205
  1. When not using the Techstream:

    1. Connect the tester probe of a timing light to the wire of the ignition coil connector for the No. 1 cylinder.
      NOTICE:
      Use a timing light that detects primary signals.


    2. H102392E79
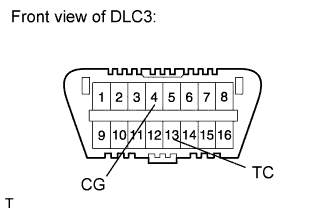
    3. Using SST, connect terminals 13 (TC) and 4 (CG) of the DLC3.

      SST
      09843-18040  

      NOTICE:
      Confirm the terminal numbers before connecting them. Connecting the wrong terminals can damage the engine.


    4. A004459E01
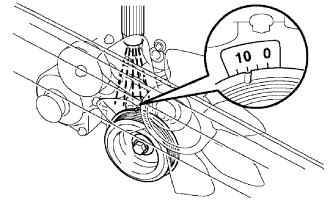
    5. Using the timing light, check the ignition timing.

      Ignition timing:
      5 to 15° BTDC at idling (transmission position)

    6. Remove SST from the DLC3.

    7. Disconnect the timing light from the engine.


35. INSPECT ENGINE IDLING SPEED
  1. Warm up and stop the engine.

    1. Allow the engine to warm up to a normal operating temperature.

  1. When using the Techstream:

    1. Connect the Techstream to the DLC3.

      NOTICE:
      Switch off all accessories and the A/C before connecting the Techstream.

    2. Race the engine at 2500 rpm for approximately 90 seconds.

    3. Push the Techstream main switch ON.

    4. Enter the following menus: / Engine / Data List / Engine Speed.

      Standard idle speed:
      650 to 750 rpm (transmission in neutral and A/C switch OFF)

      HINT:
      Refer to the Techstream operator's manual for further details.

      If the idle speed is not as specified, check the air intake system.

    5. Disconnect the Techstream from the DLC3.


    H102392E88
  1. When not using the Techstream:

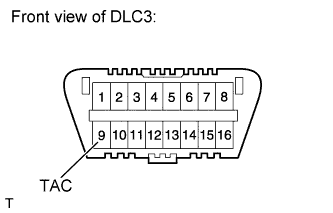
    1. Using SST, connect the tachometer probe to terminal 9 (TAC) of the DLC3.

      SST
      09843-18030  

      NOTICE:
      Confirm the terminal numbers before connecting them. Connecting the wrong terminals can damage the engine.

    2. Race the engine at 2500 rpm for approximately 90 seconds.

    3. Check the idle speed.

      Idle speed:
      650 to 750 rpm (transmission in neutral and A/C switch OFF)

      If the idle speed is not as specified, check the air intake system.

    4. Disconnect the tachometer from the DLC3.


36. INSTALL NO. 1 ENGINE UNDER COVER


    A150108
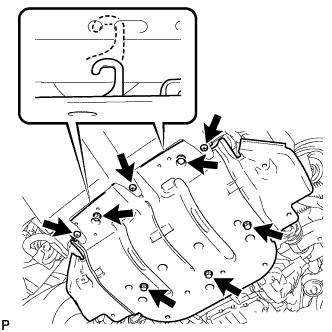
  1. Hook the engine under cover onto the vehicle body as shown in the illustration.

  1. Install the 3 screws and 5 bolts.

    1. for bolt

    Torque:
    29 N*m{ 296 kgf*cm , 21 ft.*lbf }

    1. for screw

    Torque:
    3.0 N*m{ 31 kgf*cm , 27 in.*lbf }