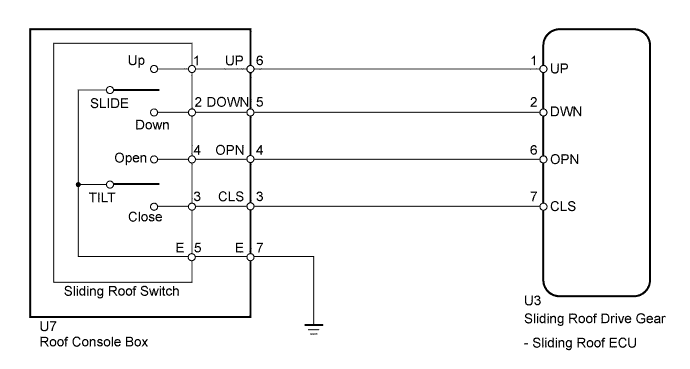
SLIDING ROOF SYSTEM > Sliding Roof Control Switch Circuit |
| 1.PERFORM ACTIVE TEST USING TECHSTREAM (SLIDING ROOF OPERATION) |
Connect the Techstream to the DLC3.
Turn the ignition switch to ON.
Turn the Techstream ON.
Enter the following menus: Body Electrical / Sliding Roof / Active Test.
According to the display on the Techstream, perform the Active Test.
| Tester Display | Test Part | Control Range | Diagnostic Note |
| Slide Roof | Operate sliding roof SLIDE CLOSE/TILT UP or SLIDE OPEN/TILT DOWN | CLOS/UP: Sliding roof SLIDE CLOSE or TILT UP operation occurs OPN/DWN: Sliding roof SLIDE OPEN or TILT DOWN operation occurs OFF: Sliding roof is not operating | - |
|
| ||||
| OK | |
 |
| 2.READ VALUE USING TECHSTREAM (SLIDING ROOF SWITCH) |
Connect the Techstream to the DLC3.
Turn the ignition switch to ON.
Turn the Techstream ON.
Enter the following menus: Body Electrical / Sliding Roof / Data List.
According to the display on the Techstream, read the Data List.
| Tester Display | Test Part | Control Range | Diagnostic Note |
| Open Switch | Sliding roof open switch signal/ON or OFF | ON: SLIDE switch is pressed to open OFF: SLIDE switch is not pressed to open | - |
| Close Switch | Sliding roof close switch signal/ON or OFF | ON: SLIDE switch is pressed to close OFF: SLIDE switch is not pressed to close | - |
| Up Switch | Sliding roof up switch signal/ON or OFF | ON: TILT switch is pressed to up OFF: TILT switch is not pressed to up | - |
| Down Switch | Sliding roof down switch signal/ON or OFF | ON: TILT switch is pressed to down OFF: TILT switch is not pressed to down | - |
|
| ||||
| OK | ||
 | ||
| ||
| 3.INSPECT SLIDING ROOF SWITCH |
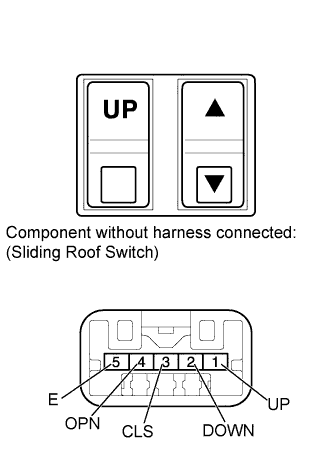 |
Remove the sliding roof switch (Click here).
Measure the resistance according to the value(s) in the table below.
| Tester Connection | Switch Condition | Specified Condition |
| 1 (UP) - 5 (E) | TILT switch is pressed to up | Below 1 Ω |
| TILT switch is not pressed to up | 10 kΩ or higher | |
| 2 (DOWN) - 5 (E) | TILT switch is pressed to down | Below 1 Ω |
| TILT switch is not pressed to down | 10 kΩ or higher | |
| 3 (CLS) - 5 (E) | SLIDE switch is pressed to close | Below 1 Ω |
| SLIDE switch is not pressed to close | 10 kΩ or higher | |
| 4 (OPN) - 5 (E) | SLIDE switch is pressed to open | Below 1 Ω |
| SLIDE switch is not pressed to open | 10 kΩ or higher |
|
| ||||
| OK | |
|
| 4.INSPECT ROOF CONSOLE BOX ASSEMBLY |
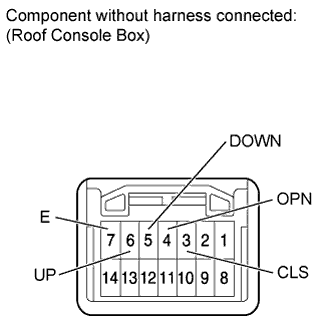 |
Remove the roof console box with sliding roof switch (Click here).
Measure the resistance according to the value(s) in the table below.
| Tester Connection | Switch Condition | Specified Condition |
| 3 (CLS) - 7 (E) | SLIDE switch is pressed to close | Below 1 Ω |
| SLIDE switch is not pressed to close | 10 kΩ or higher | |
| 4 (OPN) - 7 (E) | SLIDE switch is pressed to open | Below 1 Ω |
| SLIDE switch is not pressed to open | 10 kΩ or higher | |
| 5 (DOWN) - 7 (E) | TILT switch is pressed to down | Below 1 Ω |
| TILT switch is not pressed to down | 10 kΩ or higher | |
| 6 (UP) - 7 (E) | TILT switch is pressed to up | Below 1 Ω |
| TILT switch is not pressed to up | 10 kΩ or higher |
|
| ||||
| OK | |
|
| 5.CHECK HARNESS AND CONNECTOR (ROOF CONSOLE BOX - SLIDING ROOF ECU AND BODY GROUND) |
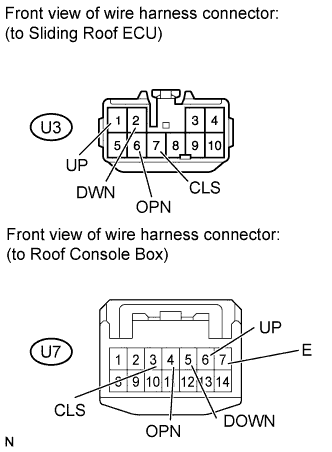 |
Disconnect the U3 ECU connector.
Disconnect the U7 switch connector.
Measure the resistance according to the value(s) in the table below.
| Tester Connection | Condition | Specified Condition |
| U7-3 (CLS) - U3-7 (CLS) | Always | Below 1 Ω |
| U7-3 (CLS) - Body ground | Always | 10 kΩ or higher |
| U7-4 (OPN) - U3-6 (OPN) | Always | Below 1 Ω |
| U7-4 (OPN) - Body ground | Always | 10 kΩ or higher |
| U7-5 (DOWN) - U3-2 (DWN) | Always | Below 1 Ω |
| U7-5 (DOWN) - Body ground | Always | 10 kΩ or higher |
| U7-6 (UP) - U3-1 (UP) | Always | Below 1 Ω |
| U7-6 (UP) - Body ground | Always | 10 kΩ or higher |
| U7-7 (E) - Body ground | Always | Below 1 Ω |
|
| ||||
| OK | ||
| ||
| ||

