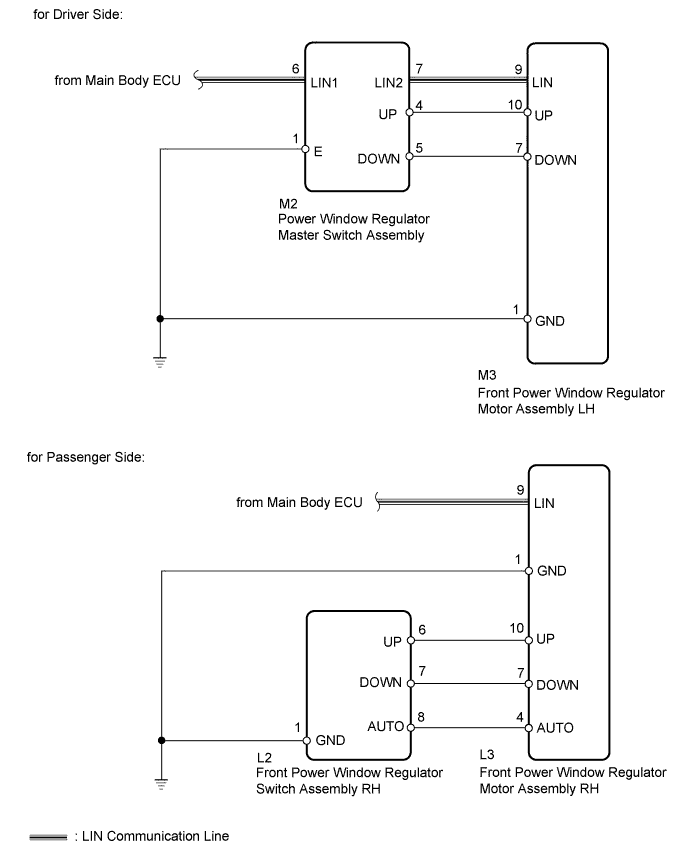
DTC B2312 Power Window Switch Malfunction |
| DTC Code | DTC Detection Condition | Trouble Area |
| B2312 |
|
|
| DTC Code | DTC Detection Condition | Trouble Area |
| B2312 |
|
|
| DTC Code | DTC Detection Condition | Trouble Area |
| B2312 |
|
|
| 1.CHECK LIN COMMUNICATION SYSTEM |
Check for LIN communication system DTCs related to the power window control system (Click here).
|
| ||||
| OK | |
 |
| 2.CHECK DTC |
Check where DTC B2312 is output from.
| Result | Proceed to |
| B2312 output from power window regulator master switch. | A |
| B2312 output from front power window regulator motor LH. | B |
| B2312 output from front power window regulator motor RH. | C |
|
| ||||
|
| ||||
| A | |
|
| 3.READ VALUE USING TECHSTREAM (POWER WINDOW REGULATOR MASTER SWITCH) |
Connect the Techstream to the DLC3.
Turn the ignition switch to ON.
Turn the Techstream on.
Enter the following menus: Body Electrical / Master Switch / Data List /
According to the display on the Techstream, read the Data List.
| Tester Display | Measurement Item/Range | Normal Condition | Diagnostic Note |
| D Door P/W Auto SW | Driver side power window auto UP/DOWN switch signal / ON or OFF | ON: Driver side power window auto UP/DOWN switch on power window regulator master switch operated OFF: Driver side power window switch on power window regulator master switch not operated | - |
| P Door P/W Auto SW | Front passenger side power window remote auto UP/DOWN switch signal / ON or OFF | ON: Front passenger side power window remote auto UP/DOWN switch on power window regulator master switch operated OFF: Front passenger side power window switch on power window regulator master switch not operated | - |
| P Door P/W Up SW | Front passenger side power window remote manual UP switch signal / ON or OFF | ON: Front passenger side power window remote manual UP switch on power window regulator master switch operated OFF: Front passenger side power window switch on power window regulator master switch not operated | - |
| P Door P/W Down SW | Front passenger side power window remote manual DOWN switch signal / ON or OFF | ON: Front passenger side power window remote manual DOWN switch on power window regulator master switch operated OFF: Front passenger side power window switch on the power window regulator master switch not operated | - |
| Window Lock Switch Status | Power window LOCK switch / ON or OFF | ON: Power window lock switch LOCK position OFF: Power window lock switch UNLOCK position | - |
|
| ||||
| OK | ||
 | ||
| ||
| 4.READ VALUE USING TECHSTREAM (FRONT POWER WINDOW REGULATOR MOTOR LH) |
Connect the Techstream to the DLC3.
Turn the ignition switch to ON.
Turn the Techstream on.
Enter the following menus: Body Electrical / D-Door Motor / Data List /
According to the display on the Techstream, read the Data List.
| Tester Display | Measurement Item/Range | Normal Condition | Diagnostic Note |
| D Door P/W Auto SW | Driver side power window auto UP/DOWN switch signal / ON or OFF | ON: Driver side power window auto UP/DOWN switch operated OFF: Driver side power window switch not operated | - |
| D Door P/W Up SW | Driver side power window MANUAL UP switch signal / ON or OFF | ON: Driver side power window manual UP switch operated OFF: Driver side power window switch not operated | - |
| D Door P/W Down SW | Driver side power window MANUAL DOWN switch signal / ON or OFF | ON: Driver side power window manual DOWN switch operated OFF: Driver side power window switch not operated | - |
|
| ||||
| OK | ||
| ||
| ||
| 5.CHECK HARNESS AND CONNECTOR (POWER WINDOW REGULATOR MASTER SWITCH - BODY GROUND) |
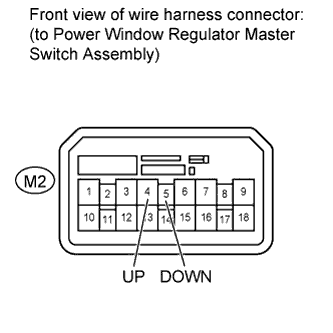 |
Disconnect the M2 power window regulator master switch connector.
Disconnect the M3 power window regulator motor assembly LH connector.
Measure the resistance according to the value(s) in the table below.
| Tester Connection | Condition | Specified Condition |
| M2-4 (UP) - Body ground | Always | 10 kΩ or higher |
| M2-5 (DOWN) - Body ground | Always | 10 kΩ or higher |
Reconnect the power window regulator motor assembly LH connector.
Reconnect the power window regulator master switch assembly connector.
|
| ||||
| OK | ||
| ||
| ||
| 6.READ VALUE USING TECHSTREAM (FRONT POWER WINDOW REGULATOR MOTOR RH) |
Connect the Techstream to the DLC3.
Turn the ignition switch to ON.
Turn the Techstream on.
Enter the following menus: Body Electrical / P-Door Motor / Data List /
According to the display on the Techstream, read the Data List.
| Tester Display | Measurement Item/Range | Normal Condition | Diagnostic Note |
| P Door P/W Auto SW | Front passenger side power window auto UP/DOWN switch signal / ON or OFF | ON: Front passenger side power window auto UP/DOWN switch operated OFF: Front passenger side power window regulator switch not operated | - |
| P Door P/W Up SW | Front passenger side power window manual UP switch signal / ON or OFF | ON: Front passenger side power window manual UP switch operated OFF: Front passenger side power window regulator switch not operated | - |
| P Door P/W Down SW | Front passenger side power window manual DOWN switch signal / ON or OFF | ON: Front passenger side power window manual DOWN switch operated OFF: Front passenger side power window regulator switch not operated | - |
|
| ||||
| OK | ||
| ||
| ||
| 7.INSPECT FRONT POWER WINDOW REGULATOR SWITCH ASSEMBLY RH |
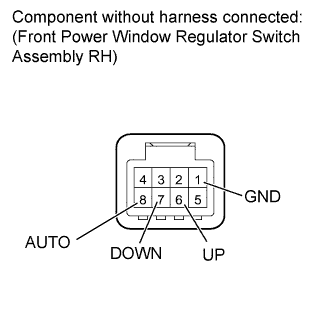 |
Remove the front power window regulator switch assembly RH (Click here).
Measure the resistance according to the value(s) in the table below.
| Tester Connection | Switch Condition | Specified Condition |
| 6 (UP) - 1 (GND) | Manual UP operation | Below 1 Ω |
| 7 (DOWN) - 1 (GND) | Manual DOWN operation | Below 1 Ω |
| 8 (AUTO) - 1 (GND) | AUTO UP/DOWN operation | Below 1 Ω |
| 6 (UP) - 1 (GND) | Not operated | 10 kΩ or higher |
| 7 (DOWN) - 1 (GND) | Not operated | 10 kΩ or higher |
| 8 (AUTO) - 1 (GND) | Not operated | 10 kΩ or higher |
Reinstall the power window regulator switch assembly RH.
|
| ||||
| OK | |
|
| 8.CHECK HARNESS AND CONNECTOR (FRONT POWER WINDOW REGULATOR SWITCH RH - BODY GROUND) |
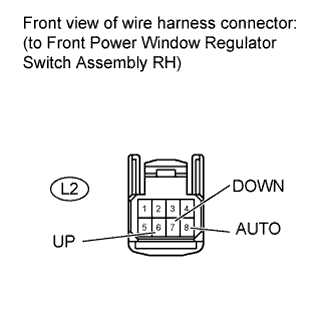 |
Disconnect the L2 power window regulator switch assembly RH connector.
Disconnect the L3 power window regulator motor assembly RH connector.
Measure the resistance according to the value(s) in the table below.
| Tester Connection | Condition | Specified Condition |
| L2-6 (UP) - Body ground | Always | 10 kΩ or higher |
| L2-7 (DOWN) - Body ground | Always | 10 kΩ or higher |
| L2-8 (AUTO) - Body ground | Always | 10 kΩ or higher |
Reconnect the power window regulator motor assembly RH connector.
Reconnect the power window regulator switch assembly RH connector.
|
| ||||
| OK | ||
| ||
| ||

