| B |  |
| GO TO CAN COMMUNICATION SYSTEM (Click here) |
VEHICLE STABILITY CONTROL SYSTEM > Slip Indicator Light does not Come ON |
| 1.CHECK CAN COMMUNICATION SYSTEM |
Check if a CAN communication system DTC is output (Click here).
| Result | Proceed to |
| DTC is not output | A |
| DTC is output | B |
|
| ||||
| A | |
 |
| 2.CHECK CONNECTOR CONNECTION CONDITION |
Check the skid control ECU connector connection condition.
|
| ||||
| OK | |
|
| 3.CHECK HARNESS AND CONNECTOR (SKID CONTROL ECU - BATTERY AND BODY GROUND) |
Disconnect the A19 ECU connector.
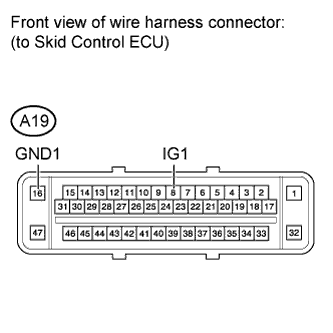 |
Measure the voltage and resistance according to the value(s) in the table below.
| Tester Connection | Switch Condition | Specified Condition |
| A19-8 (IG1) - Body ground | Ignition switch ON | 11 to 14 V |
| Tester Connection | Condition | Specified Condition |
| A19-16 (GND1) - Body ground | Always | Below 1 Ω |
|
| ||||
| OK | |
|
| 4.PERFORM ACTIVE TEST USING TECHSTREAM (SLIP INDICATOR LIGHT) |
Connect the Techstream to the DLC3.
Turn the ignition switch to ON.
Turn the Techstream ON.
Select the Active Test mode and operate the slip indicator light using the Techstream.
| Tester Display | Test Part | Control Range | Diagnostic Note |
| Slip Indicator Light | Slip indicator light | Indicator light ON/OFF | Observe combination meter |
Check that the slip indicator light turns on and off in the combination meter when using the Techstream.
|
| ||||
| OK | |
|
| 5.INSPECT VSC OFF SWITCH |
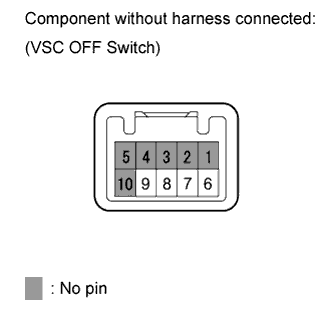 |
Remove the VSC OFF switch (Click here).
Measure the resistance according to the value(s) in the table below.
| Tester Connection | Switch Condition | Specified Condition |
| 6 - 9 | Switch is pressed | Below 1 Ω |
| Switch is not pressed | 10 kΩ or higher |
|
| ||||
| OK | |
|
| 6.CHECK HARNESS AND CONNECTOR (SKID CONTROL ECU - VSC OFF SWITCH AND BODY GROUND) |
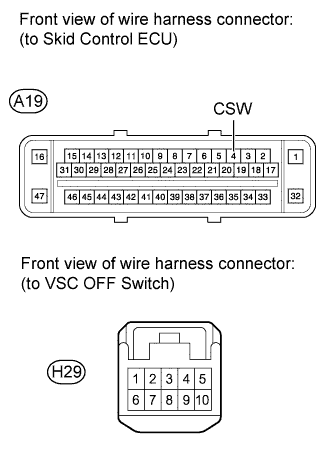 |
Disconnect the A19 ECU connector.
Disconnect the H29 switch connector.
Measure the resistance according to the value(s) in the table below.
| Tester Connection | Condition | Specified Condition |
| A19-4 (CSW) - H29-9 | Always | Below 1 Ω |
| A19-4 (CSW) - Body ground | Always | 10 kΩ or higher |
| H29-6 - Body ground | Always | Below 1 Ω |
|
| ||||
| OK | ||
 | ||
| ||