INSTRUMENT PANEL SAFETY PAD > INSTALLATION |
| 1. INSTALL NO. 1 INSTRUMENT PANEL PIN |
Install the 2 instrument panel pins with the 2 <G> or <H> screws.
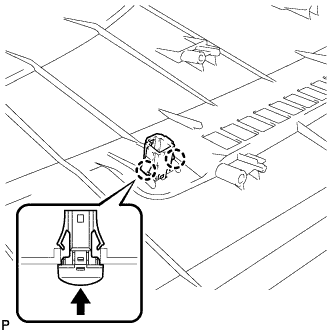
| 2. INSTALL AUTOMATIC LIGHT CONTROL SENSOR |
|
Attach the 2 claws to install the automatic light control sensor.
| 3. INSTALL FRONT PASSENGER AIRBAG ASSEMBLY |
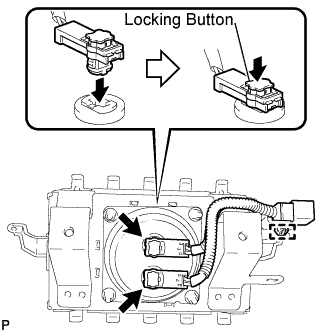 |
Connect the airbag connector to install the instrument panel wire.
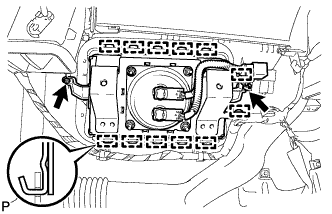 |
Engage the 10 hooks and install the front passenger airbag on the instrument panel.
Engage the 2 clamps.
Install the 2 screws.
| 4. INSTALL NO. 2 INSTRUMENT PANEL WIRE |
Attach the wire harness clamps to install the instrument panel wire.
Connect the 2 connectors.
| 5. INSTALL NAVIGATION ANTENNA ASSEMBLY |
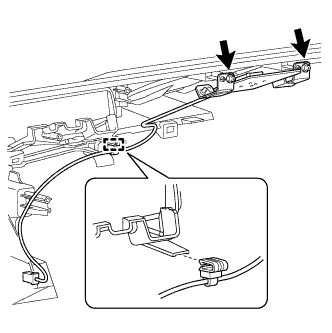 |
Install the antenna with the 2 screws.
Engage the clamp.
| 6. INSTALL ACCESSORY METER ASSEMBLY |
Install the accessory meter with the 3 screws.
| 7. INSTALL NO. 3 INSTRUMENT PANEL REGISTER ASSEMBLY |
Install the register with the 3 <G> or <H> screws.
| 8. INSTALL NO. 4 INSTRUMENT PANEL REGISTER ASSEMBLY |
Install the register with the 3 <G> or <H> screws.
| 9. INSTALL DEFROSTER NOZZLE ASSEMBLY |
Install the defroster nozzle with the 3 <G> or <H> screws.
| 10. INSTALL NO. 2 SIDE DEFROSTER NOZZLE DUCT |
Attach the 2 claws to install the duct.
Install the 2 <G> or <H> screws.
| 11. INSTALL NO. 1 SIDE DEFROSTER NOZZLE DUCT |
Attach the 2 claws to install the duct.
Install the 2 <G> or <H> screws.
| 12. INSTALL NO. 1 HEATER TO REGISTER DUCT |
Install the duct with the 5 <G> or <H> screws.
Attach the clamp.
| 13. INSTALL NO. 1 INSTRUMENT PANEL CLIP |
Attach the 2 claws to install the 2 clips.
| 14. INSTALL NO. 3 INSTRUMENT PANEL STAY |
Attach the 3 claws to install the 3 stays.
| 15. INSTALL INSTRUMENT PANEL SUB-ASSEMBLY (for 8 Speakers) |
Attach the 5 claws to install the instrument panel.
Install the 3 <C> bolts and 2 <E> nuts.
Install the 2 <F> passenger airbag bolts.
Connect the connectors and attach the wire harness clamps.
Install the wire harness with the bolt.
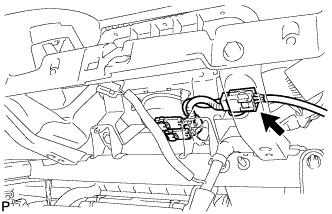 |
Connect the airbag connector.
| 16. INSTALL INSTRUMENT PANEL SUB-ASSEMBLY (for 14 Speakers) |
Attach the 5 claws to install the instrument panel.
Install the 3 <C> bolts and 2 <E> nuts.
Install the 2 <F> passenger airbag bolts.
Connect the connectors and attach the wire harness clamps.
Install the wire harness with the bolt.
|
Connect the airbag connector.
| 17. INSTALL REAR NO. 4 AIR DUCT (for 14 Speakers) |
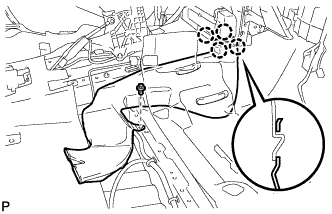 |
Attach the 4 claws and install the air duct.
Install the clip.
| 18. INSTALL STEREO COMPONENT AMPLIFIER ASSEMBLY (for 14 Speakers) |
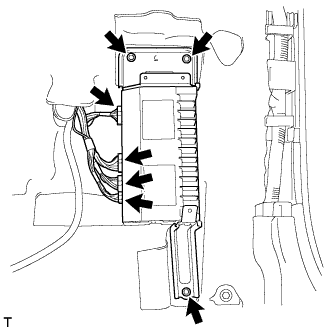 |
Install the amplifier with the 3 bolts.
Connect the 4 connectors.
| 19. INSTALL AUDIO AMPLIFIER COVER (for 14 Speakers) |
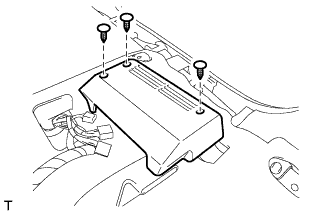 |
Set the cover on the stereo amplifier assembly.
Engage the 3 clips.
| 20. INSTALL FRONT RH SEAT ASSEMBLY (for 14 Speakers) |
Place the front seat assembly in the cabin.
Connect the seat wire connectors under the seat.
Connect the cable to the negative (-) battery terminal.
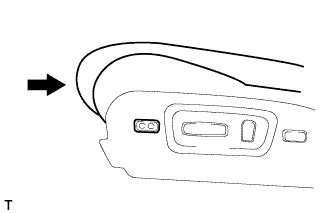 |
Operate the leg support adjustment switch to move the seat cushion to the closed position.
Operate the power seat switch to move the seat to the rearmost position.
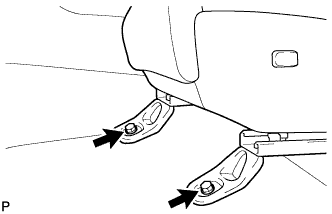 |
Install the 2 bolts.
Operate the power seat switch to move the seat to the foremost position.
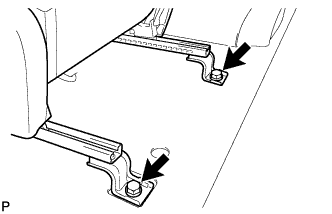 |
Install the 2 bolts.
| 21. INSTALL SEAT TRACK OUTER COVER RH (for 14 Speakers) |
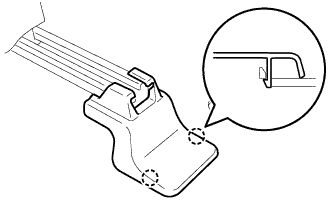 |
Attach the 2 claws to install the seat track cover.
| 22. INSTALL SEAT TRACK INNER COVER RH (for 14 Speakers) |
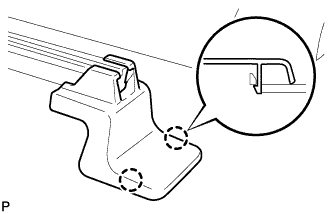 |
Attach the 2 claws to install the seat track cover.
| 23. INSTALL FRONT SEAT HEADREST ASSEMBLY (for 14 Speakers) |
| 24. INSTALL FRONT NO. 4 SPEAKER ASSEMBLY (for 14 Speakers) |
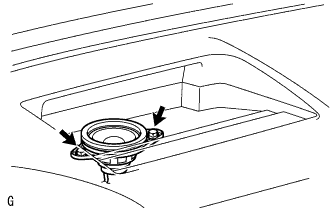 |
Connect the connector.
Temporarily install the speaker by aligning the positioning pins of the speaker with the instrument panel.
Install the speaker with the 2 bolts.
| 25. INSTALL NO. 3 INSTRUMENT PANEL SPEAKER PANEL SUB-ASSEMBLY |
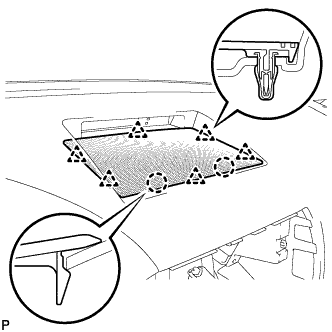 |
Attach the 6 clips and 2 claws to install the speaker panel.
| 26. INSTALL FRONT NO. 2 SPEAKER ASSEMBLY RH |
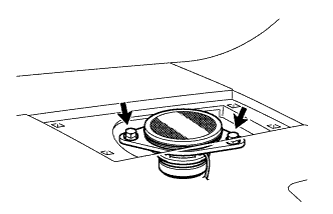 |
Connect the speaker connector.
Temporarily install the speaker by aligning the positioning pins of the speaker with the instrument panel.
Install the speaker with the 2 bolts.
| 27. INSTALL NO. 2 INSTRUMENT PANEL SPEAKER PANEL SUB-ASSEMBLY |
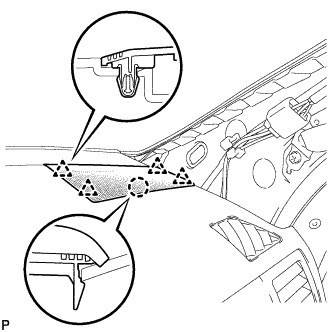 |
Attach the 4 clips and claw to install the speaker panel.
| 28. INSTALL FRONT NO. 2 SPEAKER ASSEMBLY LH |
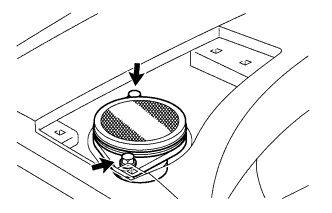 |
Connect the speaker connector.
Temporarily install the speaker by aligning the positioning pins of the speaker with the instrument panel.
Install the speaker with the 2 bolts.
| 29. INSTALL INSTRUMENT PANEL SPEAKER PANEL SUB-ASSEMBLY |
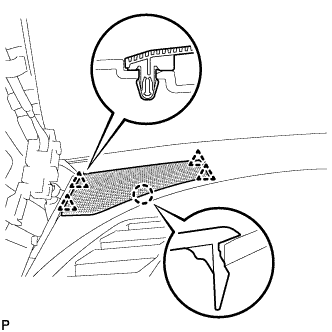 |
Attach the 4 clips and claw to install the speaker panel.
| 30. INSTALL NO. 2 INSTRUMENT PANEL BOX DOOR SUB-ASSEMBLY |
Attach the clip to install the box door.
Install the 6 <B> or <H> screws.
| 31. INSTALL LOWER INSTRUMENT PANEL FINISH PANEL SUB-ASSEMBLY RH |
Connect the connector.
Attach the 3 claws to install the finish panel.
Install the 3 <D> screws and bolt <A>.
| 32. INSTALL LOWER NO. 2 INSTRUMENT PANEL AIRBAG ASSEMBLY |
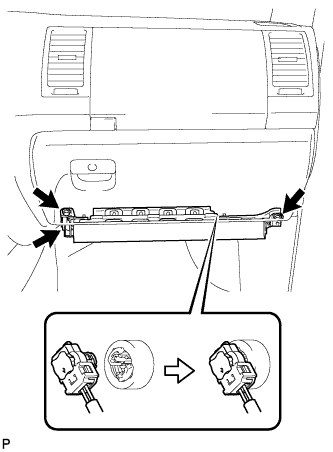 |
Connect the connector.
Install the 3 bolts to install the instrument panel airbag.
| 33. INSTALL LOWER INSTRUMENT PANEL |
Attach the 2 claws.
Install the panel with the bolt <A> and screw <D>.
| 34. INSTALL NO. 2 INSTRUMENT PANEL UNDER COVER SUB-ASSEMBLY |
Attach the 2 guides and 4 claws.
Attach the clip to install the under cover.
| 35. INSTALL INSTRUMENT SIDE PANEL RH |
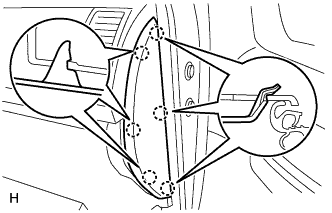 |
Attach the 6 claws to install the side panel.
| 36. INSTALL FRONT PILLAR GARNISH RH |
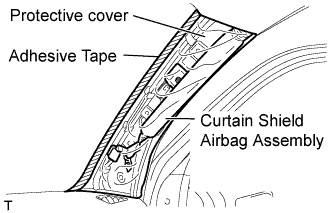 |
Remove the protective cover.
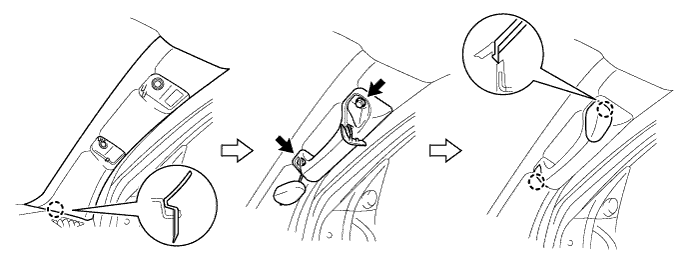
Engage the claw to install the front pillar garnish.
Install the assist grip with the 2 bolts.
Engage the 2 claws to install the 2 assist grip plugs.
| 37. INSTALL FRONT DOOR OPENING TRIM WEATHERSTRIP RH |
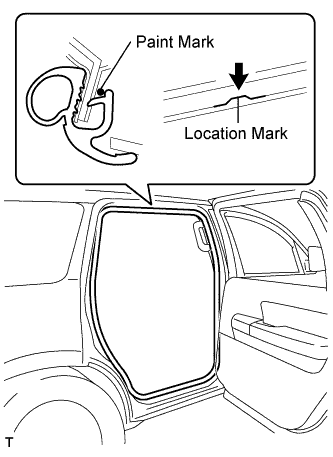 |
Align the location mark with the paint mark first, and install the rear door opening trim weatherstrip, as shown in the illustration.
| Area | Color |
| RH side | Pink |
| LH side | Purple |
| 38. INSTALL COWL SIDE TRIM BOARD RH |
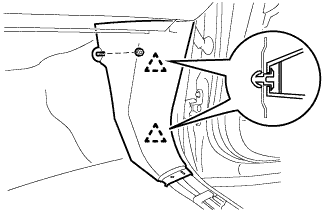 |
Engage the 2 clips to install the cowl side trim board.
Install the clip.
| 39. INSTALL FRONT DOOR SCUFF PLATE RH |
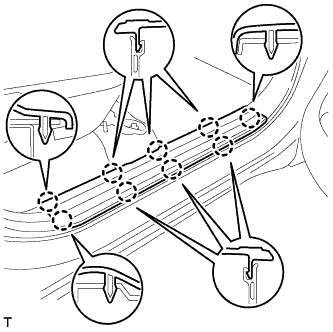 |
Engage the 9 claws to install the scuff plate.
| 40. INSTALL NAVIGATION RECEIVER ASSEMBLY WITH BRACKET (w/ Navigation System) |
for DVD:
Install the navigation receiver assembly with bracket .
for SD:
Install the navigation receiver assembly with bracket .
| 41. INSTALL RADIO RECEIVER ASSEMBLY WITH BRACKET (w/o USB Audio System) |
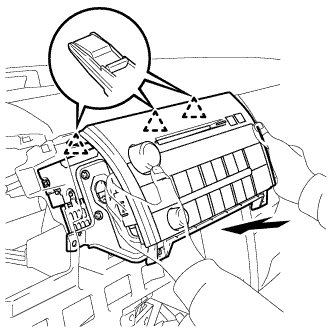 |
Connect the connectors.
Insert the radio receiver and engage the 3 clips on its backside.
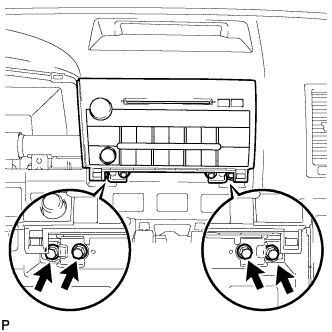 |
Install the radio receiver with the 4 bolts.
| 42. INSTALL RADIO RECEIVER ASSEMBLY WITH BRACKET (w/ USB Audio System) |
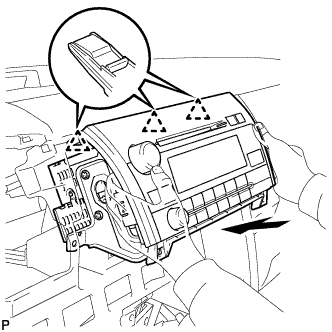 |
Connect the connectors.
Insert the radio receiver and engage the 3 clips on its backside.
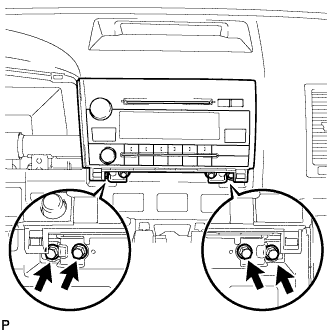 |
Install the radio receiver with the 4 bolts.
| 43. INSTALL INTEGRATION CONTROL AND PANEL ASSEMBLY |
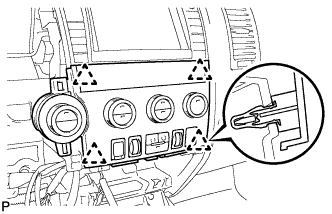 |
Connect the connectors.
Attach the 4 clips and install the panel.
| 44. INSTALL CENTER LOWER INSTRUMENT PANEL FINISH PANEL |
Connect the connectors.
Attach the 4 clips and 2 claws to install the finish panel.
| 45. INSTALL COMBINATION METER ASSEMBLY |
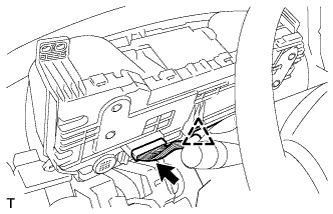 |
Connect the connector and engage the clip and install the combination meter assembly.
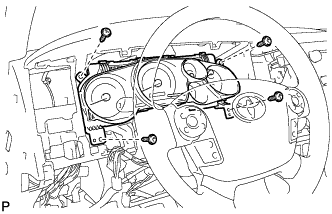 |
Install the 4 screws.
| 46. INSTALL INSTRUMENT CLUSTER FINISH PANEL ASSEMBLY |
Attach the 12 clips to install the finish panel.
Connect the 2 connectors and attach the wire harness clamp.
Attach the 4 claws to install the instrument panel finish panel retainer.
| 47. INSTALL FRONT CONSOLE BOX |
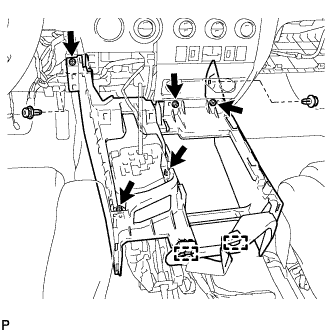 |
Install the front console box with the 5 screws and 2 clips.
Attach the 2 clamps.
| 48. INSTALL REAR CONSOLE BOX ASSEMBLY |
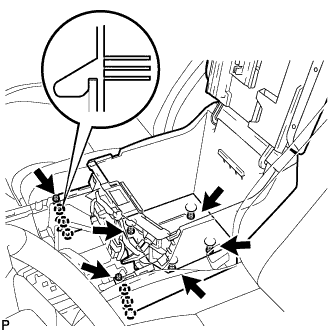 |
Attach the 6 claws to install the rear console box.
Install the 2 screws and 4 bolts.
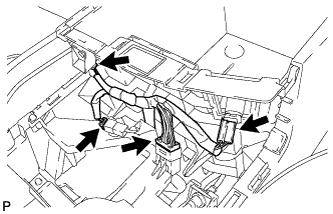 |
Connect the connectors.
| 49. INSTALL CONSOLE BOX CARPET |
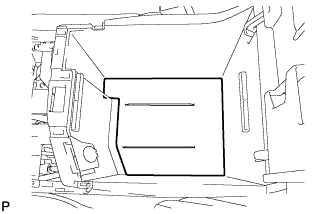 |
Install the console box carpet.
| 50. INSTALL REAR CONSOLE BOX POCKET |
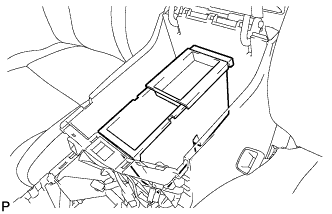 |
Install the rear console box pocket.
| 51. INSTALL REAR UPPER CONSOLE PANEL SUB-ASSEMBLY |
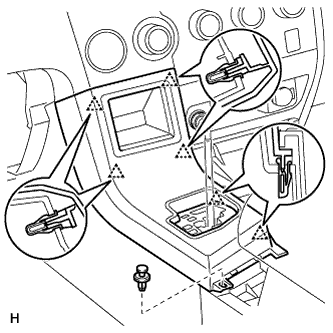 |
Connect the connectors.
Attach the 6 clips to install the console panel.
Install the clip.
| 52. INSTALL UPPER CONSOLE PANEL SUB-ASSEMBLY |
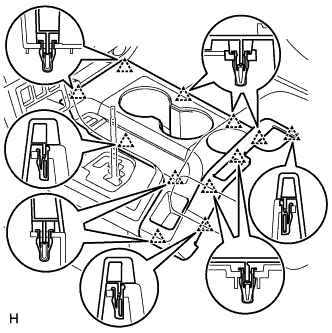 |
Attach the 12 clips to install the console panel.
| 53. INSTALL SHIFT LEVER KNOB SUB-ASSEMBLY |
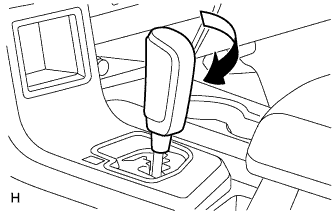 |
Install the shift lever knob and twist it in the direction indicated by the arrow.
| 54. INSTALL LOWER NO. 1 INSTRUMENT PANEL AIRBAG ASSEMBLY |
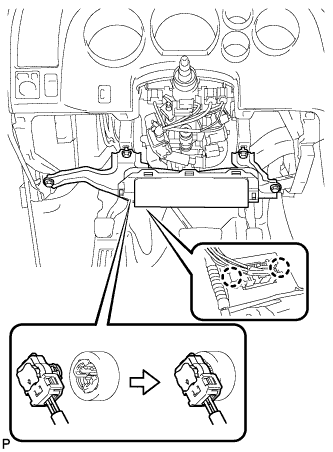 |
Connect the connector.
Attach the 2 claws to install the DLC3.
Install the 4 bolts to install the instrument panel airbag.
| 55. INSTALL LOWER INSTRUMENT PANEL FINISH PANEL SUB-ASSEMBLY LH |
Attach the 2 claws to install the sensor.
Connect the connectors.
Attach the 9 clips and claw to install the finish panel.
Install the 2 <A> bolts.
| 56. INSTALL HOOD LOCK CONTROL LEVER SUB-ASSEMBLY |
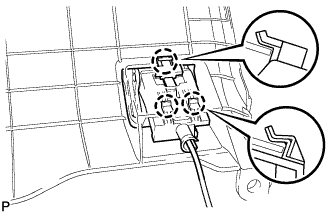 |
Connect the hood lock control cable assembly to the hood lock control lever sub-assembly.
engage the 3 claws to install the hood lock lever
| 57. INSTALL INSTRUMENT SIDE PANEL LH |
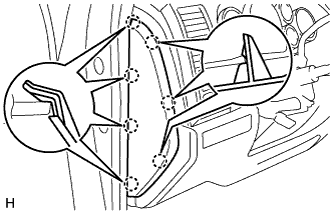 |
Attach the 7 claws to install the side panel.
| 58. INSTALL FRONT PILLAR GARNISH LH |
| 59. INSTALL FRONT DOOR OPENING TRIM WEATHERSTRIP LH |
| 60. INSTALL COWL SIDE TRIM BOARD LH |
| 61. INSTALL FRONT DOOR SCUFF PLATE LH |
| 62. INSTALL TURN SIGNAL SWITCH ASSEMBLY WITH SPIRAL CABLE SUB-ASSEMBLY |
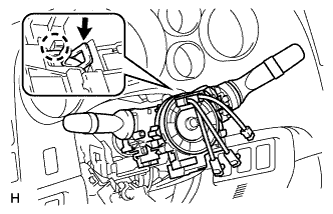 |
Using pliers, grip the claws of the clamp and install the combination switch with spiral cable to the steering column assembly with the clamp.
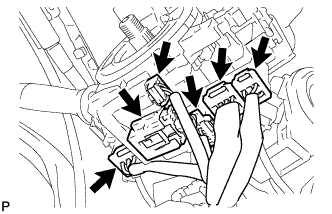 |
Connect the 6 connectors to the combination switch with spiral cable.
| 63. INSTALL UPPER STEERING COLUMN COVER |
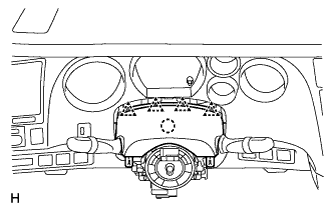 |
Attach the claw to install the upper steering column cover.
Attach the 4 clips.
| 64. INSTALL LOWER STEERING COLUMN COVER |
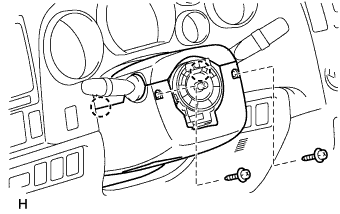 |
Attach the 2 claws to install the lower steering column cover.
Install the 2 screws.
| 65. INSTALL STEERING WHEEL ASSEMBLY |
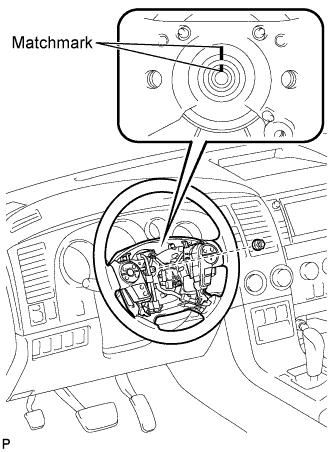 |
Align the matchmarks on the steering wheel and steering main shaft.
Install the steering wheel set nut.
| 66. INSTALL STEERING PAD |
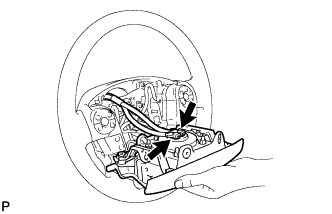 |
Confirm that the ignition switch is turned off.
Confirm that the negative battery terminal is disconnected.
Connect the horn terminal.
Connect the airbag connector.
Install the steering pad.
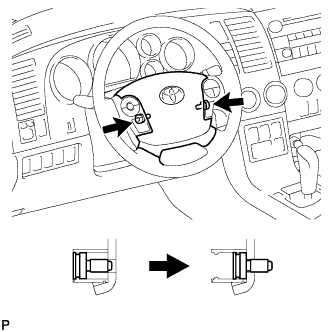 |
Using "TORX" socked wrench T30, tighten the 2 screws.
| 67. INSTALL LOWER NO. 3 STEERING WHEEL COVER |
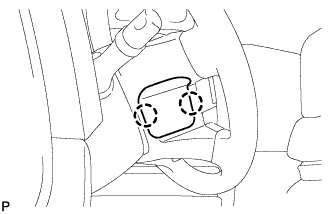 |
Attach the 2 claws to install the cover.
| 68. INSTALL LOWER NO. 2 STEERING WHEEL COVER |
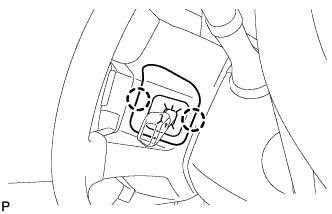 |
Attach the 2 claws to install the cover.
| 69. CONNECT CABLE TO NEGATIVE BATTERY TERMINAL |
| 70. CHECK SRS WARNING LIGHT |
Check the SRS warning light (Click here).