ROOF HEADLINING > REMOVAL |
| 1. PRECAUTION |
| 2. DISCONNECT CABLE FROM NEGATIVE BATTERY TERMINAL |
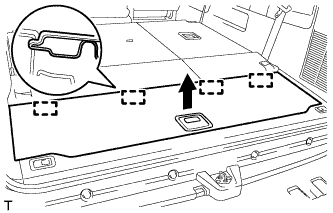
| 3. REMOVE NO. 2 DECK BOARD SUB-ASSEMBLY |
|
Raise the handle, disengage the 4 guides and remove the No. 2 deck board.
| 4. REMOVE LUGGAGE COMPARTMENT TRIM BOX |
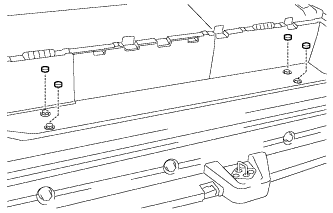 |
Remove the 4 caps.
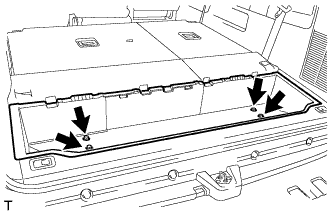 |
Remove the 4 bolts and luggage compartment trim box.
| 5. REMOVE ROPE HOOK ASSEMBLY |
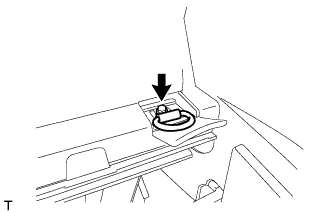 |
Remove the bolt and rope hook.
| 6. REMOVE NO. 1 DECK BOARD SUB-ASSEMBLY |
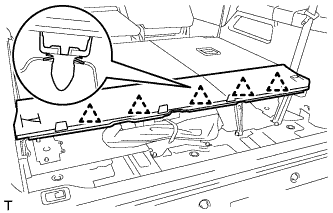 |
Disengage the 5 clips and remove the No. 1 deck board.
| 7. REMOVE DECK BOARD REINFORCEMENT SUB-ASSEMBLY |
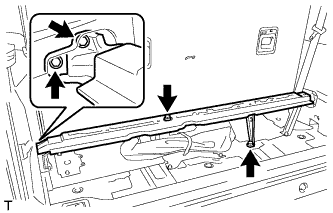 |
Remove the 4 bolts and deck board reinforcement.
| 8. REMOVE DECK BOARD BRACKET |
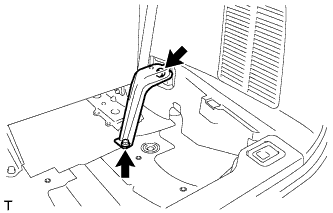 |
Remove the 2 bolts and deck board bracket.
| 9. REMOVE REAR NO. 2 SEAT ASSEMBLY RH |
for Manual Seat:
Remove the rear No. 2 seat assembly RH .
for Power Seat:
Remove the rear No. 2 seat assembly RH .
| 10. REMOVE REAR NO. 2 SEAT ASSEMBLY LH |
for Manual Seat:
Remove the rear No. 2 seat assembly LH .
for Power Seat:
Remove the rear No. 2 seat assembly LH .
| 11. REMOVE FRONT DOOR SCUFF PLATE RH |
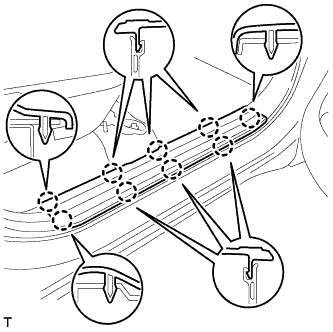 |
Detach the 9 claws and remove the scuff plate.
| 12. REMOVE FRONT DOOR SCUFF PLATE LH |
| 13. REMOVE COWL SIDE TRIM BOARD RH |
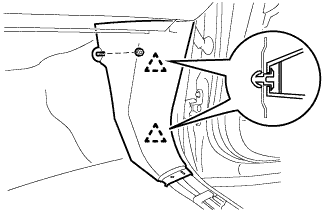 |
Remove the clip.
Disengage the 2 clips and remove the cowl side trim board.
| 14. REMOVE COWL SIDE TRIM BOARD LH |
| 15. REMOVE FRONT DOOR OPENING TRIM WEATHERSTRIP RH |
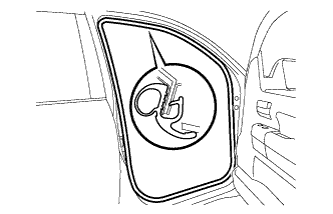 |
Remove the front door opening trim weatherstrip.
| 16. REMOVE FRONT DOOR OPENING TRIM WEATHERSTRIP LH |
| 17. REMOVE REAR SEAT CUSHION HINGE LOWER COVER RH |
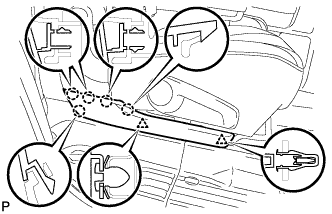 |
Disengage the 2 clips and 5 claws, and remove the rear seat cushion hinge lower cover.
| 18. REMOVE REAR SEAT CUSHION HINGE LOWER COVER LH |
| 19. REMOVE REAR FLOOR STEP NO. 1 COVER |
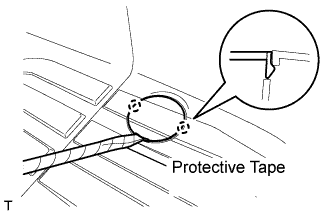 |
Using a screwdriver with its tip wrapped in protective tape, disengage the 2 claws and remove the cap.
| 20. REMOVE REAR FLOOR STEP NO. 2 COVER |
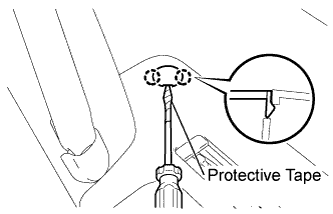 |
Using a screwdriver with its tip wrapped in protective tape, disengage the 2 claws and remove the cap.
| 21. REMOVE REAR DOOR SCUFF PLATE RH |
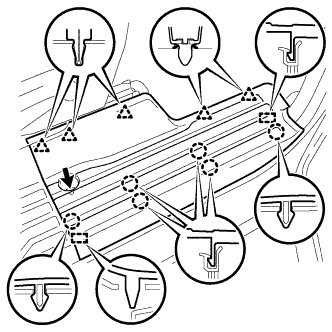 |
Remove the bolt.
Disengage the 5 clips and the 6 claws and 2 guides, and remove the rear door scuff plate front side.
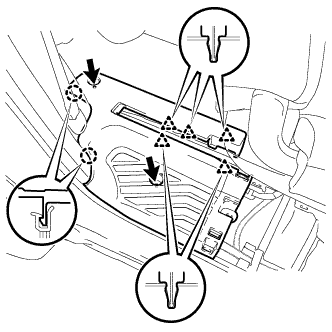 |
Remove the 2 bolts.
Disengage the 5 clips and 2 claws, and remove the scuff plate rear side.
| 22. REMOVE REAR DOOR SCUFF PLATE LH |
| 23. REMOVE REAR DOOR OPENING TRIM WEATHERSTRIP RH |
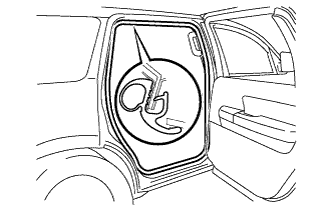 |
Remove the rear door opening trim weatherstrip.
| 24. REMOVE REAR DOOR OPENING TRIM WEATHERSTRIP LH |
| 25. REMOVE FRONT PILLAR GARNISH RH |
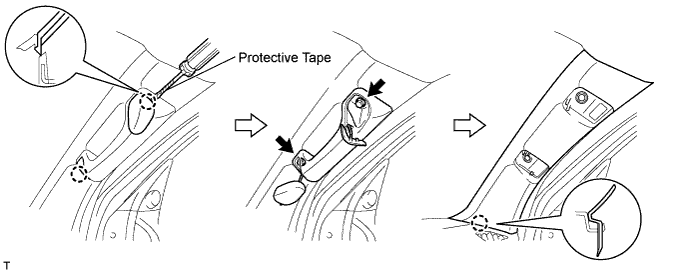
Using a screwdriver with its tip wrapped in protective tape, disengage the 2 claws and remove the 2 assist grip plugs.
Remove the 2 bolts and assist grip.
Detach the claw and remove the front pillar garnish.
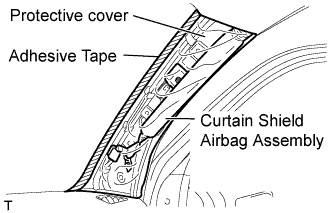 |
Protect the curtain shield airbag.
Thoroughly cover the airbag with a cloth or nylon sheet and fix the ends of the cover with adhesive tape, as shown in the illustration.
| 26. REMOVE FRONT PILLAR GARNISH LH |
| 27. REMOVE LOWER CENTER PILLAR GARNISH RH |
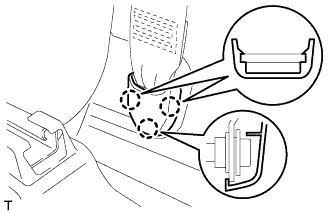 |
Disengage the 3 claws and remove the outer lap belt anchor cover.
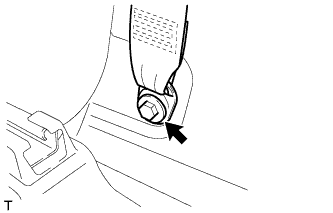 |
Remove the bolt and outer lap belt anchor.
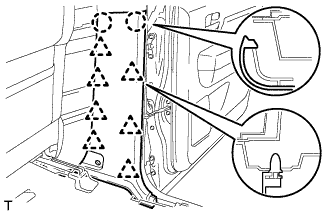 |
Disengage the 7 clips and 2 claws, and remove the center pillar garnish.
| 28. REMOVE LOWER CENTER PILLAR GARNISH LH |
| 29. REMOVE CENTER PILLAR GARNISH RH |
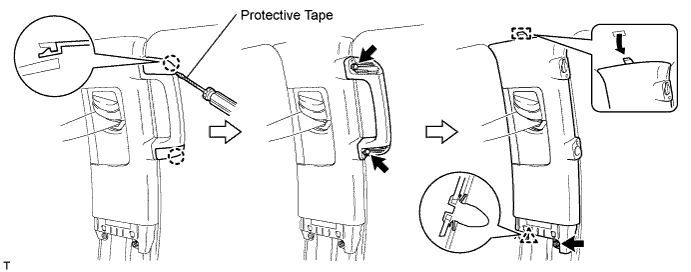
Using a screwdriver with its tip wrapped in protective tape, disengage the 2 claws and remove the 2 assist grip plugs.
Remove the 2 bolts and assist grip.
Remove the bolt.
Disengage the clip and guide.
Pass the front seat outer belt floor anchor through the center pillar garnish, and remove the center pillar garnish.
| 30. REMOVE CENTER PILLAR GARNISH LH |
| 31. REMOVE ROPE HOOK ASSEMBLY |
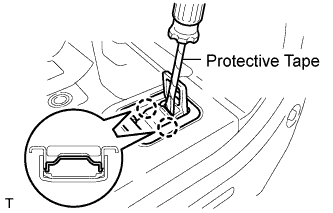 |
Using a screwdriver with its tip wrapped in protective tape, disengage the 2 claws and remove the cover.
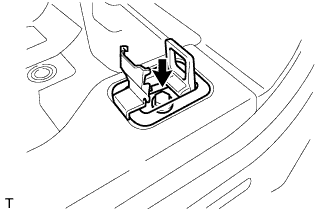 |
Remove the bolt and rope hook.
| 32. REMOVE REAR FLOOR MAT SUPPORT PLATE |
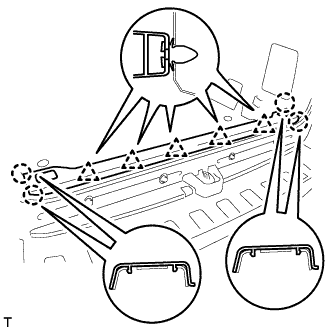 |
Disengage the 5 clips and 4 claws, and remove the rear floor mat support plate.
| 33. REMOVE QUARTER TRIM PANEL ASSEMBLY RH |
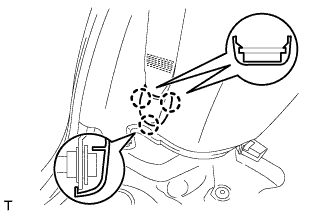 |
Disengage the 3 claws and remove the outer lap belt anchor cover.
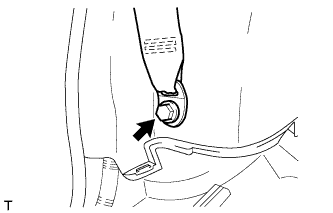 |
Remove the bolt and outer lap belt anchor.
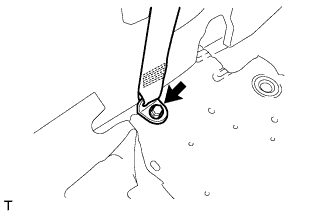 |
Remove the bolt and outer lap belt anchor.
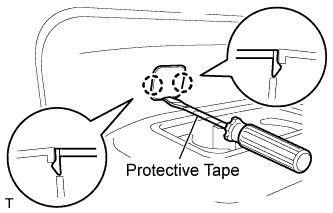 |
Using a screwdriver with its tip wrapped in protective tape, disengage the 2 claws and remove the cover.
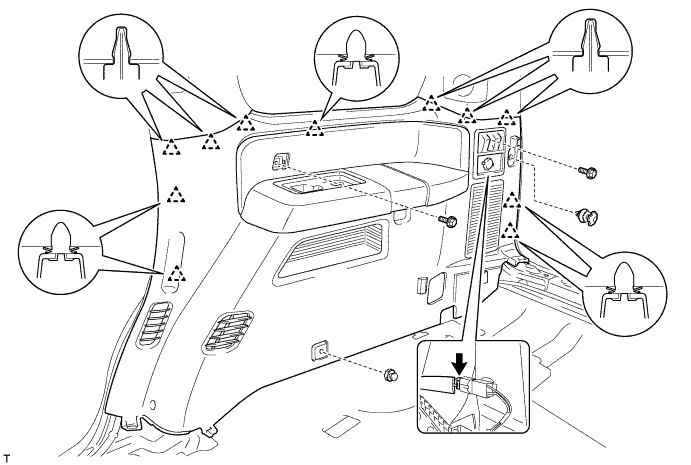
Remove the 2 bolts and 2 clips.
Disengage the 11 clips.
Disconnect the connector and remove the quarter trim panel.
| 34. REMOVE QUARTER TRIM PANEL ASSEMBLY LH |
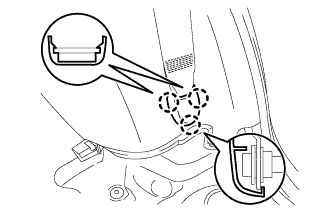 |
Disengage the 3 claws and remove the outer lap belt anchor cover.
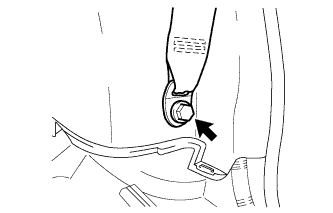 |
Remove the bolt and outer lap belt anchor.
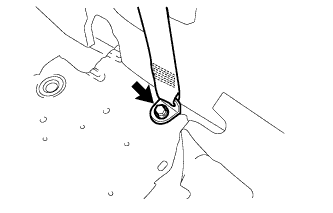 |
Remove the bolt and outer lap belt anchor.
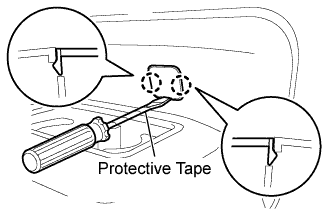 |
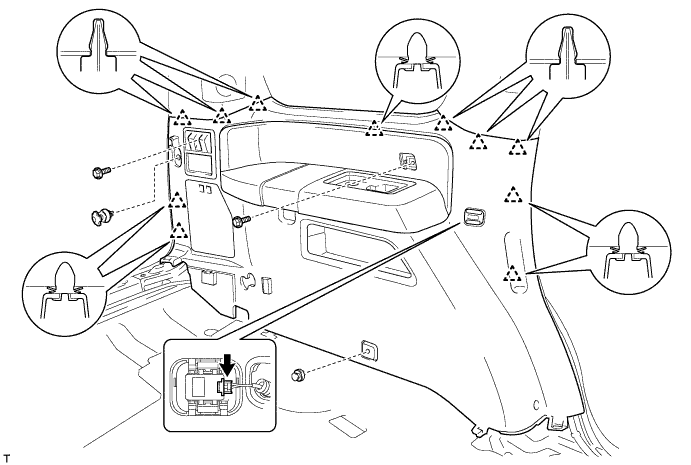
Using a screwdriver with its tip wrapped in protective tape, disengage the 2 claws and remove the cover.
Remove the 2 bolts and 2 clips.
Disengage the 11 clips.
Disconnect the connector and remove the quarter trim panel.
| 35. REMOVE QUARTER TRIM PANEL ASSEMBLY RH (for Power Seat) |
|
Disengage the 3 claws and remove the outer lap belt anchor cover.
|
Remove the bolt and outer lap belt anchor.
|
Remove the bolt and outer lap belt anchor.
|
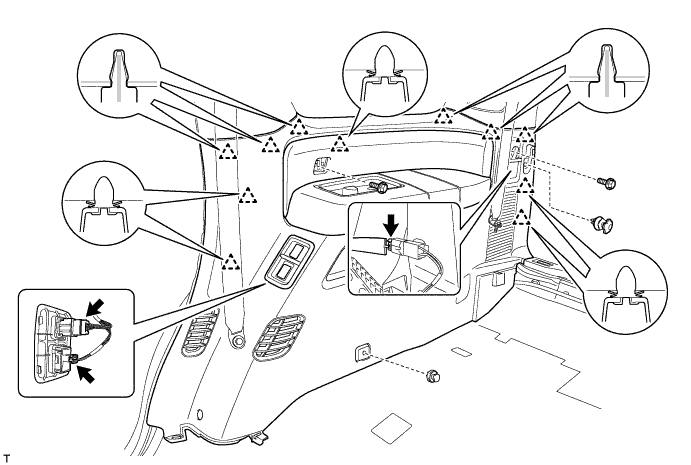
Using a screwdriver with its tip wrapped in protective tape, disengage the 2 claws and remove the cover.
Remove the 2 bolts and 2 clips.
Disengage the 11 clips.
Disconnect the 3 connectors and remove the quarter trim panel.
| 36. REMOVE QUARTER TRIM PANEL ASSEMBLY LH (for Power Seat) |
|
Disengage the 3 claws and remove the outer lap belt anchor cover.
|
Remove the bolt and outer lap belt anchor.
|
Remove the bolt and outer lap belt anchor.
|
Using a screwdriver with its tip wrapped in protective tape, disengage the 2 claws and remove the cover.
Remove the 2 bolts and 2 clips.
Disengage the 2 clamps and remove the wire harness.
Disengage the 11 clips and 2 clamps.
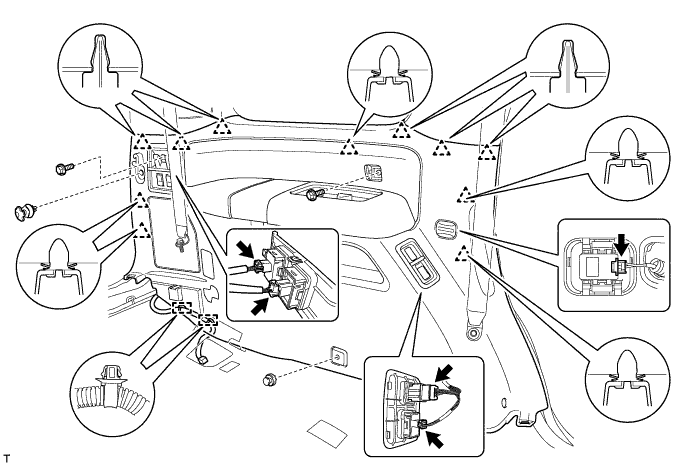
Disconnect the 3 connectors and remove the quarter trim panel.
| 37. REMOVE REAR WINDOW SIDE GARNISH ASSEMBLY RH |
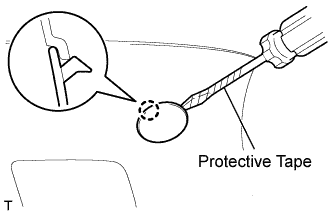 |
Using a screwdriver with its tip wrapped in protective tape, disengage the claw and remove the cover.
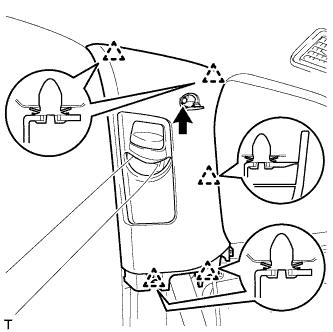 |
Remove the bolt.
Detach the 5 clips.
Pass the rear seat outer belt floor anchor through the rear window side garnish, and remove the rear window side garnish.
| 38. REMOVE REAR WINDOW SIDE GARNISH ASSEMBLY LH |
| 39. REMOVE REAR WINDOW NO. 2 SIDE GARNISH ASSEMBLY RH |
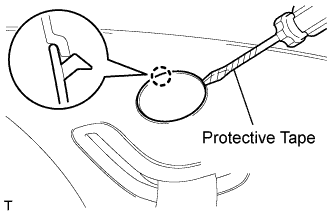 |
Using a screwdriver with its tip wrapped in protective tape, disengage the claw and remove the cover.
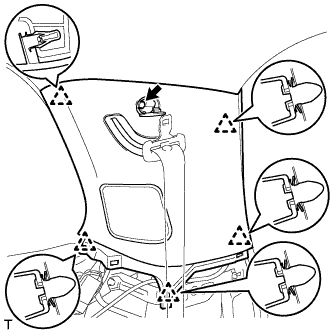 |
Remove the bolt.
Disengage the 5 clips.
Pass the rear seat outer belt floor anchor through the rear window No. 2 side garnish, and remove the rear window No. 2 side garnish.
| 40. REMOVE REAR WINDOW NO. 2 SIDE GARNISH ASSEMBLY LH (w/o Power Back Door) |
| 41. REMOVE REAR WINDOW NO. 2 SIDE GARNISH ASSEMBLY LH (w/ Power Back Door) |
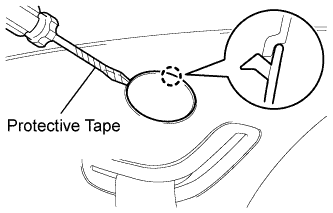 |
Using a screwdriver, disengage the claw and remove the cover.
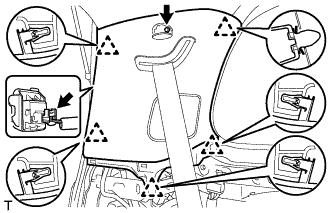 |
Remove the bolt.
Disengage the 5 clips.
Disconnect the connector.
Pass the rear seat outer belt floor anchor through the rear window No. 2 side garnish, and remove the rear window No. 2 side garnish.
| 42. REMOVE ROOF CONSOLE BOX ASSEMBLY |
for Short Type:
Remove the roof console box .
for Long Type:
Remove the roof console box .
| 43. REMOVE NO. 1 ROOM LIGHT ASSEMBLY |
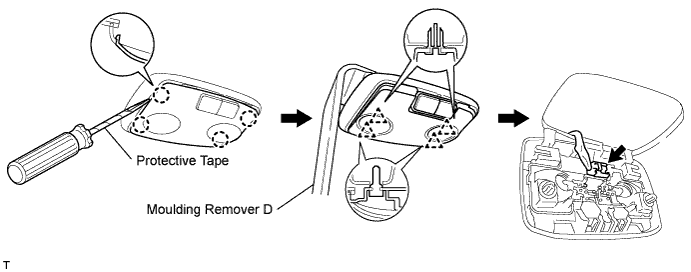
Using a screwdriver with its tip wrapped in protective tape, disengage the 4 claws and remove the lens.
Using a moulding remover D, disengage the 4 clips.
Disconnect the connector and then remove the No. 1 room light assembly.
| 44. REMOVE NO. 1 ROOM LIGHT ASSEMBLY (w/ Rear Seat Entertainment System) |
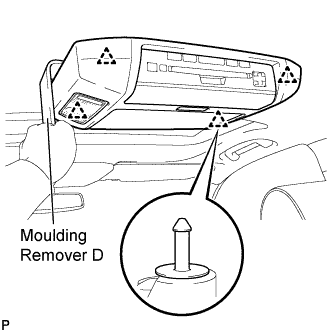 |
Using a moulding remover D, disengage the 4 clips.
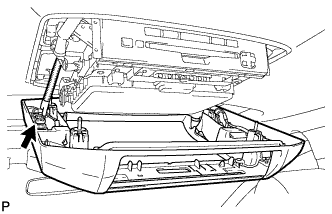 |
Disconnect the connector and then remove the No. 1 room light assembly.
| 45. REMOVE NO. 2 ROOM LIGHT ASSEMBLY |
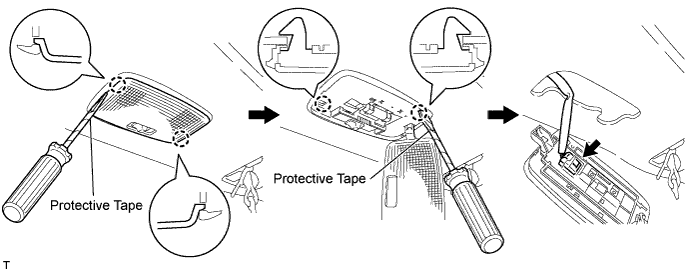
Using a screwdriver with its tip wrapped in protective tape, disengage the 2 claws and remove the lens.
Using a screwdriver with its tip wrapped in protective tape, disengage the 2 claws.
Disconnect the connector and then remove the No. 2 room light assembly.
| 46. REMOVE VISOR BRACKET COVER RH |
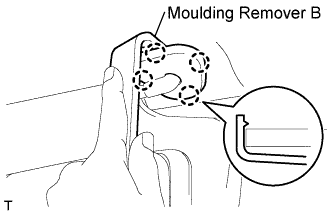 |
Using a moulding remover B with its tip wrapped in protective tape, disengage the 4 claws and remove the visor bracket cover.
| 47. REMOVE VISOR BRACKET COVER LH |
| 48. REMOVE VISOR ASSEMBLY RH (w/o Illumination) |
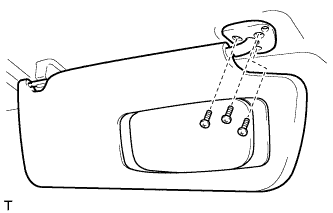 |
Remove the 3 screws and visor.
| 49. REMOVE VISOR ASSEMBLY LH (w/o Illumination) |
| 50. REMOVE VISOR ASSEMBLY RH (w/ Illumination) |
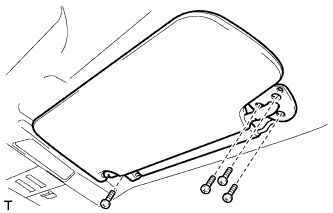 |
Remove the 4 screws.
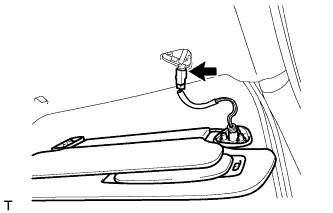 |
Disconnect the connector and then remove the visor.
| 51. REMOVE VISOR ASSEMBLY LH (w/ Illumination) |
| 52. REMOVE ASSIST GRIP SUB-ASSEMBLY |
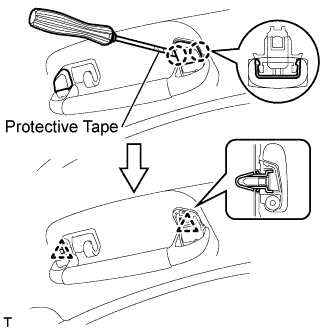 |
Using a screwdriver with its tip wrapped in protective tape, disengage the 4 claws and remove the 2 assist grip covers.
Disengage the 2 clips and remove the assist grip.
| 53. REMOVE ASSIST GRIP PLUG |
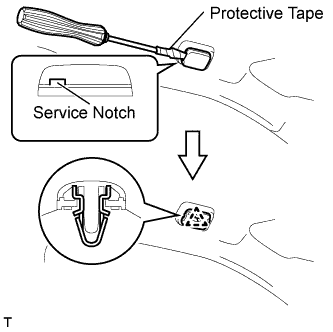 |
Insert a screwdriver with its tip wrapped in protective tape, into the service notch and break off the cap.
Disengage the clip and remove the assist grip plug.
| 54. REMOVE ROOF HEADLINING REAR TRIM COVER LH |
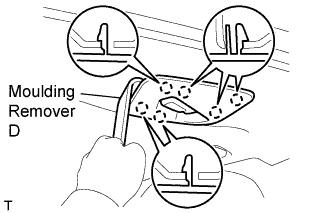 |
Using a moulding remover D, disengage the 6 claws and remove the roof headlining rear trim cover.
| 55. REMOVE REAR VIEW INNER MIRROR STAY HOLDER COVER (w/ EC Mirror) |
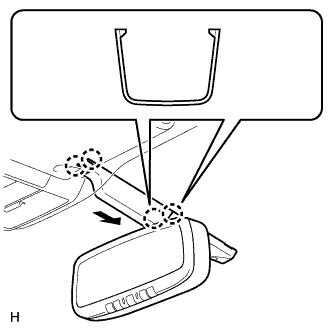 |
Slide the inner rear view mirror stay holder cover in the direction indicated by the arrow in the illustration to detach the 2 claws from the roof headlining, and then detach the 2 claws of the inner rear view mirror stay holder cover from the mirror and remove the inner rear view mirror stay holder cover.
| 56. REMOVE ROOF HEADLINING ASSEMBLY (w/o Rear Seat Entertainment System) |
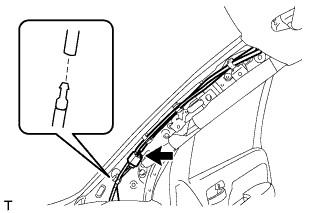 |
Disconnect the connector.
Remove the washer hose and amplifier antenna.
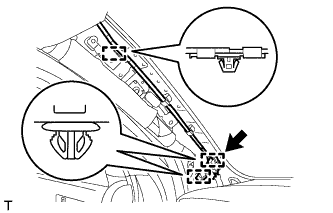 |
Disconnect the connector.
Disengage the 3 clamps and remove the roof wire.
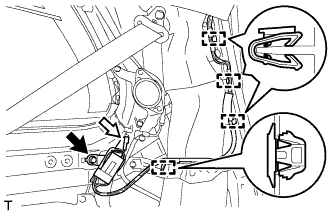 |
Disconnect the connector.
Remove the bolt.
Disengage the 4 clamps and remove the amplifier antenna.
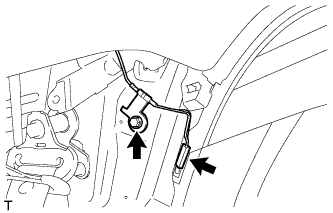 |
Disconnect the connector.
Remove the bolt and amplifier antenna.
Disconnect the satellite radio antenna connector.
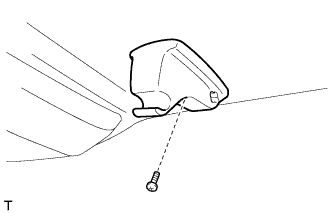 |
Remove the screw and visor holder.
Disengage the clip.
Remove the washer hose and the roof headlining.
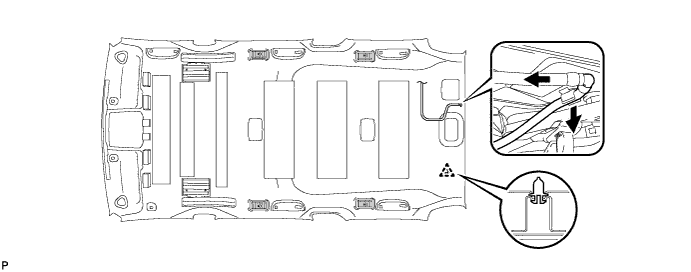
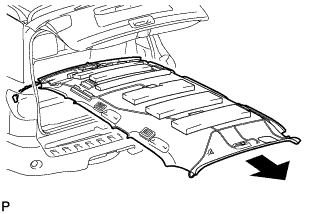 |
Take out the roof headlining from the cabin as shown in the illustration.
| 57. REMOVE ROOF HEADLINING ASSEMBLY (w/ Rear Seat Entertainment System) |
|
Disconnect the connector.
Remove the washer hose and amplifier antenna.
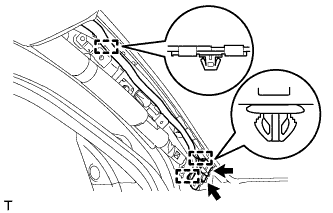 |
Disconnect the 2 connectors.
Disengage the 3 clamps and remove the roof wire.
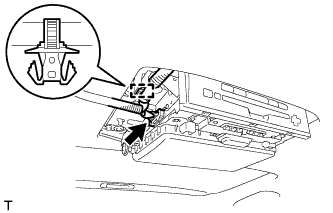 |
Disconnect the connector.
Disengage the clamp and remove the wire harness.
|
Disconnect the connector.
Remove the bolt.
Disengage the 4 clamps and remove the amplifier antenna.
|
Disconnect the connector.
Remove the bolt and amplifier antenna.
|
Remove the screw and visor holder.
Disengage the clip.
Remove the washer hose and the roof headlining.
|
Take out the roof headlining from the cabin as shown in the illustration.
| 58. REMOVE ROOF HEADLINING ASSEMBLY (w/ Sliding Roof) |
|
Disconnect the connector.
Remove the washer hose and amplifier antenna.
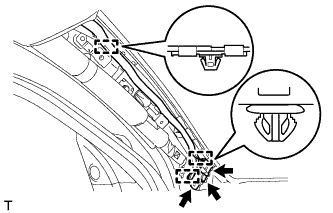 |
Disconnect the 3 connectors.
Disengage the 3 clamps and remove the roof wire.
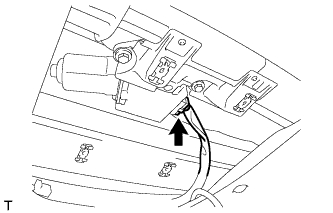 |
Disconnect the connector.
|
Disconnect the connector.
Remove the bolt.
Disengage the 4 clamps and remove the amplifier antenna.
|
Disconnect the connector.
Remove the bolt and amplifier antenna.
Disengage the clip and 14 fasteners.
Remove the washer hose and the roof headlining.
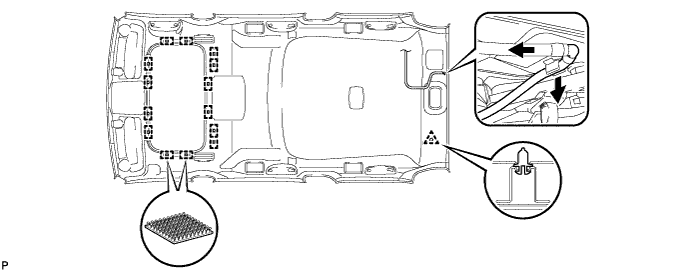
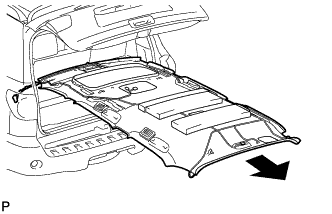 |
Take out the roof headlining from the cabin as shown in the illustration.