3UR-FBE FUEL FUEL TANK REMOVAL
PROCEDURE

 1.DISCHARGE FUEL SYSTEM PRESSURE
Discharge the fuel system pressure (See page Engine / Hybrid System>3UR-FBE FUEL>FUEL SYSTEM>PRECAUTION).
77310A
2.REMOVE FUEL TANK CAP
77209D
3.DISCONNECT FUEL TANK MAIN TUBE SUB-ASSEMBLY
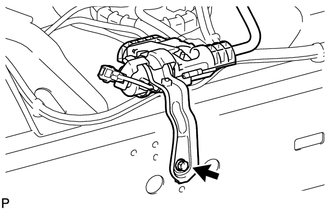
Remove the bolt and disconnect the fuel pressure switching valve.
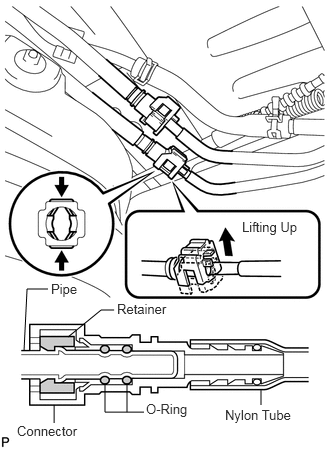
Detach the lock claws by lifting up the cover, as shown in the illustration.
Pinch and pull the main tube connector to disconnect the fuel tank main tube sub-assembly connector from the pipe.
- NOTICE:
- ·
Check for foreign matter in the pipe and around the connector. Clean if necessary. Foreign matter may damage the O-ring or cause leaks in the seal between the pipe and connector.
·Do not use any tools to separate the pipe and connector.
·Do not forcefully bend or twist the nylon tube.
·Check for foreign matter on the pipe seal surface. Clean if necessary.
·Put the pipe and connector ends in plastic bags to prevent damage and foreign matter contamination.
·If the pipe and connector are stuck together, pinch the connector between your fingers and turn it carefully to disconnect it.
77204A
4.DISCONNECT FUEL TANK RETURN TUBE
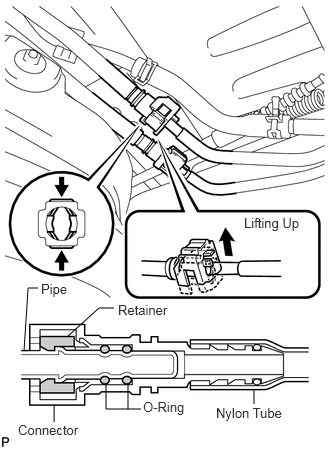
Detach the lock claws by lifting up the cover, as shown in the illustration.
Pinch and pull the return tube connector to disconnect the fuel tank return tube connector from the pipe.
- NOTICE:
- ·
Check for foreign matter in the pipe and around the connector. Clean if necessary. Foreign matter may damage the O-ring or cause leaks in the seal between the pipe and connector.
·Do not use any tools to separate the pipe and connector.
·Do not forcefully bend or twist the nylon tube.
·Check for foreign matter on the pipe seal surface. Clean if necessary.
·Put the pipe and connector ends in plastic bags to prevent damage and foreign matter contamination.
·If the pipe and connector are stuck together, pinch the connector between your fingers and turn it carefully to disconnect it.
77100
5.REMOVE FUEL TANK ASSEMBLY
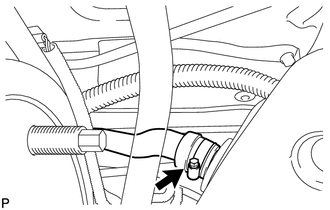
Disconnect the fuel tank to filler pipe hose from the fuel tank assembly.
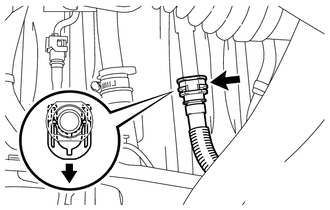
Pull up the retainer and disconnect the vent line hose.
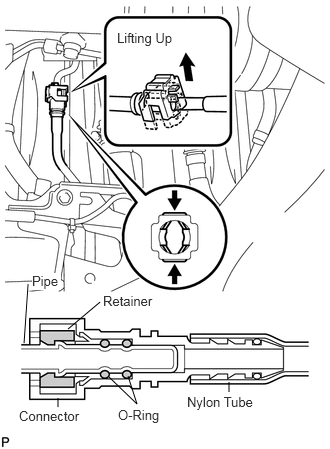
Detach the lock claws by lifting up the cover, as shown in the illustration.
Disconnect the fuel tank breather tube from the fuel tank inlet pipe sub-assembly.
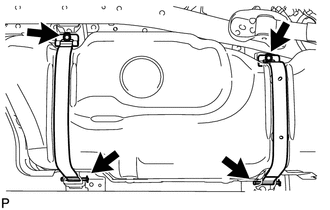
Set a transmission jack underneath the fuel tank assembly.
Remove the 2 bolts, 2 clips, 2 pins and 2 fuel tank bands.
Slowly lower the transmission jack slightly.
- NOTICE:
-
Be careful not to cut the wirings.
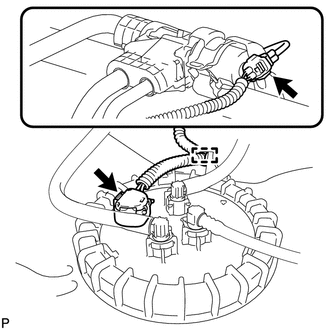
Disconnect the wire harness clamp from the fuel tank assembly.
Disconnect the fuel pump connector and fuel pressure switching valve connector, and then lower the transmission jack.
- NOTICE:
- ·
Before this procedure, check the connector for dirt, mud or other contamination.
·Do not use any tools in this procedure.
77204A
6.REMOVE FUEL TANK RETURN TUBE
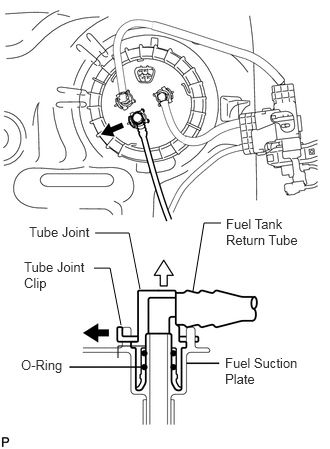
Remove the tube joint clip and pull out the fuel tank return tube to remove it.
- NOTICE:
- ·
Remove any dirt and foreign matter on the fuel tube joint before performing this work.
·Do not allow any scratches or foreign matter on the parts when disconnecting them, as the fuel tube joint contains the O-rings that seal the plug.
·Perform this work by hand. Do not use any tools.
·Do not forcibly bend, twist or turn the nylon tube.
·Protect the disconnected part by covering it with a plastic bag and tape after disconnecting the fuel tube.
77697
7.REMOVE NO. 1 FUEL TANK HEAT INSULATOR
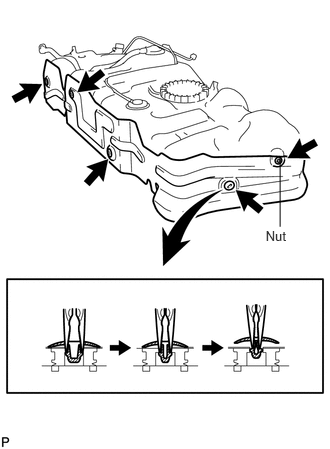
Remove the nut from the heat insulator.
Using needle-nose pliers, remove the 4 clips shown in the illustration and No. 1 fuel tank heat insulator.
8.REMOVE FUEL PRESSURE SWITCHING VALVE ASSEMBLY
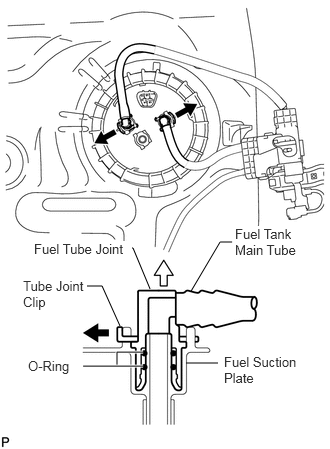
Remove the 2 tube joint clips and pull out the 2 fuel tank main tubes. Then remove the fuel pressure switching valve assembly.
- NOTICE:
- ·
Remove any dirt and foreign matter on the fuel tube joint before performing this work.
·Do not allow any scratches or foreign matter on the parts when disconnecting them, as the fuel tube joint contains the O-rings that seal the plug.
·Perform this work by hand. Do not use any tools.
·Do not forcibly bend, twist or turn the nylon tube.
·Protect the disconnected part by covering it with a plastic bag and tape after disconnecting the fuel tubes.
77020A
9.REMOVE FUEL SUCTION WITH PUMP AND GAUGE TUBE ASSEMBLY