3UR-FBE EMISSION CONTROL EMISSION CONTROL SYSTEM ON-VEHICLE INSPECTION
PROCEDURE

 1.INSPECT FUEL CUT-OFF RPM
Start and warm up the engine.
Open the throttle valve and keep the engine speed at 3000 rpm.
Use a sound scope to check for injector operating noise.
Check that when the accelerator pedal is released, injector operation noise stops momentarily and then resumes.
If the result is as not specified, check the injector, wiring and ECM.
2.VISUALLY INSPECT HOSES, CONNECTIONS AND GASKETS
Check that there are no cracks, leaks or damage.
- HINT:
-
Separation of the engine oil dipstick, oil filler cap, ventilation hose, etc. may cause an engine failure or engine malfunctions. Disconnection, looseness or cracks in the parts of the air induction system between the throttle body and cylinder head will allow air suction and cause an engine failure or engine malfunctions.
- NOTICE:
- ·
Detachment or other problems with the engine oil dipstick, filler cap, ventilation hose and other components may cause the engine to run improperly.
·Disconnection, looseness or cracks in the parts of the air induction system between the throttle body and cylinder head will allow air suction and cause an engine failure or engine failure malfunctions.
If the result is not as specified, replace parts as necessary.
3.INSPECT FUEL CUT-OFF VALVE AND FILL CHECK VALVE
Disconnect the vent line hose from the charcoal canister assembly.
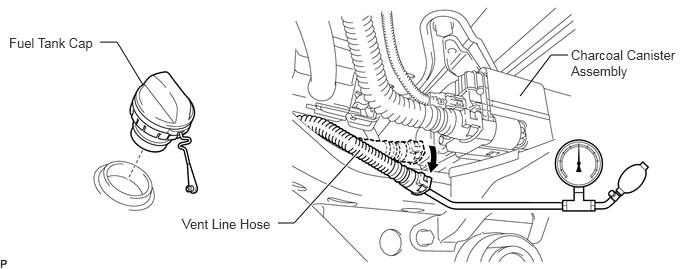
Connect the pressure gauge to the vent line hose.
Fill the fuel tank assembly with fuel.
Apply pressure of 4 kPa (41 gf/cm2, 0.6 psi) to the vent port of the fuel tank assembly.
- HINT:
-
In the condition that the fuel is full, as the float value of the fill check valve is closed and has no ventilation, it is necessary to check the fuel amount (volume).
Remove the fuel tank cap, and check that the pressure inside the tank drops.
If pressure does not drop, replace the fuel tank assembly.
Reconnect the vent line hose to the charcoal canister assembly.
4.CHECK AIR INLET LINE
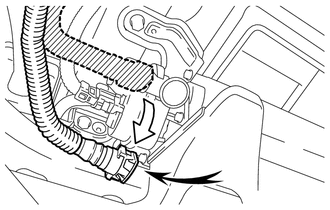
Disconnect the air inlet line hose from the charcoal canister assembly.
Check that there is ventilation in the air inlet line.
- HINT:
-
If air cannot flow freely into the air inlet line, repair or replace it.
Reconnect the air inlet line hose to the charcoal canister assembly.
5.INSPECT PRESSURE SENSOR
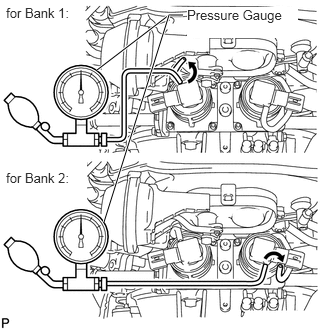
Connect a pressure gauge to the air pressure sensor as shown in the illustration.
Connect the Techstream to the DLC3.
Turn the ignition switch to ON and turn the Techstream main switch on.
Enter the following menus: Powertrain / Engine and ECT / Data List / All Data / Air pump pressure (absolute), Air pump2 pressure (absolute).
Check that the pressure displayed on the Techstream fluctuates when applying pressure to the pressure sensor with the pressure gauge.
- OK:
Pressure fluctuates in response to pressure applied with pressure gauge.
- HINT:
-
The Techstream displays the air pump pressure (Air pump pressure (absolute) and Air pump2 pressure (absolute)) as absolute pressure.
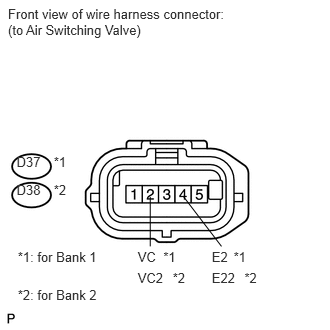
Check the power source voltage.
Disconnect the connector.
Measure the voltage according to the value(s) in the table below.
- Standard Voltage:
Tester Connection Switch Condition Specified Condition D37-2 (VC) - D37-4 (E2) Ignition switch ON 4.75 to 5.25 V D38-2 (VC2) - D38-4 (E22)