3UR-FE LUBRICATION OIL AND OIL FILTER REPLACEMENT
CAUTION / NOTICE / HINT
- CAUTION:
- ·
Prolonged and repeated contact with engine oil will result in the removal of natural oils from the skin, leading to dryness, irritation and dermatitis. In addition, used engine oil contains potentially harmful contaminants which may cause skin cancer.
·Precautions should be taken when replacing engine oil to minimize the risk of your skin making contact with used engine oil. Protective clothing and gloves that cannot be penetrated by oil should be worn. The skin should be washed with soap and water, or use waterless hand cleaner, to remove any used engine oil thoroughly. Do not use gasoline, thinners, or solvents.
·In order to protect the environment, used oil and used oil filters must be disposed of at designated disposal sites.
PROCEDURE

 1.DRAIN ENGINE OIL
Remove the oil filler cap.
Remove the oil pan drain plug and gasket, and drain the engine oil into a container.
Install a new gasket and the oil pan drain plug.
- Torque:
- 40 N*m (408 kgf*cm, 30 ft.*lbf)
51441
2.REMOVE NO. 1 ENGINE UNDER COVER
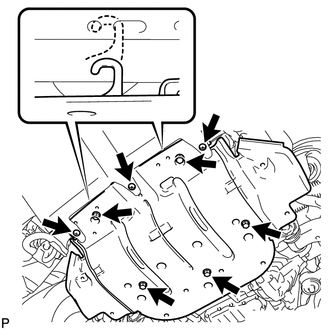
Remove the 3 screws and 5 bolts.
Unhook the engine under cover from the vehicle body as shown in the illustration.
15643
3.REMOVE OIL FILTER DRAIN PLUG
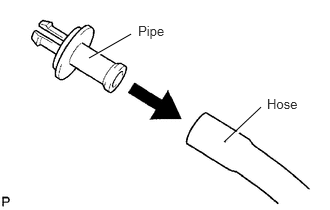
Connect a hose with an inside diameter of 15 mm (0.591 in.) to the pipe.
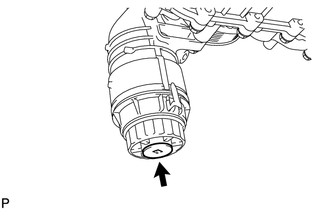
Remove the oil filter drain plug.
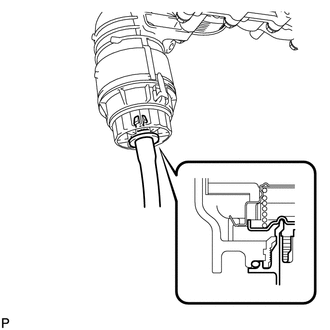
Install the pipe to the oil filter cap.
- HINT:
-
Use a container to catch the draining oil.
- NOTICE:
-
If the O-ring is removed with the drain plug, install the O-ring together with the pipe.
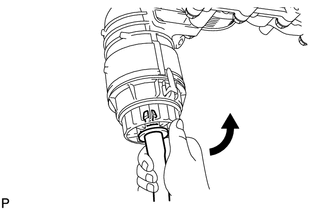
Check that oil is drained from the oil filter. Then disconnect the pipe and remove the O-ring, as shown in the illustration.
15620
4.REMOVE OIL FILTER CAP ASSEMBLY
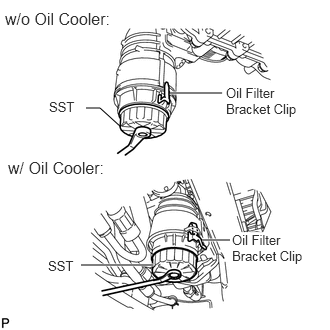
Using SST, remove the oil filter cap.
- SST
- 09228-06501
- NOTICE:
-
Do not remove the oil filter bracket clip.
04152
5.REMOVE OIL FILTER ELEMENT
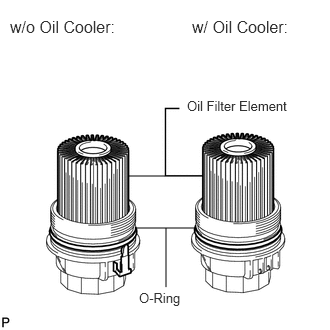
Remove the oil filter element and O-ring from the oil filter cap.
- NOTICE:
-
Be sure to remove the O-ring for the cap by hand, without using any tools, to prevent damage to the cap's O-ring groove.
04152
6.INSTALL OIL FILTER ELEMENT
Clean the inside of the oil filter cap, its threads and its O-ring groove.
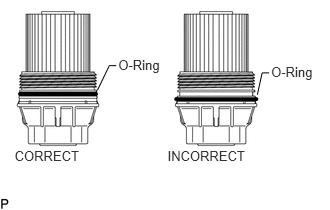
Apply a small amount of engine oil to a new O-ring and install it to the oil filter cap.
- NOTICE:
- ·
Be sure to install the O-ring in the proper location, otherwise oil may leak.
·Do not twist the O-ring.
15620
7.INSTALL OIL FILTER CAP ASSEMBLY
Install a new oil filter element to the oil filter cap.
Remove any dirt or foreign matter from the installation surface of the engine.
Apply a small amount of engine oil to the O-ring again and temporarily install the oil filter cap.
Using SST, tighten the oil filter cap.
- SST
- 09228-06501
- Torque:
- 25 N*m (255 kgf*cm, 18 ft.*lbf)
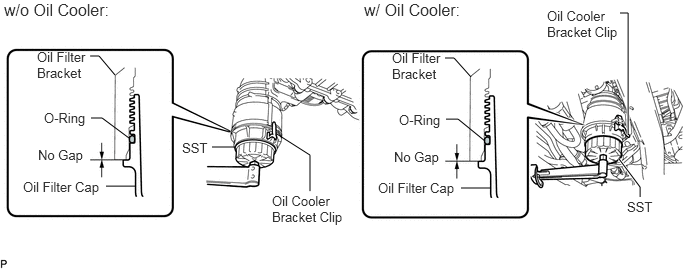
- NOTICE:
- ·
When tightening the oil filter cap, do not remove the oil filter bracket clip.
·Make sure that the oil filter is installed securely as shown in the illustration.
·Be careful that the O-ring does not get caught between any surrounding parts.
·After tightening the oil filter cap, make sure that there is no gap and that the O-ring is not protruding.
15643
8.INSTALL OIL FILTER DRAIN PLUG
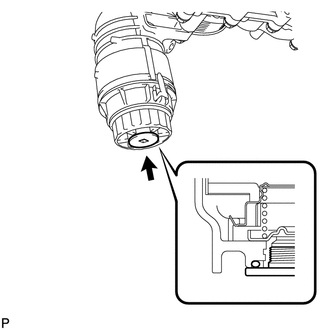
Apply a small amount of engine oil to a new drain plug O-ring, and install it to the oil filter cap.
- NOTICE:
-
Before installing the O-ring, remove any dirt or foreign matter from the installation surface of the oil filter cap.
Install the oil filter drain plug.
- Torque:
- 13 N*m (127 kgf*cm, 9 ft.*lbf)
- NOTICE:
-
Be careful that the O-ring does not get caught between any surrounding parts.
9.ADD ENGINE OIL
Add fresh oil.
- Standard Oil Grade:
Oil Grade Oil Viscosity (SAE) ILSAC multigrade engine oil 0W-20
- Standard Oil Capacity:
Item Specified Condition Drain and refill without oil filter change 7.1 liters (7.5 US qts, 6.2 Imp. qts) Drain and refill with oil filter change 7.5 liters (7.9 US qts, 6.6 Imp. qts) Dry fill 9.3 liters (9.8 US qts, 8.2 Imp. qts)
Install the oil filler cap.
10.INSPECT FOR OIL LEAK
Start the engine. Make sure that there are no oil leaks from the area that was worked on.
11.CHECK ENGINE OIL LEVEL
51441
12.INSTALL NO. 1 ENGINE UNDER COVER
Hook the engine under cover to the vehicle body as shown in the illustration.
Install the 3 screws and 5 bolts.
Bolt
- Torque:
- 29 N*m (296 kgf*cm, 21 ft.*lbf)
Screw
- Torque:
- 3.0 N*m (31 kgf*cm, 27 in.*lbf)