AUDIO / VIDEO AUDIO AND VISUAL SYSTEM OPERATION CHECK
CHECK PANEL & STEERING SWITCH
- HINT:
- ·
The radio and display receiver assembly panel switches are checked in the following procedure.
·Illustrations may differ from the actual vehicle screen depending on the device settings and options. Therefore, some detailed areas may not be exactly the same as on the actual vehicle screen.
·Some of the following functions may also differ from the actual vehicle depending on the device settings and options.
Enter diagnostic mode (See page Audio / Visual / Telematics>AUDIO / VIDEO>AUDIO AND VISUAL SYSTEM>DTC CHECK / CLEAR).
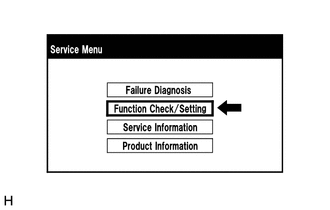
Select "Function Check/Setting" from the "Service Menu" screen.
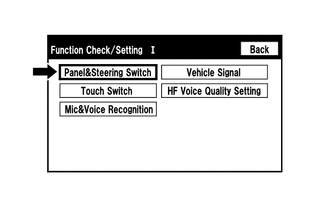
Select "Panel&Steering Switch" from the "Function Check/Setting I" screen.
Panel & Steering Switch Check Mode
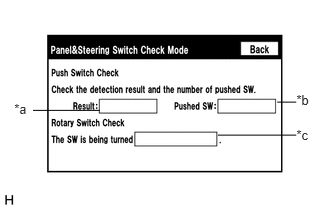
Operate each switch and check that the number of switches pushed and the switch conditions are correctly displayed.
| Display | Content |
|---|---|
| *a: Switch condition | "Pushed" is displayed when any switch is pushed |
| *b: Number of pushed switch | ·
Number of switches pushed at once is displayed ·
If more than 3 switches are pushed at once, "More than 3" is displayed |
| *c: Rotary switch direction | Direction of rotary switch is displayed |
- NOTICE:
-
When the return switch on the remote operation board is pressed and held for 3 seconds or more, diagnostic mode will be canceled.
CHECK TOUCH SWITCH
- HINT:
- ·
The touch switches on the screen are checked in the following procedure.
·Illustrations may differ from the actual vehicle screen depending on the device settings and options. Therefore, some detailed areas may not be exactly the same as on the actual vehicle screen.
Enter diagnostic mode (See page Audio / Visual / Telematics>AUDIO / VIDEO>AUDIO AND VISUAL SYSTEM>DTC CHECK / CLEAR).
Select "Function Check/Setting" from the "Service Menu" screen.
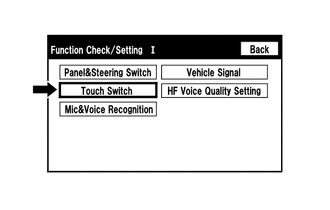
Select "Touch Switch" from the "Function Check/Setting I" screen.
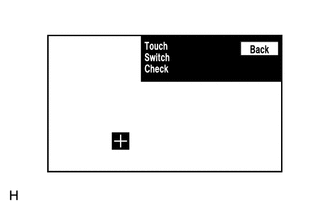
Touch Switch Check
Touch the display anywhere in the open area to perform the check when the "Touch Switch Check" screen is displayed.
- HINT:
- ·
A "+" mark is displayed where the display is touched.
·The "+" mark remains on the display even after the finger is removed.
CHECK MICROPHONE
- HINT:
- ·
The microphone and microphone input level are checked in the following procedure.
·Illustrations may differ from the actual vehicle screen depending on the device settings and options. Therefore, some detailed areas may not be exactly the same as on the actual vehicle screen.
Enter diagnostic mode (See page Audio / Visual / Telematics>AUDIO / VIDEO>AUDIO AND VISUAL SYSTEM>DTC CHECK / CLEAR).
Select "Function Check/Setting" from the "Service Menu" screen.
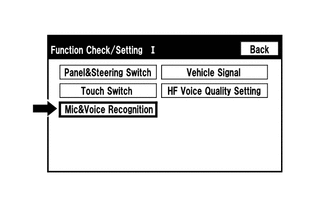
Select "Mic&Voice Recognition" from the "Function Check/Setting I" screen.
Microphone and Voice Recognition Check
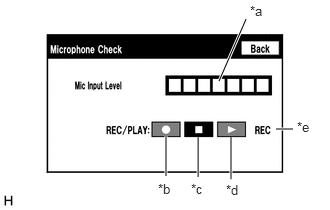
When speaking into the microphone, check that the microphone input level meter changes according to the input level.
| Display | Content |
|---|---|
| *a: Microphone input level meter | Monitors the microphone input level every 0.1 seconds and displays the results in 8 different levels |
| *b: Recording switch* | Starts recording |
| *c: Stop switch* | Stops recording and playing |
| *d: Play switch* | Plays the recorded voice |
| *e: Recording indicator* | Comes on while recording |
*: w/ Recording Function
CHECK VEHICLE SIGNAL
- HINT:
- ·
Vehicle signals received by the radio and display receiver assembly are checked in the following procedure.
·Illustrations may differ from the actual vehicle screen depending on the device settings and options. Therefore, some detailed areas may not be exactly the same as on the actual vehicle screen.
Enter diagnostic mode (See page Audio / Visual / Telematics>AUDIO / VIDEO>AUDIO AND VISUAL SYSTEM>DTC CHECK / CLEAR).
Select "Function Check/Setting" from the "Service Menu" screen.
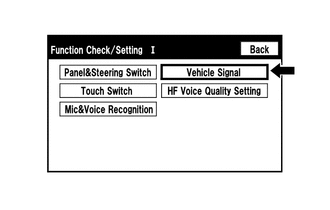
Select "Vehicle Signal" from the "Function Check/Setting I" screen.
Vehicle Signal Check Mode
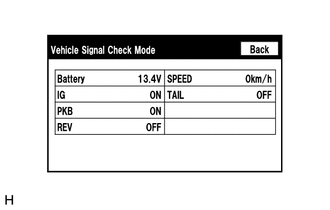
When the "Vehicle Signal Check Mode" screen is displayed, check all the vehicle signal conditions.
| Display | Content |
|---|---|
| Battery | Battery voltage is displayed |
| IG | Ignition switch ON/OFF state is displayed |
| PKB | Parking brake ON/OFF state is displayed |
| REV | Reverse signal ON/OFF state is displayed |
| SPEED | Vehicle speed is displayed in km/h |
| TAIL | Tail signal (light control switch) ON/OFF state is displayed |
- HINT:
- ·
Only items sending vehicle signals will be displayed.
·This screen displays vehicle signals received by the radio and display receiver assembly.
·This screen is updated once per second.
CHECK HF VOICE QUALITY SETTING
- HINT:
- ·
The hands-free voice of a "Bluetooth" compatible phone can be adjusted using the following procedure.
·Illustrations may differ from the actual vehicle screen depending on the device settings and options. Therefore, some detailed areas may not be exactly the same as on the actual vehicle screen.
Enter diagnostic mode (See page Audio / Visual / Telematics>AUDIO / VIDEO>AUDIO AND VISUAL SYSTEM>DTC CHECK / CLEAR).
Select "Function Check/Setting" from the "Service Menu" screen.
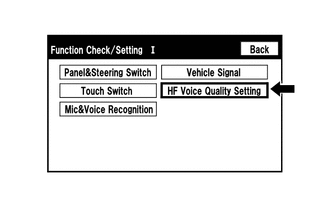
Select "HF Voice Quality Setting" from the "Function Check/Setting I" screen.
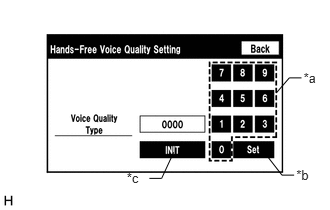
Hands-Free Voice Quality Setting
| *a | Numeric keypad |
| *b | Setting button |
| *c | Reset button |
- NOTICE:
-
Sound quality may deteriorate when the receive voice level is changed more than necessary. For this reason, check that the received voice quality is still acceptable after changing this setting.
If necessary, refer to the table below to adjust the voice quality type with the numeric keypad.
When adjusting the settings, use the number pad on the screen to input the voice quality type according to the table.
| Parameter | Target Phenomenon | Voice Quality Type | Effect of Changing Voice Quality | Negative Effect of Changing Voice Quality |
|---|---|---|---|---|
| A
(Noise) |
The other party hears background noise when listening to your voice | 1000 | The amount of background noise the other party hears when listening to your voice is reduced | The volume of voice the other party hears when listening to your voice may temporarily drop |
| B
(Noise) |
The other party hears a lot of background noise when listening to your voice | 2000 | The amount of background noise the other party hears when listening to your voice is sharply reduced. | The volume of voice the other party hears when listening to your voice may temporarily drop. |
| C
(Noise) |
The other party hears weak echoes | 0100 | The amount of echo is reduced (low level) | Sound quality of the other party deteriorates (low level) |
| D
(Noise) |
The other party hears strong echoes | 0200 | The amount of echo is reduced (high level) | Sound quality of the other party deteriorates (high level) |
| Parameter | Target Phenomenon | Voice Quality Type | Effect of Changing Voice Quality | Negative Effect of Changing Voice Quality |
|---|---|---|---|---|
| A+C | The other party hears background noise and weak echoes when listening to your voice | 1100 | ·
The amount of background noise the other party hears when listening to your voice is reduced ·
The amount of echo is reduced (low level) |
·
The volume of voice may drop temporarily ·
Sound quality of the other party deteriorates (low level) |
| A+D | The other party hears background noise and strong echoes when listening to your voice | 1200 | ·
The amount of background noise the other party hears when listening to your voice is reduced ·
The amount of echo is reduced (high level) |
·
The volume of voice may drop temporarily ·
Sound quality of the other party deteriorates (high level) |
| B+C | The other party hears a lot of background noise and weak echoes when listening to your voice | 2100 | ·
The amount of background noise the other party hears when listening to your voice is sharply reduced ·
The amount of echo is reduced (low level) |
·
The volume of voice may drop temporarily ·
Sound quality of the other party deteriorates (low level) |
| B+D | The other party hears a lot of background noise and strong echoes when listening to your voice | 2200 | ·
The amount of background noise the other party hears when listening to your voice is sharply reduced ·
The amount of echo is reduced (high level) |
·
The volume of voice may drop temporarily ·
Sound quality of the other party deteriorates (high level) |
- HINT:
- ·
The default value is "0000".
·Settings will be applied when the setting button is selected.
·If voice quality type values that are not in the table are input, the setting will not be applied and a positive effect may not be gained.
·If the quality of phone calls decreases due to the changed settings, return the settings to "0000" by pressing the "INIT" switch.
CHECK SPEAKER
This function is used when checking the speaker wiring and whether the speakers are functioning properly.
Illustrations may differ from the actual vehicle screen depending on the device settings and options. Therefore, some detailed areas may not be shown exactly the same as on the actual vehicle screen.
Turn audio mode on and play any audio source.
- HINT:
-
This audio source will be used for the speaker check.
Enter diagnostic mode (See page Audio / Visual / Telematics>AUDIO / VIDEO>AUDIO AND VISUAL SYSTEM>DTC CHECK / CLEAR).
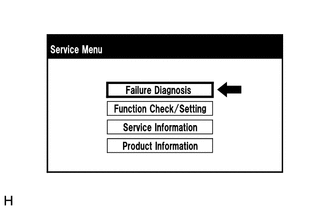
Select "Failure Diagnosis" from the "Service Menu" screen.
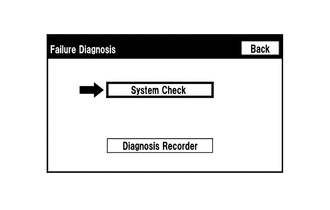
Select "System Check" from the "Failure Diagnosis" screen.
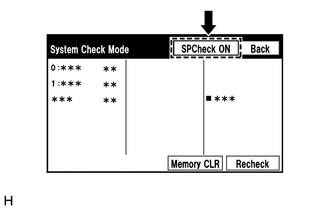
Select "SPCheck ON" from the "System Check Mode" screen.
Check the speaker wiring and check that the speakers are functioning properly.
- HINT:
- ·
Check that each speaker outputs sound from the selected audio source properly.
·"SPCheck OFF" is displayed during the speaker check.
·Sound can be heard from the speakers around the vehicle in order beginning from a speaker on the front side.
Sound stops when any of the following conditions are met:
The "SPCheck OFF" switch is pressed.
The ignition switch is turned off.
Diagnostic mode is turned off.
The screen is changed to another screen.
Audio mode is turned off.
CONNECTED NAVIGATION RESET PROCEDURE
- NOTICE:
-
Check if the problem symptom has been repaired after each step.
Duplicate the problem symptom.
Check for DTCs and repair the systems for which any DTCs are output (See page Audio / Visual / Telematics>AUDIO / VIDEO>AUDIO AND VISUAL SYSTEM>DTC CHECK / CLEAR).
Check cellular phone compatibility.
Go to the Toyota website and check if the cellular phone/vehicle is compatible.
If the cellular phone is not compatible, recommend to the customer a compatible cellular phone.
Reset the application on the phone. The procedure varies based on the phone model (ex. iPhone and Android devices).
Reset the phone.
- NOTICE:
-
Only perform this step if the customer is present and approves.
Turn off the phone and remove the battery for 15 seconds. For instructions on how to reset cellular devices, refer to the appropriate manufacturer's website.
Delete all paired devices from the cellular phone.
The procedure varies based on the phone model. Contact the service provider or cellular phone manufacturer if assistance is required.
Remove the Connected Navigation app from the phone.
- NOTICE:
-
Only perform this step if the customer is present and approves.
The procedure varies based on the phone model. Contact the service provider or cellular phone manufacturer if assistance is required.
Reinstall the Connected Navigation app on the phone. (If removed.)
The procedure varies based on the phone model. Contact the service provider or cellular phone manufacturer if assistance is required.
Disconnect the cable from the negative (-) battery terminal.
- NOTICE:
-
After turning the ignition switch off, waiting time may be required before disconnecting the cable from the negative (-) battery terminal. Therefore, make sure to read the disconnecting the cable from the negative (-) battery terminal notices before proceeding with work (See page General>INTRODUCTION>REPAIR INSTRUCTION>PRECAUTION).
Record all radio station presets.
Disconnect the cable from the negative (-) battery terminal and leave it disconnected for 2 minutes.
Delete all personal data from the head unit.
Record all radio station presets.
Delete all personal data from the head unit.
- NOTICE:
-
Only perform this step if the customer is present and approves.
- HINT:
-
Re-installation of applications must be completed before applications will appear on the head unit.