HEATING / AIR CONDITIONING COMPRESSOR INSTALLATION
PROCEDURE

 1.ADJUST COMPRESSOR OIL
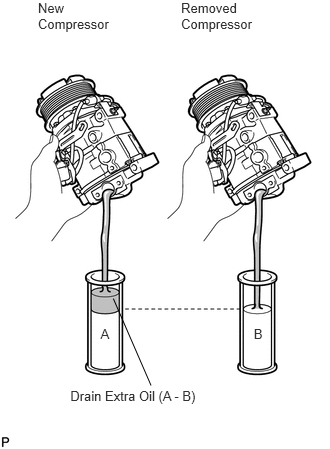
When replacing the compressor with a new one, gradually discharge the refrigerant gas from the service valve. Then drain the following amount of oil from the new compressor before installation, so that the amount of oil contained in it is the same as that in the compressor to be replaced.
- HINT:
-
New compressors are filled with sufficient oil for the whole cycle. Therefore, it is necessary to drain residual oil from the condenser and cooling unit.
- Standard:
(The amount of oil inside a new compressor: 190 (+15) cc (6.4 (+0.51) fl.oz.)) - (The amount of oil remaining in the removed compressor) = The amount of oil to be removed when replacing the compressor
- NOTICE:
- ·
When checking the compressor oil level, observe the precautions for cooler removal/ installation.
·If a new compressor is installed without removing the same amount of oil as is remaining in the vehicle pipes, the amount of oil will be too large. This prevents heat exchange in the refrigerant cycle and will be causes a refrigeration failure.
·If the amount of oil remaining in the removed compressor is too low, check for an oil leak.
·Use ND-OIL8 or equivalent for compressor oil.
88320
2.INSTALL COOLER COMPRESSOR ASSEMBLY
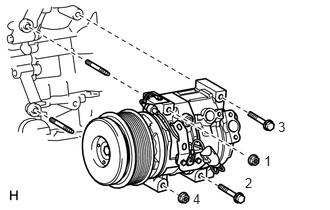
Install the cooler compressor and 2 stud bolts.
- Torque:
- 10 N*m (102 kgf*cm, 7 ft.*lbf)
Install the 2 bolts and 2 nuts.
- Torque:
- 25 N*m (250 kgf*cm, 18 ft.*lbf)
- HINT:
-
Tighten the bolts and nuts in the order shown in the illustration to install the cooler compressor.
Connect the connector.
88711
3.CONNECT NO. 1 COOLER REFRIGERANT DISCHARGE HOSE
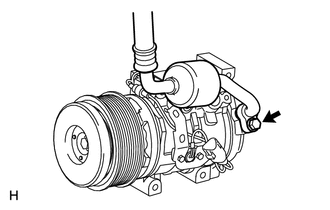
Remove the attached vinyl tape from the cooler refrigerant discharge hose.
Sufficiently apply compressor oil to a new O-ring and the fitting surface of the cooler compressor.
- Compressor oil:
ND-OIL 8 or equivalent
Install the O-ring on the cooler refrigerant discharge hose.
Connect the cooler refrigerant discharge hose on the cooler compressor with the bolt.
- Torque:
- 9.8 N*m (100 kgf*cm, 87 in.*lbf)
88712
4.CONNECT NO. 1 COOLER REFRIGERANT SUCTION HOSE
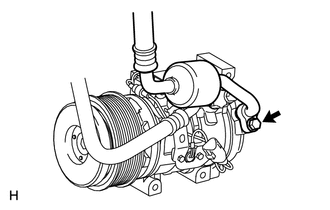
Remove the attached vinyl tape from the cooler refrigerant suction hose.
Sufficiently apply compressor oil to a new O-ring and the fitting surface of the cooler compressor.
- Compressor oil:
ND-OIL 8 or equivalent
Install the O-ring on the cooler refrigerant suction hose.
Connect the cooler refrigerant suction hose on the cooler compressor with the bolt.
- Torque:
- 9.8 N*m (100 kgf*cm, 87 in.*lbf)
53886G
5.INSTALL FENDER APRON MUDGUARD SEAL LH
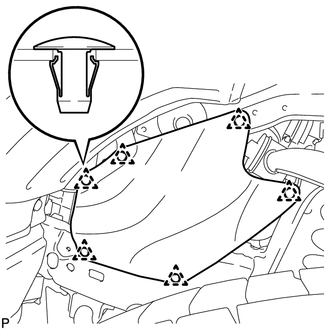
Install the seal with the 6 clips.
16361A
6.INSTALL FAN & GENERATOR V BELT
Install the fan and generator V belt (See page Engine / Hybrid System>3UR-FE ENGINE MECHANICAL>DRIVE BELT>INSTALLATION).
7.CHARGE REFRIGERANT
8. WARM UP ENGINE
9.INSPECT FOR REFRIGERANT LEAK