Home › ENGINE › 2GR-FE LUBRICATION › OIL PUMP

OIL PUMP > INSTALLATION

for Preparation Click here


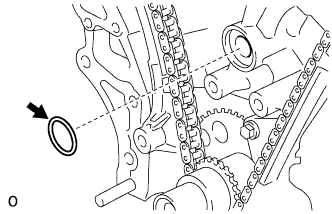
1. INSTALL TIMING CHAIN CASE OIL SEAL


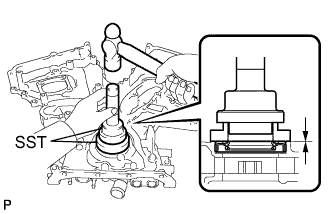
    A125109E04
  1. Using SST, tap in a new oil seal until its surface is flush with the timing chain case edge.

    SST
    09223-22010  
    09506-35010  

    NOTICE:
    1. Keep the lip free from foreign matter.
    2. Do not tap on the oil seal at an angle.
    3. Make sure that the oil seal edge does not stick out of the timing chain case.


2. INSTALL TIMING CHAIN COVER SUB-ASSEMBLY


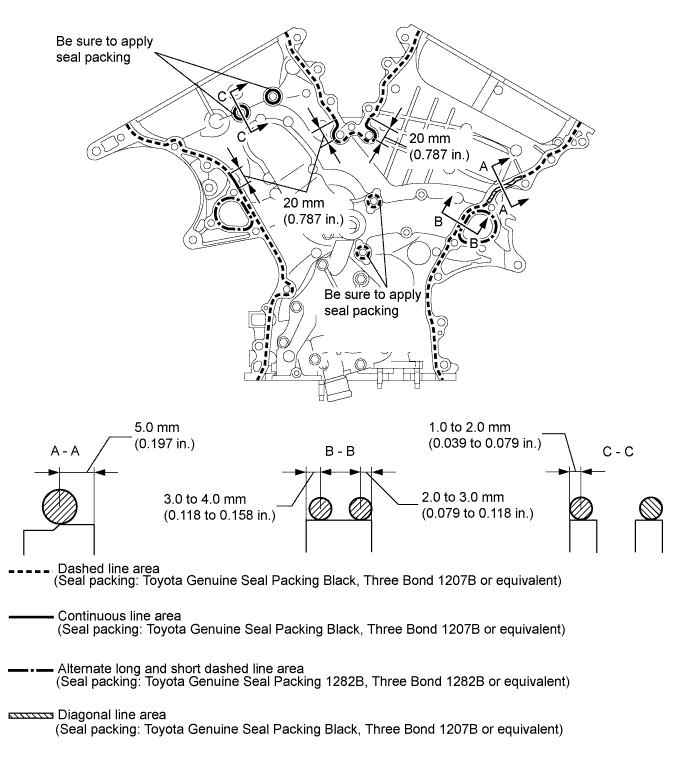
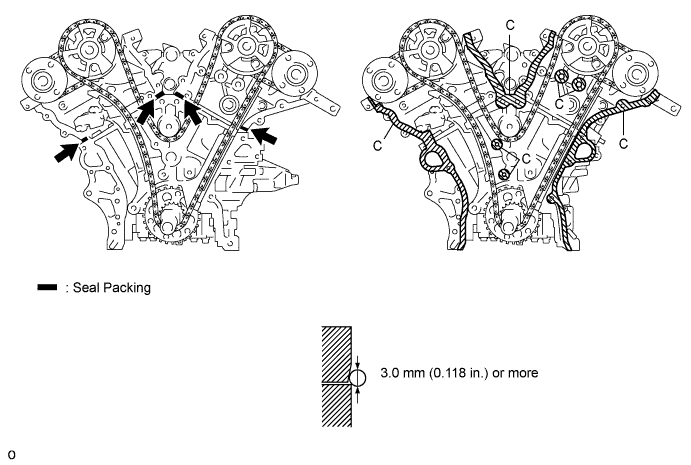
  1. Apply seal packing in a continuous line to the engine unit as shown in the following illustration.


    A132228E03

    Seal packing:
    Toyota Genuine Seal Packing Black, Three Bond 1207B or equivalent

    Seal diameter:
    3.0 mm (0.118 in.)

    NOTICE:
    1. Be sure to clean and degrease the contact surfaces, especially the surfaces indicated by C in the illustration.
    2. When the contact surfaces are wet, wipe them with an oil-free cloth before applying seal packing.
    3. Install the chain cover within 3 minutes.
    4. Do not start the engine for at least 2 hours after installing.


  1. Apply seal packing in a continuous line to the timing chain cover as shown in the following illustration.


    A134901E05

    Seal packing:
    Toyota Genuine Seal Packing Black, Three Bond 1207B or equivalent
    Toyota Genuine Seal Packing 1282B, Three Bond 1282B or equivalent

    NOTICE:
    1. When the contact surfaces are wet, wipe them with an oil-free cloth before applying seal packing.
    2. Install the chain cover within 3 minutes and tighten the bolts within 15 minutes after applying seal packing.
    3. Do not start the engine for at least 2 hours after installing it.


    Apply seal packing as follows:

    Area
    Seal Packing Diameter
    Application Position from Inside Seal Line
    Continuous Line Area
    4.5 mm (0.177 in.) or more
    3.0 to 4.0 mm (0.118 to 0.158 in.)
    Alternate Long and Short Dashed Line Area
    3.5 mm (0.138 in.) or more
    2.0 to 3.0 mm (0.079 to 0.118 in.)
    Dashed Line Area
    3.5 mm (0.138 in.) or more
    3.0 to 4.0 mm (0.118 to 0.158 in.)
    Diagonal Line Area
    6.0 mm (0.236 in.) or more
    5.0 mm (0.197 in.)


    A128017E01
  1. Install a new gasket.


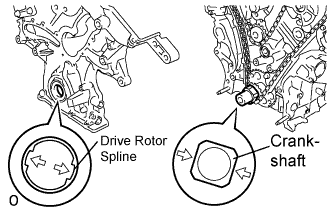
    A132229E02
  1. Align the oil pump's drive rotor spline and the crankshaft as shown in the illustration. Install the spline and chain cover to the crankshaft.


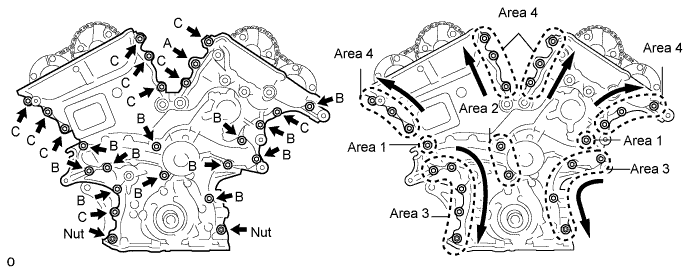
  1. Temporarily tighten the timing chain cover with the 23 bolts and 2 nuts.


    A128019E02

    Bolt length 
    Item
    Length
    Bolt A
    40 mm (1.57 in.)
    Bolt B
    55 mm (2.17 in.)
    Bolt C
    25 mm (0.98 in.)

    NOTICE:
    Make sure that there is no oil on the bolt threads.

  1. Fully tighten the bolts in: Area 1 and Area 2.

    Torque:
    21 N*m{ 214 kgf*cm , 15 ft.*lbf }

  1. Fully tighten the bolts and nuts in: Area 3.

    Torque:
    21 N*m{ 214 kgf*cm , 15 ft.*lbf }

    HINT:
    Tighten the bolts and nuts from top to bottom as shown in the illustration.

  1. Fully tighten the bolts in: Area 4.

    Torque:
    Bolt A:
    43 N*m{ 438 kgf*cm , 32 ft.*lbf }
    Except bolt A:
    21 N*m{ 214 kgf*cm , 15 ft.*lbf }

    HINT:
    Tighten the bolts from bottom to top as shown in the illustration.


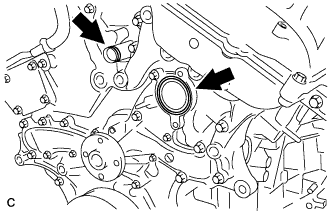
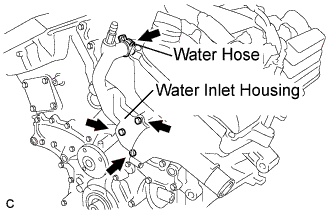
3. INSTALL WATER INLET HOUSING


    A128122
  1. Install a new water inlet housing gasket and water outlet pipe O-ring.


    A133375E04
  1. Install the water inlet housing with the 2 bolts and nut.

    Torque:
    10 N*m{ 102 kgf*cm , 7 ft.*lbf }

    NOTICE:
    Be careful not to allow the O-ring to get caught between the parts.

  1. Connect the water hose.


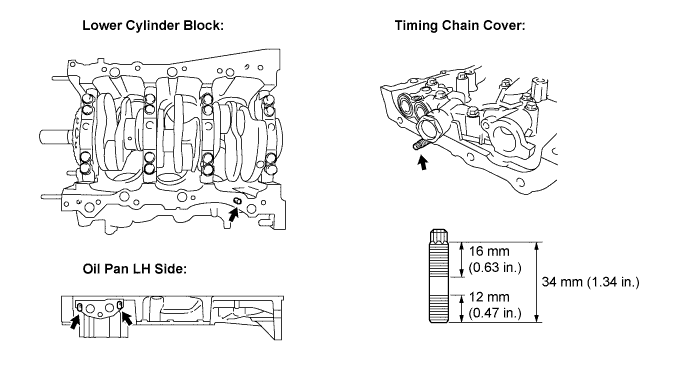
4. INSTALL OIL PAN SUB-ASSEMBLY


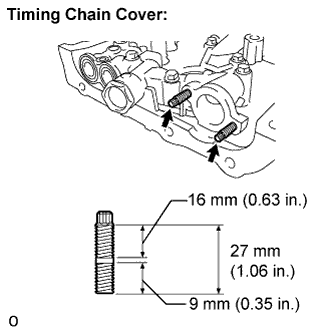
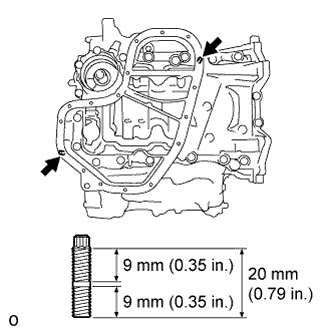
  1. When replacing a stud bolt, install it by using an E8 "TORX" socket wrench.


    A136298E01

    Torque:
    10 N*m{ 102 kgf*cm , 7 ft.*lbf }


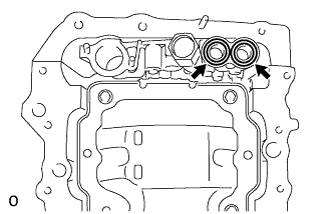
    A129684
  1. Install 2 new O-rings.


    A132232E01
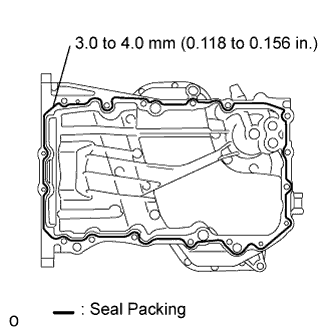
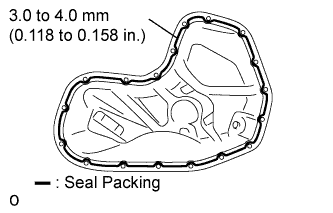
  1. Apply seal packing in a continuous line as shown in the illustration.

    Seal packing:
    Toyota Genuine Seal Packing Black, Three Bond 1207B or equivalent

    Seal diameter:
    3.0 to 4.0 mm (0.118 to 0.156 in.)

    NOTICE:
    1. Remove any oil from the contact surface.
    2. Install the oil pan within 3 minutes after applying seal packing.
    3. Do not start the engine for at least 2 hours after installing.


    A162634E02
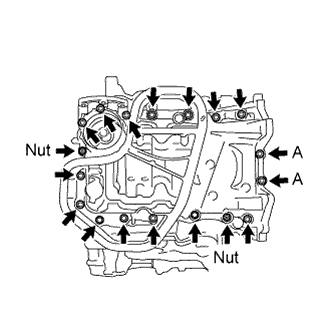
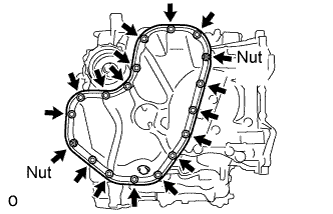
  1. Install the oil pan with the 16 bolts and 2 nuts.

    Torque:
    10 N*m{ 102 kgf*cm , 7 ft.*lbf } for bolt A
    21 N*m{ 214 kgf*cm , 15 ft.*lbf } for bolts except A


5. INSTALL OIL STRAINER SUB-ASSEMBLY


    A134963E01
  1. Using an E6 "TORX" socket, install the stud bolts as shown in the illustration.

    Torque:
    4.0 N*m{ 41 kgf*cm , 35 in.*lbf }


    A129681E01
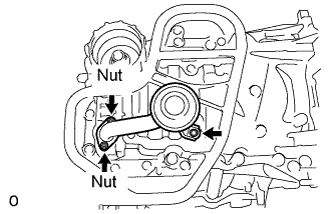
  1. Install a new gasket and the oil strainer sub-assembly with the bolt and 2 nuts.

    Torque:
    10 N*m{ 102 kgf*cm , 7 ft.*lbf }


6. INSTALL NO. 2 OIL PAN SUB-ASSEMBLY


    A134964E01
  1. Using an E6 "TORX" socket, install the stud bolts as shown in the illustration.

    Torque:
    4.0 N*m{ 41 kgf*cm , 35 in.*lbf }


    A132234E02
  1. Apply seal packing in a continuous line as shown in the illustration.

    Seal packing:
    Toyota Genuine Seal Packing Black, Three Bond 1207B or equivalent

    Seal diameter:
    3.0 to 4.0 mm (0.118 to 0.158 in.)

    NOTICE:
    1. Remove any oil from the contact surface.
    2. Install the oil pan No. 2 within 3 minutes after applying seal packing.
    3. Do not start the engine for at least 2 hours after installing.


    A129680E01
  1. Install the oil pan with the 16 bolts and 2 nuts.

    Torque:
    10 N*m{ 102 kgf*cm , 7 ft.*lbf }


7. INSTALL CYLINDER HEAD COVER SUB-ASSEMBLY (for Bank 1)


    A132236E01
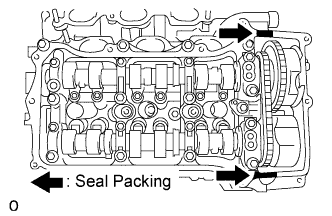
  1. Apply seal packing as shown in the illustration.

    Seal packing:
    Toyota Genuine Seal Packing Black, Three Bond 1207B or equivalent

    NOTICE:
    1. Remove any oil from the contact surface.
    2. Install the head cover within 3 minutes after applying seal packing.
    3. Do not start the engine for at least 2 hours after installing.


    A129699
  1. Install 3 new gaskets as shown in the illustration.

  1. Install a new gasket to the head cover.


    A129679E01
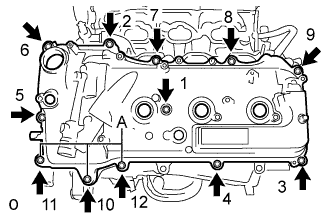
  1. Install a head cover with the 12 bolts and a new washer.

    Torque:
    21 N*m{ 214 kgf*cm , 15 ft.*lbf } for bolt A
    10 N*m{ 102 kgf*cm , 7 ft.*lbf } for bolts except A

    HINT:
    After tightening all bolts, check the tightening torque of 1 and 11. Retighten the bolt if necessary.


8. INSTALL CYLINDER HEAD COVER SUB-ASSEMBLY (for Bank 2)


    A132237E01
  1. Apply seal packing as shown in the illustration.

    Seal packing:
    Toyota Genuine Seal Packing Black, Three Bond 1207B or equivalent

    NOTICE:
    1. Remove any oil from the contact surface.
    2. Install the head cover within 3 minutes after applying seal packing.
    3. Do not start the engine for at least 2 hours after installing.


    A129705
  1. Install 3 new gaskets as shown in the illustration.

  1. Install a new cylinder head cover gasket to the cylinder head cover sub-assembly.


    A129678E03
  1. Install the cylinder head cover with the 12 bolts and a new washer.

    Torque:
    21 N*m{ 214 kgf*cm , 15 ft.*lbf } for bolt A
    10 N*m{ 102 kgf*cm , 7 ft.*lbf } for bolts except A

    HINT:
    After tightening all bolts, check the tightening torque of 1 and 10. Retighten the bolt if necessary.


9. INSTALL CRANKSHAFT PULLEY
  1. Align the pulley set key with the key groove of the pulley, and slide on the pulley.


    A122396E01
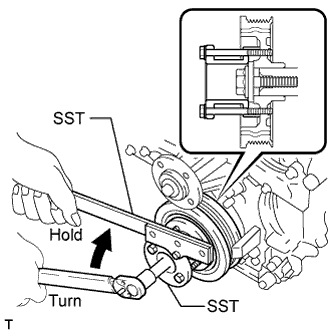
  1. Using SST, install the pulley bolt.

    SST
    09213-70011   (09213-70020)
    09330-00021  

    Torque:
    250 N*m{ 2550 kgf*cm , 184 ft.*lbf }


10. INSTALL OIL COOLER PIPE


    A141494
  1. Install a new gasket to the oil pan sub-assembly.

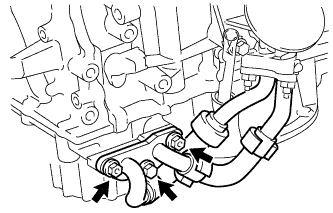
  1. Install the oil cooler pipe with the bolt and 2 nuts.

    Torque:
    21 N*m{ 214 kgf*cm , 16 ft.*lbf }


11. INSTALL NO. 1 OIL PIPE
  1. Make sure that there is no foreign matter on the mesh of the oil control valve filter LH.

    NOTICE:
    Do not touch the mesh when installing the oil control valve filter.


    A135726E01
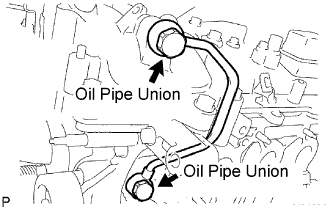
  1. Install the oil control valve filter LH to the oil pipe union. Install new gaskets and temporarily install the oil pipe (on the head cover side).

  1. Install a new gasket and temporarily install the oil pipe (on the cylinder head side) with the oil check valve bolt.

  1. Tighten the oil pipe union (on the head cover side).

    Torque:
    65 N*m{ 663 kgf*cm , 48 ft.*lbf }

  1. Tighten the oil pipe union (on the cylinder head side).

    Torque:
    65 N*m{ 663 kgf*cm , 48 ft.*lbf }

    NOTICE:
    If the link that connects the gaskets is broken, remove the connecting link by using nippers or similar tools.


12. INSTALL OIL PIPE
  1. Make sure that there is no foreign matter on the mesh of the oil control valve filter RH.

    NOTICE:
    Do not touch the mesh when installing the oil control valve filter.


    A187513E02
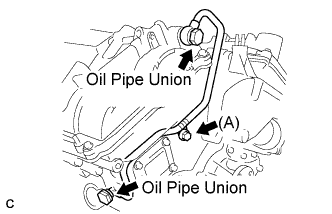
  1. Install the oil control valve filter RH to the oil pipe union. Install new gaskets and temporarily install the oil pipe (on the head cover side).

  1. Install a new gasket and temporarily install the oil pipe (on the cylinder head side) with the oil check valve bolt.

  1. Install the bolt (A) to the cylinder head.

    Torque:
    10 N*m{ 102 kgf*cm , 7 ft.*lbf }

  1. Tighten the oil pipe union (on the cylinder head side).

    Torque:
    65 N*m{ 663 kgf*cm , 48 ft.*lbf }

  1. Tighten the oil pipe union (on the head cover side).

    Torque:
    65 N*m{ 663 kgf*cm , 48 ft.*lbf }

    NOTICE:
    If the link that connects the gaskets is broken, remove the connecting link by using nippers or similar tools.


13. INSTALL OIL LEVEL GAUGE GUIDE SUB-ASSEMBLY


    A155017
  1. Install 2 new O-rings to the oil level gauge guide.

  1. Apply a light coat of engine oil to the O-rings.

  1. Push in the oil level gauge guide end into the guide hole.

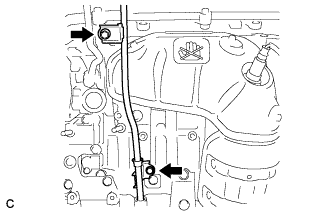
  1. Install the No. 1 oil level gauge guide with the bolt.

    Torque:
    21 N*m{ 214 kgf*cm , 15 ft.*lbf }

  1. Install the No. 2 oil level gauge guide with the bolt.

    Torque:
    21 N*m{ 214 kgf*cm , 15 ft.*lbf }

  1. Install the oil level gauge.


14. INSTALL ENGINE ASSEMBLY WITH TRANSAXLE

HINT:
Click here