DRIVE SHAFT / PROPELLER SHAFT REAR DRIVE SHAFT ASSEMBLY INSTALLATION
PROCEDURE

 42340B
1.INSTALL REAR DRIVE SHAFT ASSEMBLY
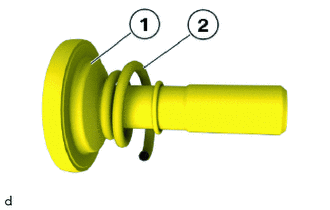
Replace 17 mm hexagon bolt (1) and compression spring (2).
Position the rear drive shaft assembly on the wheel bearing from the center of the vehicle.
Hand-tighten the 17 mm hexagon bolt (1) with the compression spring.
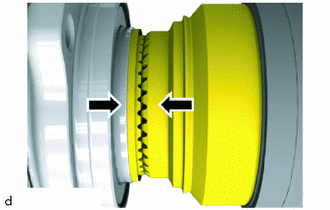
Check whether front gearing is locked tooth in tooth by reciprocally rotating the wheel bearing and the rear drive shaft assembly.
If positive locking is ensured: Press brake pedal.
Tighten the 17 mm hexagon bolt.
- Torque:
- 210 N*m (2141 kgf*cm, 155 ft.*lbf)
Tighten the 17 mm hexagon bolt an additional 90°.
- SST
- 09900-WA010
- HINT:
- ·
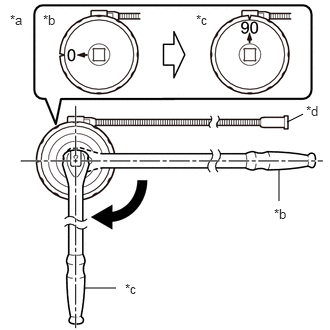 2.99,1.271 3.156,1.188 false 2.906,2.094 2.906,1.76 false 0.875,3 1.208,3 false 0.104,0.125 0.417,0.281 0.313,0.156 10 false *a 0.448,0.125 0.76,0.281 0.313,0.156 10 false *b 2.042,0.125 2.354,0.281 0.313,0.156 10 false *c 3.188,1.073 3.427,1.271 0.24,0.198 10 false *d 2.854,2.146 3.167,2.302 0.313,0.156 10 false *b 1.302,2.927 1.615,3.083 0.313,0.156 10 false *c
*a Example *b Before Tightening *c After Tightening *d Magnetic Portion
·The magnetic portion is used to secure the gauge to the vehicle.
·After first adjusting the needle of the gauge to 0°, tighten to the specified angle.
·Perform the work procedure carefully so that the gauge, etc. does not become tilted.
Install the sealing cap.
41110
2.INSTALL REAR DIFERENTIAL CARRIER ASSEMBLY