AXLE AND DIFFERENTIAL REAR DIFFERENTIAL CARRIER ASSEMBLY INSTALLATION
PROCEDURE

 1.REPLACE REAR DRIVE SHAFT OIL SEAL
- HINT:
-
When reusing the rear differential carrier assembly, use this procedure.
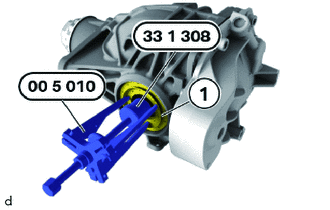
Pull out the rear drive shaft oil seal (1) using special tool 0 490 466 (00 5 010) or 0 492 104 (33 1 308).
- SST
- 09500-WA090
09900-WA210
Replace rear drive shaft oil seal at front.
- HINT:
-
Rear drive shaft oil seal ring are equipped with an installation protection ring. The installation protection ring is used to protect the sealing lip when installing the rear drive shaft assembly.
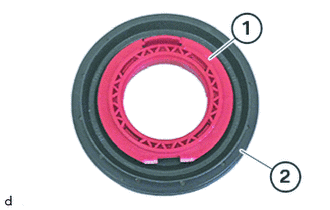
Install the rear drive shaft oil seal (2) using the installation protection ring (1).
Make sure that the installation protection ring does not slide out of the rear drive shaft oil seal.
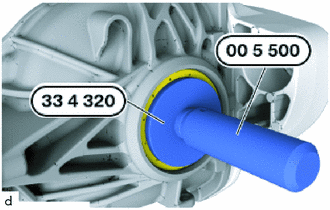
w/o LSD:
Coat housing sheet metal flange and the sealing lips of the new rear drive shaft oil seal with approved differential oil.
Tap in rear drive shaft oil seal with special tools 0 490 475 (00 5 500) and 0 495 313 (33 4 320) up to the limit position.
- SST
- 09500-WA070
09500-WA080
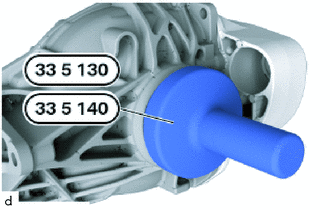
w/ LSD:
Coat housing sheet metal flange and the sealing lips of the new rear drive shaft oil seal with approved differential oil.
Tap in rear drive shaft oil seal with special tools 0 495 860 (33 5 130) and 0 495 862 (33 5 140) up to the limit position.
- SST
- 09500-WA060
09500-WA210
41110
2.INSTALL REAR DIFFERENTIAL CARRIER ASSEMBLY
- NOTICE:
-
Extreme force being required during installation is an indication that the component is damaged or deformed. Check the component; replace if necessary.
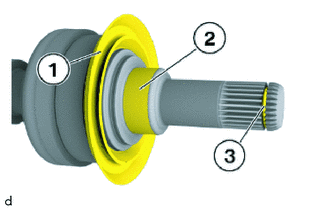
Check the gearing of the rear drive shaft assembly for damage; replace the components if necessary.
Check the dust plate (1) for damage; replace if necessary.
Replace the shaft snap ring (3).
- NOTICE:
-
It is essential to replace the shaft snap ring of the rear drive shaft assembly.
Coat the contact surface (2) of the rear drive shaft assembly with approved differential oil.
- HINT:
-
Use the same procedures for the oposite side.
Lift rear differential carrier assembly.
Swing the rear differential carrier assembly towards the left side.
Press (tilt) the right rear differential carrier assembly downwards.
Guide in the left rear drive shaft assembly upwards.
Insert rear drive shaft assembly into rear differential carrier assembly.
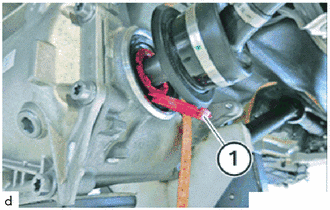
Pull on the tab (1) of the installation protection ring until one of the two predetermined breaking points breaks.
Pull out the assembly protection ring.
- HINT:
-
Use the same procedures for the oposite side.
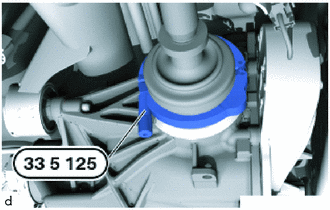
Drive rear drive shaft assembly with special tool 0 495 857 (33 5 125) and a rubber mallet into rear differential carrier assembly.
- SST
- 09500-WA020
09500-WA030
- HINT:
-
Use the same procedures for the oposite side.
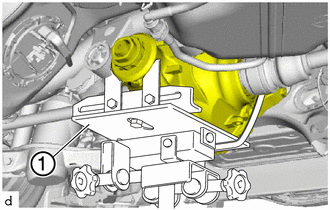
Insert the rear differential carrier assembly into the rear suspension member sub-assembly using the transmission jack (1).
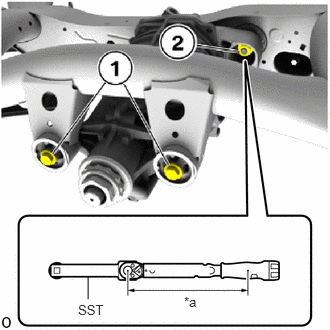
| *a | Torque Wrench Fulcrum Length |
Replace 18 mm bolts (1).
Hand-tighten the 18 mm bolts (1).
Replace the nut (2).
Hand-tighten the nut (2).
Loosen tensioning strap.
Release the transmission jack and put away.
Tighten the 18 mm bolts (1).
- Torque:
- 100 N*m (1020 kgf*cm, 74 ft.*lbf)
Tighten nut (2).
- SST
- 09961-01270
- Torque:
- 165 N*m (1683 kgf*cm, 122 ft.*lbf)
- HINT:
- ·
Calculate the torque wrench reading when changing the fulcrum length of the torque wrench.
Click hereGeneral>INTRODUCTION>REPAIR INSTRUCTION>PRECAUTION
·When using SST (fulcrum length of 200 mm (7.87 in.)) + torque wrench (fulcrum length of 400 mm (13.12 ft.)):
110 N*m (1122 kgf*cm, 81 ft.*lbf)
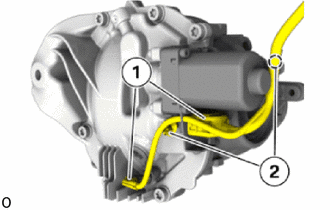
w/ LSD:
Connect connectors (1) and lock.
Attach the cable clip (2).
Connect the ground wire with the bolt.
- Torque:
- 8.0 N*m (82 kgf*cm, 71 in.*lbf)
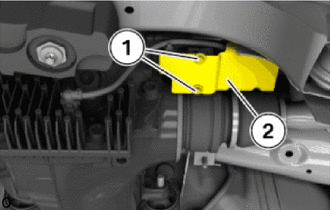
Install the rear differential protector (2) with the bolts (1).
- Torque:
- 4.5 N*m (46 kgf*cm, 40 in.*lbf)
48738
3.INSTALL REAR SUSPENSION ARM COVER LH
48737
4.INSTALL REAR SUSPENSION ARM COVER RH
- HINT:
-
Use the same procedure as for the LH side.
37100
5.INSTALL PROPELLER SHAFT WITH CENTER BEARING ASSEMBLY
6.INSPECT DIFFERENTIAL OIL
7. DELETING WEAR DATA (w/ LSD)
Connect the diagnosis system with the vehicle.
Service functions / Power train / Regulated limited slip differential / Clear wear data