EXTERIOR PANELS / TRIM NAME PLATE INSTALLATION
PROCEDURE

 1.INSTALL SYMBOL EMBLEM
Remove the adhesive residue on the rear bumper assembly and clean the adhesive area with cleaner.
- Cleaner:
Cleaner R2
Install the replace symbol emblem.
Remove the peeling paper from the face of the symbol emblem.
- HINT:
-
After removing the peeling paper, keep the exposed adhesive free from foreign matter.
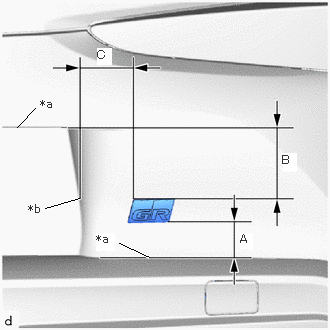
| *a | Rear Bumper Assembly Edge |
| *b | Rear Bumper Assembly End of R |
Install the symbol emblem in the position shown in the illustration.
- HINT:
-
Press the symbol emblem firmly to install it.
- Standard:
Area Specified Condition A 40.9 mm (1.61 in.) B 91.6 mm (3.61 in.) C 84.6 mm (3.33 in.)
2.INSTALL NAME PLATE
Remove the adhesive residue on the rear bumper assembly and clean the adhesive area with the cleaner.
- Cleaner:
Cleaner R2
Install the replace name plate.
Remove the peeling paper from the face of the name plate.
- HINT:
-
After removing the peeling paper, keep the exposed adhesive free from foreign matter.
Install the name plate in the position shown in the illustration.
- HINT:
-
Press the name plate firmly to install it.
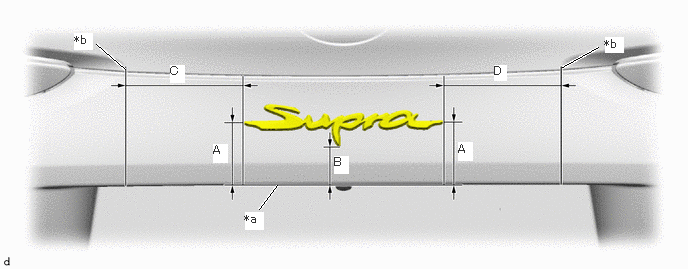
| *a | Rear Bumper Assembly Edge | *b | Rear Bumper Assembly End of R |
- Standard:
Area Specified Condition A 65 mm (2.56 in.) B 40 mm (1.57 in.) C 131 mm (5.16 in.) D 138 mm (5.43 in.)
3.INSTALL NO. 1 REAR NAME PLATE
Remove the adhesive residue on the rear bumper assembly and clean the adhesive area with the cleaner.
- Cleaner:
Cleaner R2
Install the replace No. 1 rear name plate.
Remove the peeling paper from the face of the No. 1 rear name plate.
- HINT:
-
After removing the peeling paper, keep the exposed adhesive free from foreign matter.
Install the No. 1 rear name plate in the position shown in the illustration.
- HINT:
-
Press the No. 1 rear name plate firmly to install it.
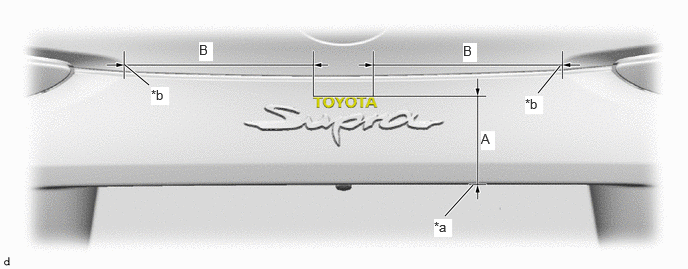
| *a | Rear Bumper Assembly Edge | *b | Rear Bumper Assembly End of R |
- Standard:
Area Specified Condition A 94 mm (3.70 in.) B 200 mm (7.87 in.)
75431A
4.INSTALL NO. 1 BACK DOOR EMBLEM
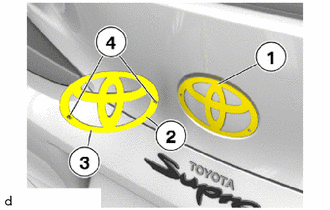
Remove adhesive residue on the tailgate and clean the adhesive area (1) with cleaner.
- Cleaner:
Cleaner R2
Peel off the liner from the adhesive tape (2).
Install a new No. 1 back door emblem (3) using the guides (4) and press it on tightly.
75301A
5.INSTALL FRONT BUMPER EMBLEM SUB-ASSEMBLY
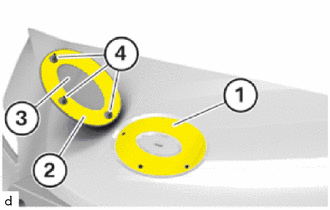
Remove glue residue from the bumper panel and clean the adhesive area (1) with cleaner.
- Cleaner:
Cleaner R2
Peel off the liner from the adhesive tape (2).
Install a new front bumper emblem sub-assembly (3) using the guides (4) and press it on tightly.
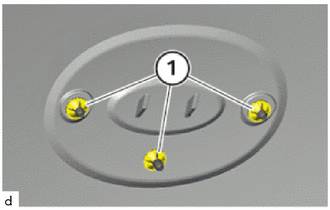
Install the 3 new spring nuts (1).
6.INSTALL FRONT BUMPER ASSEMBLY