PARK ASSIST / MONITORING TELEVISION CAMERA INSTALLATION
PROCEDURE

 1.INSTALL BRACKET FOR REAR VIEW CAMERA
- HINT:
-
Perform this procedure only when replacement of the bracket for rear view camera is necessary.
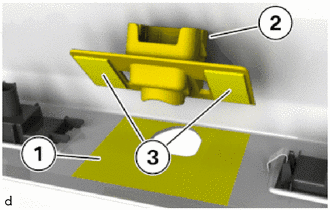
Replace the bracket for rear view camera (2).
Remove adhesive residue on the tailgate and clean the adhesive area (1) with cleaner.
- Cleaner:
Cleaner R2
Peel off the release paper from the bracket for rear view camera.
- HINT:
-
After removing the peeling paper, do not touch the surface of the tape with your fingers or cotton work gloves.
Position the bracket for rear view camera (2) and press the adhesive strips (3) on tight.
- NOTICE:
- ·
Make sure that the rear bumper assembly and the bracket for rear view camera are properly aligned.
·Detaching and reattaching a bracket for rear view camera will degrade its adhesive performance, so if reattachment is necessary, make sure to clean the installation surface again and replace the bracket for rear view camera with a new one.
- HINT:
-
Press the area shown in the illustration with a force of to securely install the bracket for rear view camera to the rear bumper assembly. Confirm there is no clearance between the bracket for rear view camera and rear bumper assembly.
2.INSTALL TELEVISION CAMERA ASSEMBLY
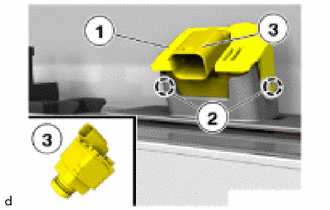
Install the television camera assembly (3).
Attach the claws (2) to install the holder (1).
3.INSTALL REAR BUMPER ASSEMBLY
4. ENCODE/PROGRAM CONTROL UNIT(S)
- NOTICE:
- ·
Use the most recent software version to prevent faults during programming/encoding.
·The battery voltage must not drop below 13.0 V during programming.
·Use only recommended chargers for a low-voltage vehicle electrical system.
·Do not exceed the maximum charging voltage of 14.8 V when charging the battery.
·When there is communication abnormality in the middle of work, control unit might be damaged.
·It may be necessary to perform the Action Plan several times.
Connect the battery charger to the vehicle.
Connect the diagnosis system with the vehicle.
Determine the action plan.
Service plan / Programming plan / Action plan / Calculate action plan
Accept and fully process the measures plan.
Service plan / Programming plan / Action plan / Perform action plan
Wait until programming/encoding has been completed.
- NOTICE:
-
When there is communication abnormality in the middle of work, control unit might be damaged.
Carry out vehicle test.
Vehicle management / Troubleshooting / Fault memory / Calculate test plan
Delete the fault memory.
Vehicle management / Troubleshooting / Fault memory / Delete fault memory
Disconnect the diagnosis system from the vehicle.
Disconnect the battery charger from the vehicle.