 |
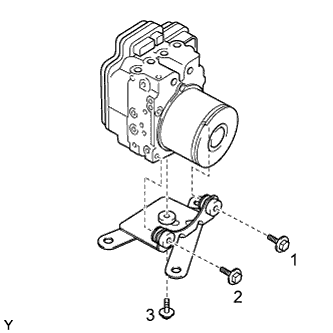
Install the actuator bracket with the 3 bolts in the sequence shown in the illustration.
- Torque:
- 5.4 N*m{ 55 kgf*cm , 48 in.*lbf }
BRAKE ACTUATOR > INSTALLATION |
| 1. INSTALL BRAKE ACTUATOR BRACKET ASSEMBLY |
|
Install the actuator bracket with the 3 bolts in the sequence shown in the illustration.
| 2. INSTALL BRAKE ACTUATOR ASSEMBLY |
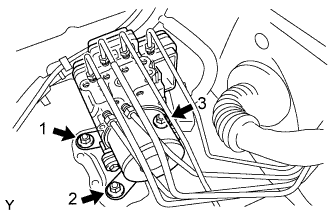 |
Install the brake actuator with bracket with the 3 nuts in the sequence shown in the illustration.
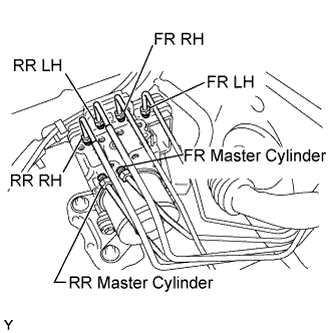 |
Temporarily install each brake tube in the correct positions of the brake actuator as shown in the illustration.
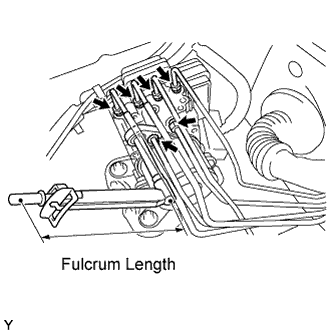 |
Using a union nut wrench, install the 6 brake tubes onto the brake actuator.
for 12 mm flare nuts :
for 10 mm flare nuts :
Connect the brake actuator connector.
Lock the connector lock lever.
| 3. INSTALL AIR INJECTION CONTROL DRIVER (for 2TR-FE) |
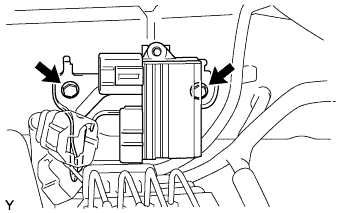 |
Install the air injection control driver with the 2 bolts.
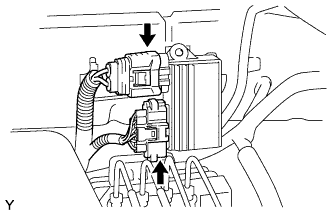 |
Connect the 2 connectors.
| 4. INSTALL AIR CLEANER CASE (for 2TR-FE) |
Install the air cleaner case with the 3 bolts.
| 5. INSTALL AIR CLEANER FILTER ELEMENT SUB-ASSEMBLY (for 2TR-FE) |
| 6. INSTALL AIR CLEANER CAP SUB-ASSEMBLY (for 2TR-FE) |
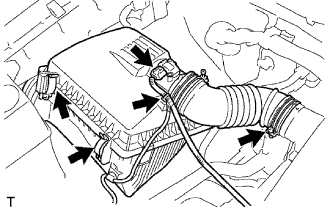 |
Install the air cleaner cap together with the air cleaner hose No. 1.
Connect the 2 air cleaner clamps.
Tighten the hose clamp bolt, then connect the air cleaner hose No. 1.
Connect the wire harness clamp.
Connect the mass air flow meter connector.
| 7. CONNECT CABLE TO NEGATIVE BATTERY TERMINAL |
| 8. FILL RESERVOIR WITH BRAKE FLUID |
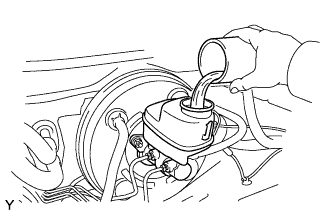 |
| 9. BLEED MASTER CYLINDER |
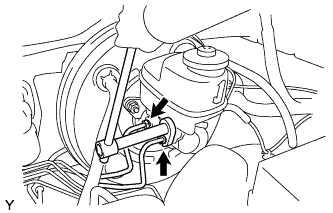 |
Using a union nut wrench, separate the brake tubes from the master cylinder.
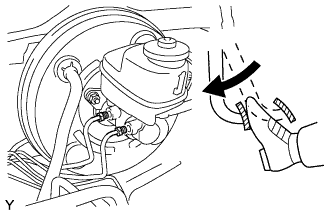 |
Slowly depress the brake pedal and hold it there (Step A).
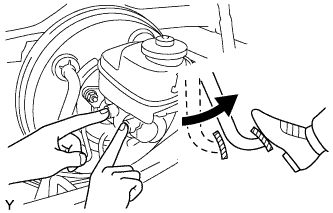 |
Block the outer holes with your fingers, and release the brake pedal (Step B).
Repeat steps A and B 3 or 4 times.
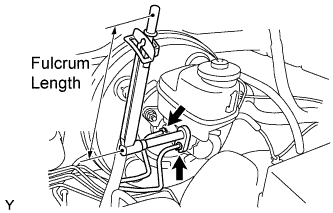 |
Using a union nut wrench, install the brake tubes into the master cylinder.
| 10. BLEED BRAKE LINE |
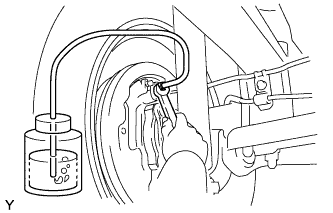 |
Connect a vinyl tube to the bleeder plug.
Depress the brake pedal several times, and then loosen the bleeder plug with the pedal depressed (Step C).
At the point where the fluid stops coming out, tighten the bleeder plug, and then release the brake pedal (Step D).
Repeat steps C and D until all the air in the fluid is completely bled out.
Tighten the bleeder plug.
Repeat the above procedure to bleed the air out of the brake line for each wheel.
| 11. BLEED BRAKE ACTUATOR |
Depress the brake pedal more than 20 times with the engine off.
Connect the Techstream to the DLC3, and turn the ignition switch ON.
Select "Air Bleeding" on the Techstream.
Bleed the air out of the brake line when Step 1: Increase appears on the Techstream display.
Connect the vinyl tube to either one of the bleeder plugs.
|
Depress the brake pedal several times, and then loosen the bleeder plug connected to the vinyl tube with the pedal depressed (Step E).
When fluid stops coming out, tighten the bleeder plug and release the brake pedal (Step F).
Repeat steps E and F until all the air in the fluid is completely bled out.
Tighten the bleeder plug completely.
Repeat the above procedure for each wheel to bleed the air out of the brake line.
Bleed the air out of the suction line when Step 2: Inhalation appears on the Techstream display.
Connect the vinyl tube to the bleeder plug at the right front wheel or the right rear wheel and loosen the bleeder plug.
Operate the brake actuator to bleed the air using the Techstream (Step G).
Check if the operation has stopped by referring to the Techstream display and tighten the bleeder plug (Step H).
Repeat steps G and H until all the air in the fluid is completely bled out.
Tighten the bleeder plug.
Repeat the above procedure for the other wheels to bleed the air out of the brake line.
Bleed the air out of the pressure reduction line when Step 3: Decrease appears on the Techstream display.
Connect a vinyl tube to either one of the bleeder plugs.
Loosen the bleeder plug (Step I).
Using the Techstream, operate the brake actuator assembly, completely depress the brake pedal and hold it there (Step J).
Tighten the bleeder plug, and then release the brake pedal (Step K).
Repeat steps I to K until all the air in the fluid is completely bled out.
Tighten the bleeder plug.
Repeat the above procedure for the other wheels to bleed the air out of the brake line.
Bleed the air out of the brake line again when Step 4: Increase appears on the Techstream display.
Connect the vinyl tube to either one of the bleeder plugs.
|
Depress the brake pedal several times, and then loosen the bleeder plug connected to the vinyl tube with the pedal depressed (Step L).
When fluid stops coming out, tighten the bleeder plug, and then release the brake pedal (Step M).
Repeat steps L and M until all the air in the fluid is completely bled out.
Tighten the bleeder plug.
Repeat the above procedure for the other wheels to bleed the air out of the brake line.
Make sure that the air bleeding is complete by referring to the Techstream display and turn off the Techstream.
Disconnect the Techstream from the DLC3.
Turn the ignition switch off.
| 12. INSPECT FLUID LEVEL IN RESERVOIR |
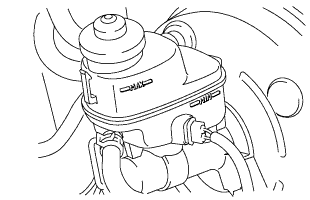 |
Check the fluid level.
If the brake fluid level is lower than the MIN line, check for leaks and inspect the disc brake pads. If necessary, refill the reservoir with brake fluid to the MAX line after repair or replacement.
| 13. INSPECT FOR BRAKE FLUID LEAK |
| 14. CHECK BRAKE ACTUATOR WITH TECHSTREAM |
| 15. PERFORM YAW RATE AND ACCELERATION SENSOR ZERO POINT CALIBRATION |
| 16. CHECK AND CLEAR DTC |