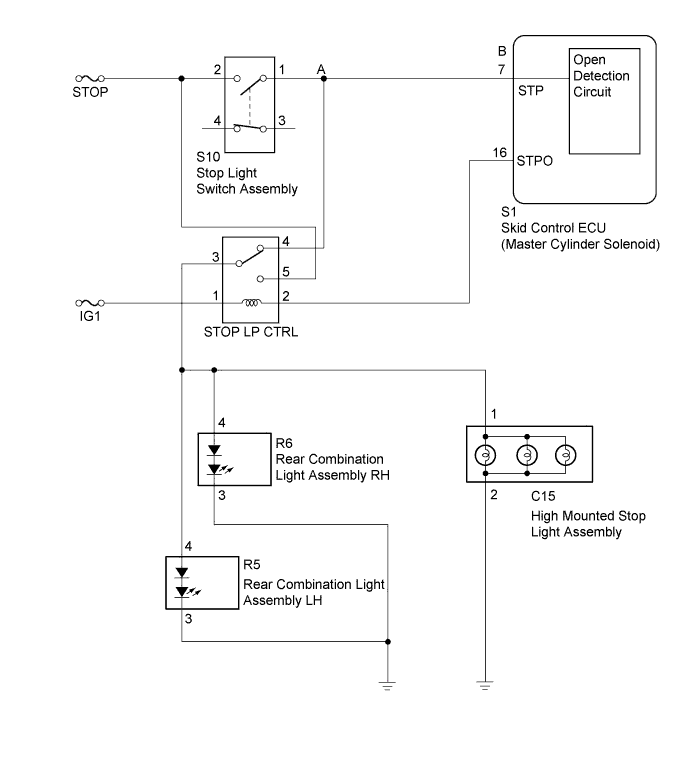
DTC C1425 Open in Stop Light Switch Circuit |
| DTC Code | DTC Detection Condition | Trouble Area |
| C1425 | When the IG1 terminal voltage is between 9.5 and 17.4 V and the skid control ECU (master cylinder solenoid) STPO terminal output is off, an open in the stop light switch circuit (A to B, A to body ground) continues for 3 seconds or more. |
|
| 1.CHECK STOP LIGHT SWITCH OPERATION |
Check that the stop lights come on when the brake pedal is depressed and go off when the brake pedal is released.
|
| ||||
| OK | |
 |
| 2.READ VALUE USING TECHSTREAM (STOP LIGHT SW) |
Turn the ignition switch off.
Connect the Techstream to the DLC3.
Turn the ignition switch to ON.
Turn the Techstream on.
Enter the following menus: Chassis / ABS/VSC/TRAC / Data List.
| Tester Display | Measurement Item/Range | Normal Condition | Diagnostic Note |
| Stop Light SW | Stop light switch/ ON or OFF | ON: Brake pedal depressed OFF: Brake pedal released | - |
Check that the stop light condition observed on the Techstream changes according to brake pedal operation.
|
| ||||
| OK | ||
 | ||
| ||
| 3.CHECK HARNESS AND CONNECTOR (STP TERMINAL) |
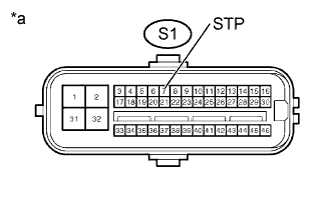 |
Disconnect the skid control ECU (master cylinder solenoid) connector.
Measure the voltage according to the value(s) in the table below.
| Tester Connection | Condition | Specified Condition |
| S1-7 (STP) - Body ground | Brake pedal depressed | 8 to 14 V |
| S1-7 (STP) - Body ground | Brake pedal released | Below 1.5 V |
| *a | Front view of wire harness connector (to Skid Control ECU (Master Cylinder Solenoid)) |
|
| ||||
| OK | |
|
| 4.RECONFIRM DTC |
Clear the DTCs (Click here).
Turn the ignition switch off.
Start the engine.
Depress the brake pedal several times to test the stop light circuit.
Check if the same DTC is output (Click here).
| Result | Proceed to |
| DTC is not output | A |
| DTC is output | B |
|
| ||||
| A | ||
| ||
| ||
| 5.CHECK HARNESS AND CONNECTOR (POWER SOURCE TERMINAL) |
Disconnect the stop light switch assembly connector.
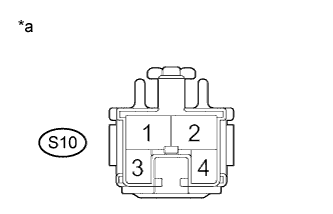 |
Measure the voltage according to the value(s) in the table below.
| Tester Connection | Switch Condition | Specified Condition |
| S10-2 - Body ground | Always | 11 to 14 V |
| *a | Front view of wire harness connector (to Stop Light Switch Assembly) |
|
| ||||
| OK | |
|
| 6.INSPECT STOP LIGHT SWITCH ASSEMBLY |
Disconnect the stop light switch assembly connector.
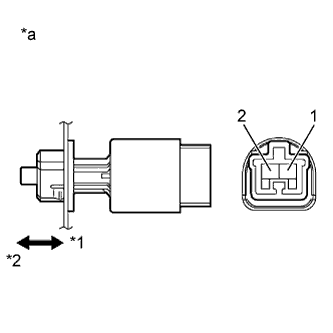 |
Measure the resistance according the value(s) in the table below.
| Tester Condition | Switch Connection | Specified Condition |
| 1 - 2 | Switch pin free | Below 1 Ω |
| 1 - 2 | Switch pin pushed in | 10 kΩ or higher |
| *a | Component without harness connected (to Stop Light Switch Assembly) |
| *1 | Pushed in |
| *2 | Free |
Reconnect the stop light switch assembly connector.
|
| ||||
| OK | |
|
| 7.CHECK HARNESS AND CONNECTOR (STOP LIGHT SWITCH ASSEMBLY - STOP LP CTRL RELAY) |
Remove the STOP LP CTRL relay from the engine room relay block.
Measure the resistance according the value(s) in the table below.
| Tester Connection | Condition | Specified Condition |
| S10-1 - STOP LP CTRL relay-4 | Always | Below 1 Ω |
| S10-1 - Body ground | Always | 10 Ω or higher |
Reinstall the STOP LP CTRL relay from the engine room relay block.
|
| ||||
| OK | |
|
| 8.INSPECT STOP LP CTRL RELAY |
Remove the STOP LP CTRL relay from the engine room relay block.
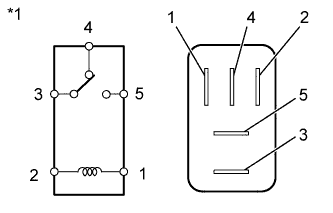 |
Measure the resistance according to the value(s) in the table below.
| Tester Connection | Condition | Specified Condition |
| 3 - 4 | Battery voltage not applied | Below 1 Ω |
| Battery voltage applied to terminal 1 and 2 | 10 kΩ or higher | |
| 3 - 5 | Battery voltage not applied | 10 kΩ or higher |
| Battery voltage applied to terminal 1 and 2 | Below 1 Ω |
| *1 | STOP LP CTRL Relay |
|
| ||||
| OK | |
|
| 9.CHECK HARNESS AND CONNECTOR (REAR COMBINATION LIGHT ASSEMBLY, HIGH MOUNTED STOP LIGHT ASSEMBLY - STOP LP CTRL RELAY) |
Disconnect the rear combination light assembly connector.
Disconnect the high mounted stop light assembly connector.
Remove the STOP LP CTRL relay.
Measure the resistance according the value(s) in the table below.
| Tester Connection | Condition | Specified Condition |
| R6-4 - STOP LP CTRL-3 | Always | Below 1 Ω |
| R6-4 - Body ground | Always | 10 kΩ or higher |
| R6-3 - Body ground | Always | Below 1 Ω |
| Tester Connection | Condition | Specified Condition |
| R5-4 - STOP LP CTRL-3 | Always | Below 1 Ω |
| R5-4 - Body ground | Always | 10 kΩ or higher |
| R5-3 - Body ground | Always | Below 1 Ω |
| Tester Connection | Condition | Specified Condition |
| C15-1 - STOP LP CTRL-3 | Always | Below 1 Ω |
| C15-1 - Body ground | Always | 10 kΩ or higher |
| C15-2 - Body ground | Always | Below 1 Ω |
Reinstall the STOP LP CTRL relay.
Reconnect the rear combination light assembly connector.
Reconnect the high mounted stop light assembly connector.
| Result | Proceed to |
| NG | A |
| OK (Rear Combination Light Assembly) | B |
| OK (High Mounted Stop Light Assembly) | C |
|
| ||||
|
| ||||
| A | ||
| ||
| ||
| 10.INSPECT REAR COMBINATION LIGHT ASSEMBLY |
Remove the rear combination light assembly connector .
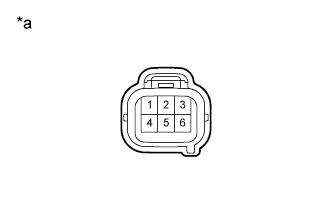 |
Apply battery voltage to the terminals and check that the rear combination light illuminates.
| Measurement Condition | Specified Condition |
| Positive battery - Terminal 4 Negative battery - Terminal 3 | Rear combination light illuminates |
| *a | Component without harness connected (to Rear Combination Light Sssembly) |
Reinstall the rear combination light assembly.
|
| ||||
| OK | ||
| ||
| ||
| 11.INSPECT CENTER STOP LIGHT BULB |
Remove the high mounted stop light assembly connector.
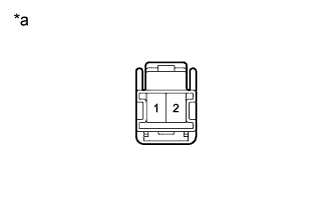 |
Apply battery voltage to the terminals and check that the rear combination light illuminates.
| Measurement Condition | Specified Condition |
| Positive battery - Terminal 1 Negative battery - Terminal 2 | High mounted stop light illuminates |
| *a | Component without harness connected (to High Mounted Stop Light Assembly) |
Reinstall the high mounted stop light assembly.
|
| ||||
| OK | ||
| ||
| ||

