ENGINE > ON-VEHICLE INSPECTION |
| 1. INSPECT ENGINE COOLANT |
Check that the coolant level in the reservoir tank is between the FULL and LOW lines when the engine is cold.
If low, check for leakage and add Toyota Super Long Life Coolant or similar high quality ethylene glycol based non-silicate, non-amine, non-nitrite, and non-borate coolant with long-life hybrid organic acid technology up to the FULL line.
| 2. INSPECT ENGINE OIL |
| 3. INSPECT BATTERY |
|
Check the voltage.
If it has been less than 20 minutes since you stopped driving the vehicle or since the engine was stopped, turn the ignition switch and electrical systems (headlight, blower motor, rear defogger etc.) to the ON position for 60 seconds. This will remove the surface charge on the battery.
Turn the ignition switch OFF.
Turn the electrical systems OFF.
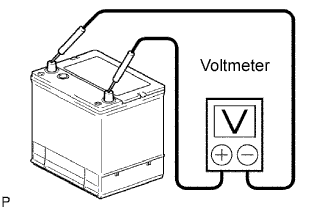
Using a voltmeter, measure the battery voltage between the negative (-) and positive (+) terminals of the battery.
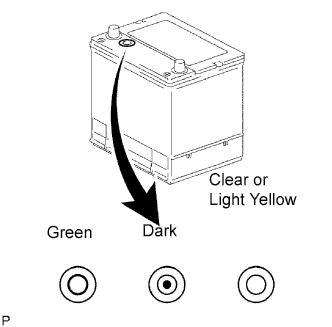 |
Check the indicator is as shown in the illustration.
| Indicator Color | Condition |
| Green | OK |
| Dark | Charging Necessary |
| Clear or Light Yellow | Insufficient Water |
| 4. INSPECT AIR CLEANER FILTER ELEMENT SUB-ASSEMBLY |
Remove the air filter.
Visually check that the air filter is not excessively damaged or oily. If necessary, replace the air filter.
| 5. INSPECT SPARK PLUG |
| 6. INSPECT V-RIBBED BELT TENSIONER ASSEMBLY |
Idle the engine and then stop the engine. Check that the drive belt is between the edges of the tensioner pulley.
Remove the drive belt from the tensioner pulley.
Turn the pulley, and check that the tensioner bearing moves smoothly and quietly.
If necessary, replace the tensioner.
| 7. INSPECT VALVE LASH ADJUSTER NOISE |
Rev up the engine several times. Check that the engine does not make any abnormal noises [*a].
If abnormal noises are heard, warm up the engine and idle it for more than 30 minutes. Then repeat step [*a].
| 8. INSPECT IGNITION TIMING |
When using a Techstream:
Warm up the engine.
Turn the ignition switch OFF.
Connect the Techstream to the DLC3.
Turn the ignition switch ON (IG).
Turn the tester ON.
Enter the following menus:
Select: Powertrain / Engine and ECT / Data List / IGN Advance.
Check that the ignition timing advances immediately when engine speed is increased.
When not using a Techstream:
Turn the ignition switch to ON.
Start the engine and warm it up.
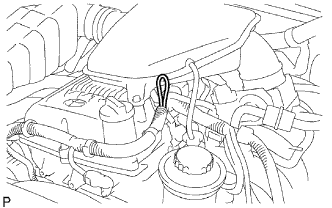 |
Install the tester terminal of a timing light in the position shown in the illustration.
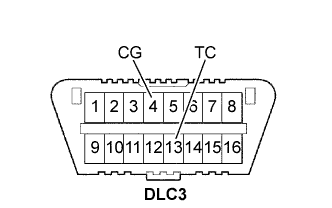 |
Using SST, connect terminals 13 (TC) and 4 (CG) of the DLC3.
Check that the ignition timing is within the specification.
| 9. INSPECT ENGINE IDLING SPEED |
When using a Techstream:
Warm up the engine.
Turn the ignition switch OFF.
Connect the Techstream to the DLC3.
Turn the ignition switch ON (IG).
Turn the tester ON.
Enter the following menus:
Select: Powertrain / Engine and ECT / Data List / Engine Speed.
 |
When not using a Techstream:
Turn the ignition switch ON.
Start the engine and warm it up.
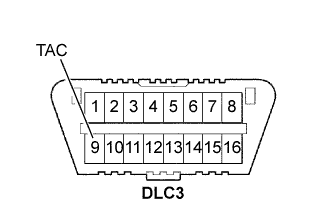
Install SST onto terminal 9 (TAC) of the DLC3. Connect a tachometer, then measure the engine idling speed.
| 10. INSPECT COMPRESSION |
Warm up the engine, then stop it.
Remove the intake air connector.
Remove the ignition coils.
Remove the spark plugs.
Disconnect the fuel infector connector.
 |
Inspect the compression.
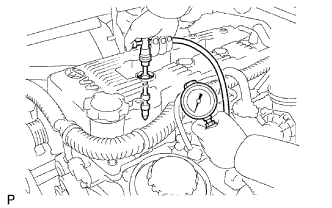
Insert a compression gauge into the plug hole.
Crank the engine, then measure the compression pressure.
If the compression pressure is low, pour a small amount of engine oil into the cylinder block, then measure it again.
| 11. INSPECT CO/HC |
Start the engine.
Keep the engine speed at 2,500 rpm for approximately 180 seconds.
Insert the CO/HC meter testing probe at least 40 cm (1.3 ft) into the tailpipe while idling.
Immediately check the CO/HC concentration while idling and/or at 2,500 rpm.
Check the A/F sensor and heated oxygen sensor operation.
See the table below for possible causes, then inspect and correct the applicable parts if necessary.
| CO | HC | Problems | Causes |
| Normal | High | Rough idling |
|
| Low | High | Rough idling (Fluctuation HC reading) |
|
| High | High | Rough idling (Black smoke from exhaust) |
|