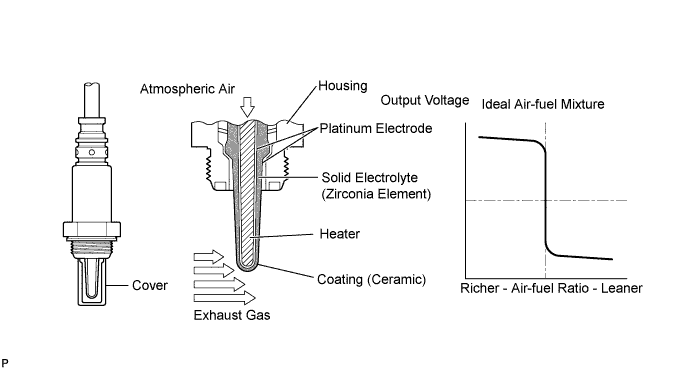
DTC P0136 Oxygen Sensor Circuit Malfunction (Bank 1 Sensor 2) |
DTC P0137 Oxygen Sensor Circuit Low Voltage (Bank 1 Sensor 2) |
DTC P0138 Oxygen Sensor Circuit High Voltage (Bank 1 Sensor 2) |
DTC P0139 Oxygen Sensor Circuit Slow Response (Bank 1 Sensor 2) |
DTC P0156 Oxygen Sensor Circuit Malfunction (Bank 2 Sensor 2) |
DTC P0157 Oxygen Sensor Circuit Low Voltage (Bank 2 Sensor 2) |
DTC P0158 Oxygen Sensor Circuit High Voltage (Bank 2 Sensor 2) |
DTC P0159 Oxygen Sensor Circuit Slow Response (Bank 2 Sensor 2) |
| DTC Code | DTC Detection Condition | Trouble Area |
| P0136 P0156 |
|
|
| P0137 P0157 |
|
|
| P0138 P0158 |
|
|
| P0139 P0159 |
|
|
| DTC Code | DTC Detection Condition | Trouble Area |
| P0136 P0156 | Not applicable | None |
| P0137 P0157 |
|
|
| P0138 P0158 | Not applicable | None |
| P0139 P0159 | Not applicable | None |
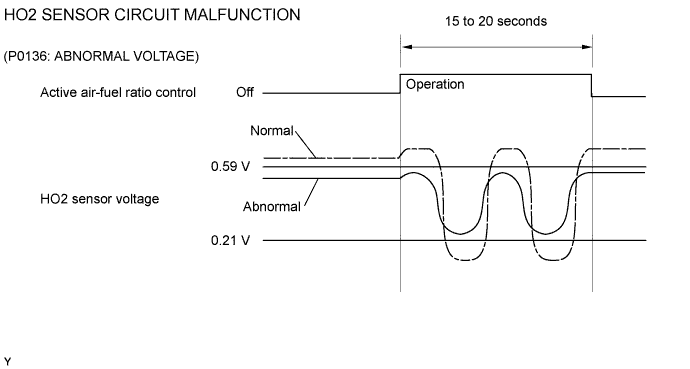
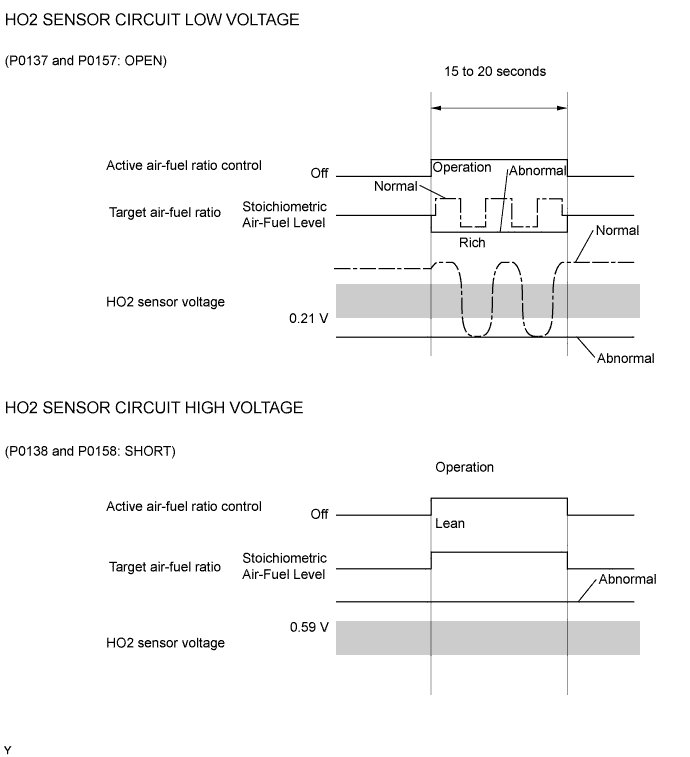
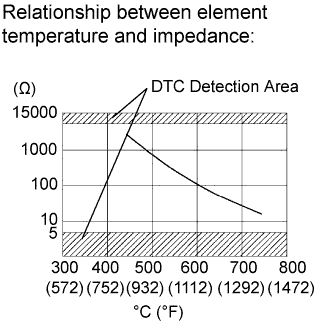
| Related DTCs | P0136: Heated oxygen sensor (for Bank 1) output voltage (Abnormal voltage output) P0136: Heated oxygen sensor (for Bank 1) impedance (Low) P0137: Heated oxygen sensor (for Bank 1) output voltage (Low voltage) P0137: Heated oxygen sensor (for Bank 1) impedance (High) P0138: Heated oxygen sensor (for Bank 1) output voltage (High voltage) P0138: Heated oxygen sensor (for Bank 1) output voltage (Extremely high) P0139: Heated oxygen sensor output voltage during fuel cut (for Bank 1) P0156: Heated oxygen sensor (for Bank 2) output voltage (Abnormal voltage output) P0156: Heated oxygen sensor (for Bank 2) impedance (Low) P0157: Heated oxygen sensor (for Bank 2) output voltage (Low voltage) P0157: Heated oxygen sensor (for Bank 2) impedance (High) P0158: Heated oxygen sensor (for Bank 2) output voltage (High voltage) P0158: Heated oxygen sensor (for Bank 2) output voltage (Extremely high) P0159: Heated oxygen sensor output voltage during fuel cut (for Bank 2) |
| Required Sensors/Components (Main) | Heated oxygen sensor |
| Required Sensors/Components (Related) | Crankshaft position sensor, engine coolant temperature sensor, mass air flow meter and throttle position sensor |
| Frequency of Operation | Once per driving cycle: Active air-fuel ratio control detection, Heated oxygen sensor voltage (During fuel cut) Continuous: Other |
| Duration | 20 seconds: Active air-fuel ratio control detection 90 seconds: Heated oxygen sensor impedance (High) 30 seconds: Heated oxygen sensor impedance (Low) 10 seconds: Output voltage (Stuck high) 9 seconds: Heated oxygen sensor voltage (During fuel cut) |
| MIL Operation | 2 driving cycles |
| Sequence of Operation | None |
| Monitor runs whenever following DTCs not present | P0016, P0018 (VVT System - Misalignment) P0017, P0019 (Exhaust VVT System - Misalignment) P0031, P0032, P0051, P0052 (Air fuel ratio sensor heater) P0037, P0038, P0057, P0058 (Rear oxygen sensor heater) P0102, P0103 (Mass air flow meter) P0112, P0113 (Intake air temperature sensor) P0115, P0117, P0118 (Engine coolant temperature sensor) P0120, P0121, P0122, P0123, P0220, P0222, P0223, P2135 (Throttle position sensor) P0125 (Insufficient coolant temperature for closed loop fuel control) P0128 (Thermostat) P0171, P0172, P0174, P0175 (Fuel system) P0301 - P0308 (Misfire) P0335 (Crankshaft position sensor) P0340, P1340 (VVT sensor) P0451, P0452, P0453, P1451, P1452, P1453, P1455 (EVAP system) P0412, P0415, P0418, P0419, P1613, P1614 (Secondary air injection system control) P2440 - P2447 (Secondary air injection system) P0500 (Vehicle speed sensor) P2195, P2196, P2197, P2198, P2237, P2238, P2239, P2240, P2241, P2242, P2252, P2253, P2255, P2256, P2A00, P2A03 (Front oxygen/Air fuel ratio sensor) |
| Active air-fuel ratio control | Executing |
| Active air-fuel ratio control begins when all of following conditions met: | - |
| Battery voltage | 11 V or more |
| Engine coolant temperature | 75°C (167°F) or more |
| Idling | OFF |
| Engine RPM | Less than 3200 rpm |
| A/F sensor status | Activated |
| Fuel system status | Closed loop |
| Fuel cut | OFF |
| Engine load | 10 to 75% |
| Shift position | 4th or higher |
| Battery voltage | 11 V or more |
| Estimated rear HO2 sensor temperature | Less than 700°C (1292°F) |
| ECM monitor | Completed |
| DTC P0607 | Not set |
| Battery voltage | 11 V or more |
| Estimated rear HO2 sensor temperature | 450 to 750°C (842 to 1382°F) |
| ECM monitor | Completed |
| DTC P0607 | Not set |
| Battery voltage | 11 V or more |
| Time after engine start | 2 seconds or more |
| Engine coolant temperature | 75°C (167°F) or higher |
| Estimated catalyst temperature | 400°C (752°F) or higher |
| Fuel cut | ON |
| Either of following conditions met: | 1 or 2 |
| 1. All of following conditions (a), (b) and (c) met | - |
| (a) Commanded air-fuel ratio | 14.3 or less |
| (b) Rear HO2 sensor voltage | 0.21 to 0.59 V |
| (c) OSC (Oxygen Storage Capacity of Catalyst) | 2 g or more |
| 2. All of following conditions (d), (e) and (f) met | - |
| (d) Commanded air-fuel ratio | 14.9 or more |
| (e) Rear HO2 sensor voltage | 0.21 to 0.59 V |
| (f) OSC | 2 g or more |
| All of following conditions (a), (b) and (c) met | - |
| (a) Commanded air-fuel ratio | 14.3 or less |
| (b) Rear HO2 sensor voltage | Less than 0.21 V |
| (c) OSC | 2 g or more |
| All of following conditions (a), (b) and (c) met | - |
| (a) Commanded air-fuel ratio | 14.9 or more |
| (b) Rear HO2 sensor voltage | More than 0.59 V |
| (c) OSC | 2 g or more |
| Duration of following condition met | 30 seconds or more |
| Heated oxygen sensor impedance | Less than 5 Ω |
| Duration of following condition met | 90 seconds or more |
| Heated oxygen sensor impedance | 15 kΩ or more |
| Duration of following condition met | 10 seconds or more |
| Heated oxygen sensor voltage | 1.2 V or more |
| Duration until rear heated oxygen sensor voltage drops to 0.2 V during fuel cut | 9 seconds or more |
| Duration of following condition met | 30 seconds or more |
| Heated oxygen sensor voltage | Varies between 0.1 and 0.9 V |
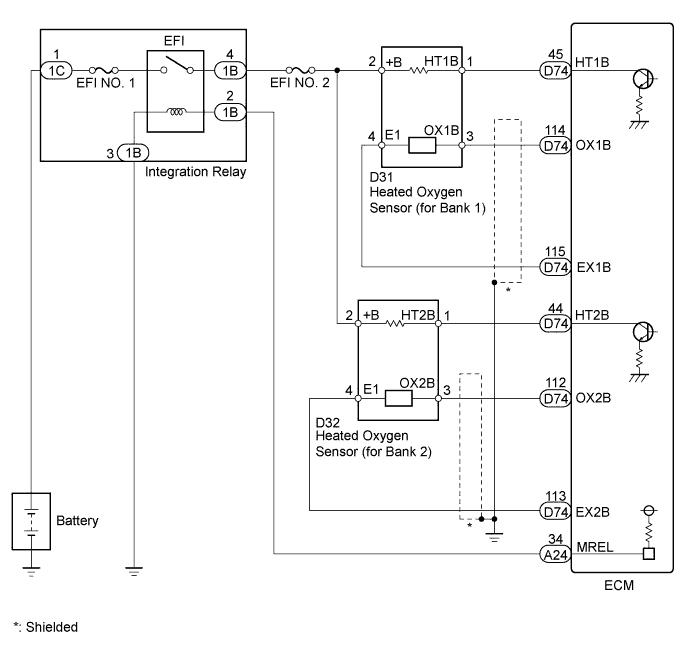
| Display Item (Sensor) | Injection Volume | Status | Voltage |
| AFS Voltage B1S1 or AFS Voltage B2S1 (A/F) | +25% | Rich | Less than 3.1 V |
| AFS Voltage B1S1 or AFS Voltage B2S1 (A/F) | -12.5% | Lean | More than 3.4 V |
| O2S B1S2 or O2S B2S2 (HO2) | +25% | Rich | More than 0.55 V |
| O2S B1S2 or O2S B2S2 (HO2) | -12.5% | Lean | Less than 0.4 V |
| Case | A/F Sensor (Sensor 1) Output Voltage | HO2 Sensor (Sensor 2) Output Voltage | Main Suspected Trouble Area |
| 1 |   |  | - |
| 2 |  | |
|
| 3 | | |
|
| 4 | | |
|
| 1.READ OUTPUT DTC |
Connect the Techstream to the DLC3.
Turn the ignition switch to ON and turn the Techstream ON.
Enter the following menus: Powertrain / Engine and ECT / Trouble Codes.
Read DTCs.
| Result | Proceed to |
| P0138 or P0158 is output | A |
| P0137 or P0157 is output | B |
| P0136 or P0156 is output | C |
| P0139 or P0159 is output | D |
|
| ||||
|
| ||||
|
| ||||
| A | |
 |
| 2.READ VALUE TECHSTREAM (OUTPUT VOLTAGE OF HEATED OXYGEN SENSOR) |
Connect the Techstream to the DLC3.
Turn the ignition switch to ON and turn the Techstream ON.
Enter the following menus: Powertrain / Engine and ECT / Data List / A/F Control System / O2S B1S2 or O2S B2S2.
Allow the engine to idle.
Read the Heated Oxygen (HO2) sensor output voltage while idling.
|
| ||||
|
| ||||
| 3.CHECK HEATED OXYGEN SENSOR |
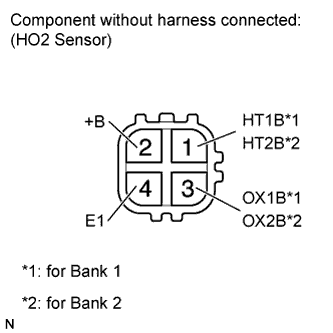 |
Disconnect the D31 or D32 HO2 sensor connector.
Measure the resistance according to the value(s) in the table below.
| Tester Connection | Condition | Specified Condition |
| 2 (+B) - 3 (OX1B) | Always | 10 kΩ or higher |
| 2 (+B) - 4 (E1) | Always | 10 kΩ or higher |
| 2 (+B) - 3 (OX2B) | Always | 10 kΩ or higher |
| 2 (+B) - 4 (E1) | Always | 10 kΩ or higher |
|
| ||||
| OK | |
|
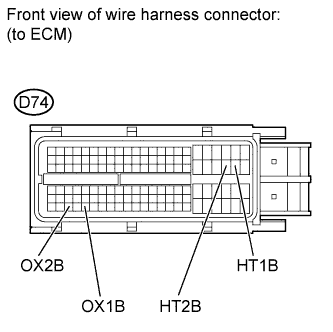
| 4.CHECK HARNESS AND CONNECTOR (HEATED OXYGEN SENSOR - ECM) |
 |
Turn the ignition switch off and wait for 5 minutes.
Disconnect the D74 ECM connector.
Measure the resistance according to the value(s) in the table below.
| Tester Connection | Condition | Specified Condition |
| D74-45 (HT1B) - D74-114 (OX1B) | Always | 10 kΩ or higher |
| D74-44 (HT2B) - D74-112 (OX2B) | Always | 10 kΩ or higher |
|
| ||||
| OK | ||
 | ||
| ||
| 5.CHECK AIR FUEL RATIO SENSOR |
Clear DTC (Click here).
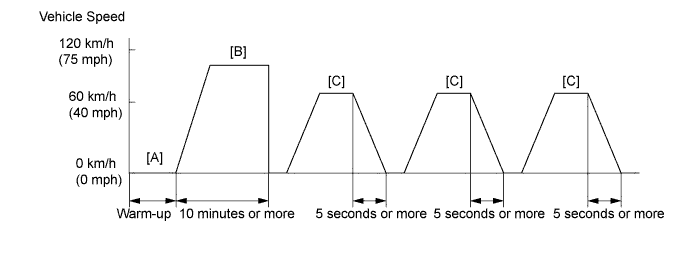
Drive the vehicle by the drive pattern as listed below:
Warm up the engine.
Drive the vehicle at 60 km/h (40 mph) or more for 10 minutes or more.
Stop the vehicle.
Accelerator the vehicle until 60 km/h (40 mph) or more and decelerate for 5 seconds or more. Perform this 3 times.
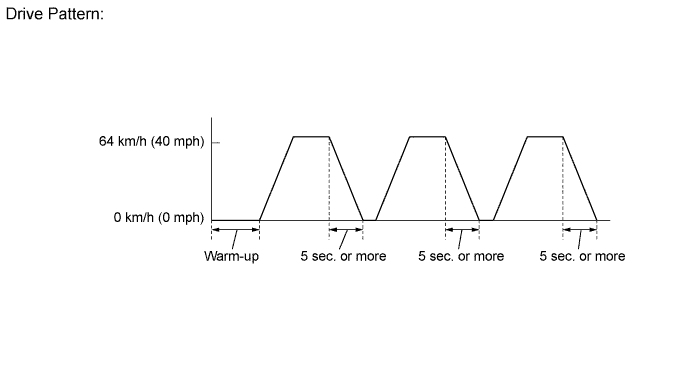
Enter the following menus: Powertrain / Engine and ECT / Monitor / O2 Sensor / Details.
Confirm that RANGE B1S1 and RANGE B2S1 are either Pass or Fail. If the Techstream shows incomplete, Re-check RANGE B1S1 and RANGE B2S1 after performing the drive pattern.
Select RANGE B1S1.
Read the test value.
|
| ||||
|
| ||||
| 6.READ VALUE USING TECHSTREAM (OUTPUT VOLTAGE OF HEATED OXYGEN SENSOR) |
Connect the Techstream to the DLC3.
Turn the ignition switch to ON and turn the Techstream ON.
Start the engine.
Enter the following menus: Powertrain / Engine and ECT / Data List / A/F Control System / O2S B1S2 or O2S B2S2.
After warming up the engine, run the engine at an engine speed of 2500 rpm for 3 minutes.
Read the output voltage of the HO2 sensor when the engine rpm is suddenly increased.
|
| ||||
| OK | |
|
| 7.PERFORM ACTIVE TEST USING TECHSTREAM (INJECTION VOLUME) |
Connect the Techstream to the DLC3.
Start the engine and turn the Techstream ON.
Warm up the engine.
Enter the following menus: Powertrain / Engine and ECT / Active Test / Control the Injection Volume.
Change the fuel injection volume using the Techstream, and monitor the voltage output of Air-Fuel Ratio (A/F) and HO2 sensors displayed on the Techstream.
| Display Item (Sensor) | Voltage Variation | Proceed to |
| AFS Voltage B1S1 (A/F) AFS Voltage B2S1 (A/F) | Alternating between more and less than 3.3 V | OK |
| Remains at more than 3.3 V | NG | |
| Remains at less than 3.3 V | NG |
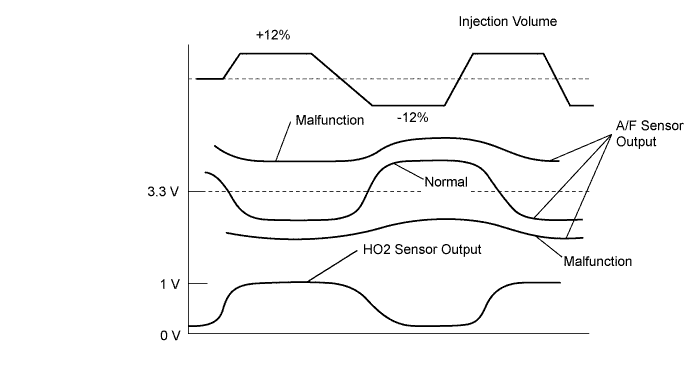
|
| ||||
| OK | |
|
| 8.CHECK FOR EXHAUST GAS LEAK |
Check for exhaust gas leak.
|
| ||||
| OK | |
|
| 9.CHECK FUEL PRESSURE |
Check the fuel pressure .
|
| ||||
| OK | |
|
| 10.INSPECT FUEL INJECTOR (INJECTION AND VOLUME) |
Check the injection volume .
|
| ||||
| OK | |
|
| 11.INSPECT MASS AIR FLOW METER |
Inspect the mass air flow meter .
|
| ||||
| OK | |
|
| 12.INSPECT ENGINE COOLANT TEMPERATURE SENSOR |
Inspect the engine coolant temperature sensor .
|
| ||||
| OK | |
|
| 13.INSPECT PCV HOSE |
Check the PCV hose connections .
|
| ||||
| OK | |
|
| 14.CHECK AIR INDUCTION SYSTEM |
Check the air induction system for vacuum leakage .
|
| ||||
| OK | |
|
| 15.CHECK SPARKS AND IGNITION |
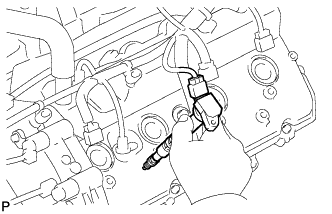 |
Disconnect the injector connectors to prevent the engine from starting.
Remove the ignition coil from the cylinder head (Click here).
Install the spark plug onto the ignition coil.
Attach the spark plug assembly to the cylinder head.
Crank the engine for less than 2 seconds and check the spark.
Install the ignition coil.
Reconnect the injector connectors.
|
| ||||
| OK | ||
| ||
| ||
| 16.CHECK FOR EXHAUST GAS LEAK |
Check for exhaust gas leak.
|
| ||||
| OK | |
|
| 17.INSPECT HEATED OXYGEN SENSOR (HEATER RESISTANCE) |
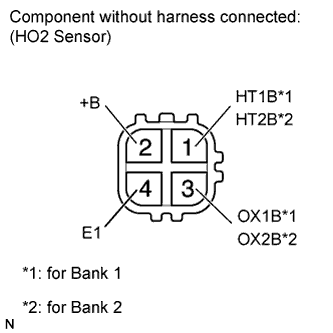 |
Disconnect the D31 or D32 HO2 sensor connector.
Measure the resistance according to the value(s) in the table below.
| Tester Connection | Condition | Specified Condition |
| 1 (HT1B) - 2 (+B) | 20°C (68°F) | 11 to 16 Ω |
| 1 (HT1B) - 4 (E1) | Always | 10 kΩ or higher |
| 1 (HT2B) - 2 (+B) | 20°C (68°F) | 11 to 16 Ω |
| 1 (HT2B) - 4 (E1) | Always | 10 kΩ or higher |
|
| ||||
| OK | |
|
| 18.INSPECT INTEGRATION RELAY (EFI RELAY) |
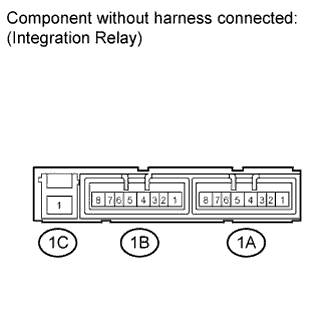 |
Remove the integration relay from the engine room relay block .
Inspect the EFI NO. 1 fuse.
Remove the EFI NO. 1 fuse from the integration relay.
Measure the resistance according to the value(s) in the table below.
| Tester Connection | Condition | Specified Condition |
| EFI NO. 1 fuse | Always | Below 1 Ω |
Reinstall the EFI NO. 1 fuse.
Inspect the EFI relay.
Measure the resistance according to the value(s) in the table below.
| Tester Connection | Condition | Specified Condition |
| 1C-1 - 1B-4 | When no battery voltage applied to terminals 1B-2 and 1B-3 | 10 kΩ or higher |
| When battery voltage applied to terminals 1B-2 and 1B-3 | Below 1 Ω |
|
| ||||
| OK | |
|
| 19.CHECK HARNESS AND CONNECTOR (HEATED OXYGEN SENSOR - ECM) |
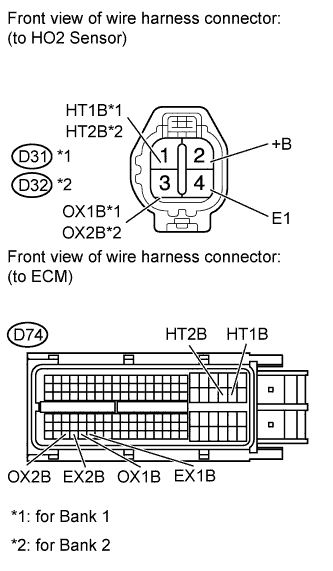 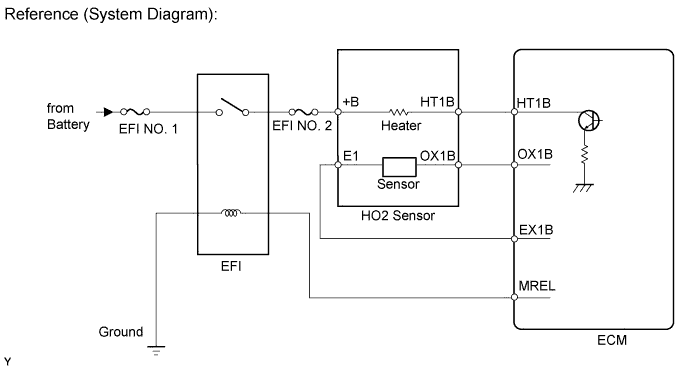 |
Disconnect the D31 or D32 HO2 sensor connector.
Turn the ignition switch to ON.
Measure the voltage according to the value(s) in the table below.
| Tester Connection | Switch Condition | Specified Condition |
| D31-2 (+B) - Body ground | Ignition switch ON | 9 to 14 V |
| D32-2 (+B) - Body ground | Ignition switch ON | 9 to 14 V |
Turn the ignition switch off.
Disconnect the D74 ECM connector.
Measure the resistance according to the value(s) in the table below.
| Tester Connection | Condition | Specified Condition |
| D31-1 (HT1B) - D74-45 (HT1B) | Always | Below 1 Ω |
| D31-3 (OX1B) - D74-114 (OX1B) | Always | Below 1 Ω |
| D31-4 (E1) - D74-115 (EX1B) | Always | Below 1 Ω |
| D32-1 (HT2B) - D74-44 (HT2B) | Always | Below 1 Ω |
| D32-3 (OX2B) - D74-112 (OX2B) | Always | Below 1 Ω |
| D32-4 (E1) - D74-113 (EX2B) | Always | Below 1 Ω |
| D31-1 (HT1B) or D74-45 (HT1B) - Body ground | Always | 10 kΩ or higher |
| D31-3 (OX1B) or D74-114 (OX1B) - Body ground | Always | 10 kΩ or higher |
| D32-1 (HT2B) or D74-44 (HT2B) - Body ground | Always | 10 kΩ or higher |
| D32-3 (OX2B) or D74-112 (OX2B) - Body ground | Always | 10 kΩ or higher |
|
| ||||
| OK | |
|
| 20.REPLACE HEATED OXYGEN SENSOR |
Replace the heated oxygen sensor (Click here).
| NEXT | |
|
| 21.PERFORM CONFIRMATION DRIVING PATTERN |
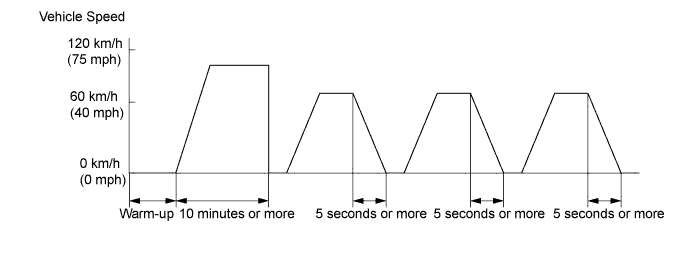
Connect the Techstream to the DLC3.
Turn the ignition switch to ON.
Warm up the engine until the engine coolant temperature is 75°C (167°F) or higher.
Drive the vehicle at 60 to 120 km/h (40 to 75 mph) for at least 10 minutes.
Drive the vehicle at 60 km/h (40 mph) or more and decelerate the vehicle for 5 seconds or more. Perform this 3 times.
Turn the Techstream ON.
Enter the following menus: Powertrain / Engine and ECT / Utility / All Readiness.
Input DTCs: P0136, P0137, P0138, P0156, P0157 and P0158.
Check that DTC MONITOR is NORMAL. If DTC MONITOR is INCOMPLETE, perform the drive pattern adding the vehicle speed and using the second gear to decelerate the vehicle.
|
| ||||
| OK | ||
| ||
| ||
| 22.REPLACE AIR FUEL RATIO SENSOR |
Replace the air fuel ratio sensor (Click here).
| NEXT | |
|
| 23.PERFORM CONFIRMATION DRIVING PATTERN |
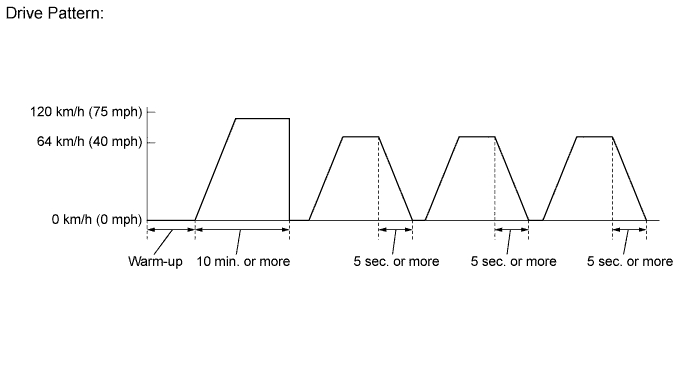
Connect the Techstream to the DLC3.
Turn the ignition switch to ON.
Warm up the engine until the engine coolant temperature is 75°C (167°F) or higher.
Drive the vehicle at 60 to 120 km/h (40 to 75 mph) for at least 10 minutes.
Drive the vehicle at 60 km/h (40 mph) or more and decelerate the vehicle for 5 seconds or more. Perform this 3 times.
Enter the following menus: Powertrain / Engine and ECT / Utility / All Readiness.
Input DTCs: P0136, P0137, P0138, P0156, P0157 and P0158.
Check that DTC MONITOR is NORMAL. If DTC MONITOR is INCOMPLETE, perform the drive pattern adding the vehicle speed and using the second gear to decelerate the vehicle.
|
| ||||
| OK | ||
| ||
| ||
| 24.READ VALUE USING TECHSTREAM (OUTPUT VOLTAGE OF HEATED OXYGEN SENSOR) |
Connect the Techstream to the DLC3.
Turn the ignition switch to ON.
Turn the Techstream ON.
Enter the following menus: Powertrain / Engine and ECT / Data List / A/F Control System / O2S B1S2 or O2S B2S2.
After warming up the engine, run the engine at an engine speed of 2500 rpm for 3 minutes.
Engine is idling.
Depress the accelerator pedal quickly until the engine speed reaches 2500 rpm 3 times.
| Result | Proceed to |
| Higher than 1.0 V | A |
| Below 1.0 V | B |
|
| ||||
| A | |
|
| 25.INSPECT HEATED OXYGEN SENSOR |
|
Disconnect the D31 or D32 HO2 sensor connector.
Measure the resistance according to the value(s) in the table below.
| Tester Connection | Condition | Specified Condition |
| 2 (+B) - 3 (OX1B) | Always | 10 kΩ or higher |
| 2 (+B) - 4 (E1) | Always | 10 kΩ or higher |
| 2 (+B) - 3 (OX2B) | Always | 10 kΩ or higher |
| 2 (+B) - 4 (E1) | Always | 10 kΩ or higher |
|
| ||||
| OK | |
|
| 26.CHECK HARNESS AND CONNECTOR (CHECK FOR SHORT) |
|
Turn the ignition switch off and wait for 5 minutes.
Disconnect the D74 ECM connector.
Measure the resistance according to the value(s) in the table below.
| Tester Connection | Condition | Specified Condition |
| D74-45 (HT1B) - D74-114 (OX1B) | Always | 10 kΩ or higher |
| D74-44 (HT2B) - D74-112 (OX2B) | Always | 10 kΩ or higher |
|
| ||||
| OK | ||
| ||
| ||
| 27.PERFORM CONFIRMATION DRIVING PATTERN |
| NEXT | |
|
| 28.READ DTC OUTPUT (DTC P0139 OR P0159 IS OUTPUT AGAIN) |
Read the DTCs (Click here).
| Result | Proceed to |
| P0139 or P0159 is output | A |
| No DTC is output | B |
|
| ||||
| A | ||
| ||
| ||

