 |
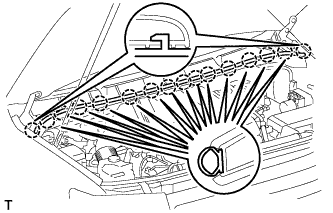
Using a clip remover, detach the 16 claws and remove the cowl top seal.
WINDSHIELD GLASS > REMOVAL |
| 1. REMOVE FRONT WIPER ARM AND BLADE ASSEMBLY LH |
Remove the nut, wiper arm and blade.
| 2. REMOVE FRONT WIPER ARM AND BLADE ASSEMBLY RH |
Remove the nut, wiper arm and blade.
| 3. REMOVE HOOD TO COWL TOP SEAL |
|
Using a clip remover, detach the 16 claws and remove the cowl top seal.
| 4. REMOVE FRONT FENDER TO COWL SIDE SEAL LH |
Using a clip remover, detach the claw and remove the cowl side seal.
| 5. REMOVE FRONT FENDER TO COWL SIDE SEAL RH |
| 6. REMOVE COWL TOP VENTILATOR LOUVER SUB-ASSEMBLY |
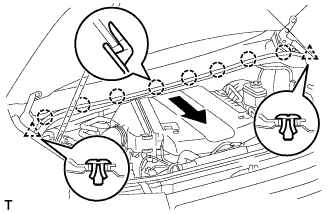 |
Remove the 2 clips.
Detach the 8 claws and remove the ventilator louver.
| 7. REMOVE FRONT DOOR OPENING TRIM WEATHERSTRIP LH |
Partially remove the front door opening trim weatherstrip LH so that the front pillar garnish LH can be removed .
| 8. REMOVE FRONT DOOR OPENING TRIM WEATHERSTRIP RH |
| 9. REMOVE FRONT PILLAR GARNISH LH |
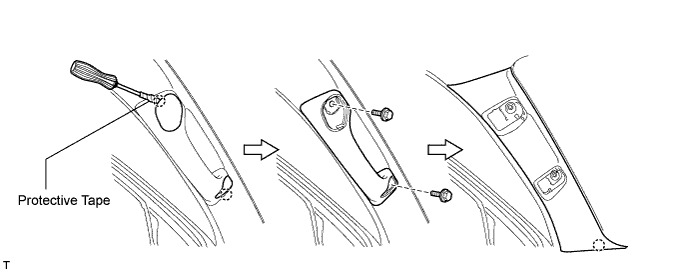
Using a screwdriver, detach the 2 claws and remove the 2 assist grip plugs.
Remove the 2 bolts and assist grip.
Detach the claw and remove the front pillar garnish.
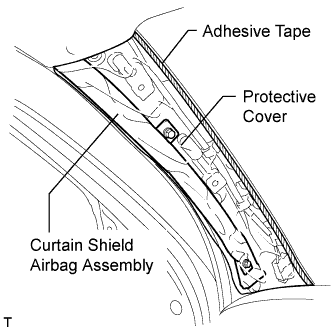 |
Protect the curtain shield airbag.
Thoroughly cover the airbag with a cloth or nylon sheet and fix the ends of the cover with adhesive tape, as shown in the illustration.
| 10. REMOVE FRONT PILLAR GARNISH RH |
| 11. REMOVE INNER REAR VIEW MIRROR ASSEMBLY |
w/ EC Mirror:
Remove the inner mirror .
w/o EC Mirror:
Remove the inner mirror .
| 12. REMOVE ROOF CONSOLE BOX ASSEMBLY |
for Short Type:
Remove the roof console box (Click here).
for Long Type:
Remove the roof console box (Click here).
| 13. REMOVE VISOR BRACKET COVER LH |
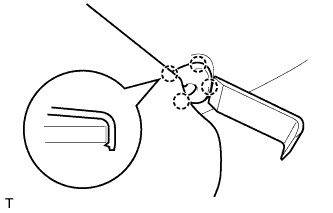 |
Using a moulding remover, detach the 4 claws and remove the visor bracket cover.
| 14. REMOVE VISOR BRACKET COVER RH |
| 15. REMOVE VISOR ASSEMBLY LH |
for Regular Cab:
Remove the visor .
for Double Cab:
Remove the visor .
for CrewMax:
Remove the visor .
| 16. REMOVE VISOR ASSEMBLY RH |
| 17. REMOVE VISOR HOLDER |
for Regular Cab:
Remove the visor holder .
for Double Cab, w/o Illumination:
Remove the visor holder .
for CrewMax, w/o Illumination:
Remove the visor holder .
| 18. REMOVE ASSIST GRIP SUB-ASSEMBLY |
for Regular Cab, for Double Cab:
Remove the assist grip .
for CrewMax:
Remove the assist grip .
| 19. REMOVE ASSIST GRIP PLUG |
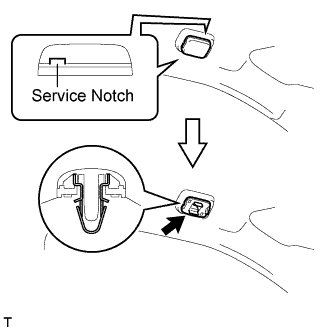 |
Insert a screwdriver into the service notch and break off the cap.
Detach the clip and remove the assist grip plug.
| 20. REMOVE ROOF HEADLINING ASSEMBLY |
Partially remove the roof headlining.
| 21. REMOVE REAR ROOF DRIP SIDE FINISH MOULDING LH |
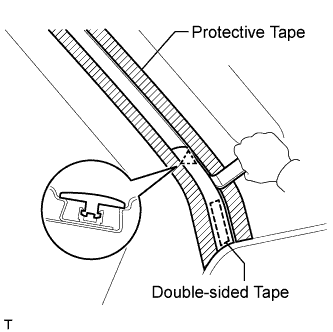 |
Put protective tape around the moulding.
Using a heat light, heat the moulding.
Using a moulding remover, detach the clip and remove the moulding.
| 22. REMOVE REAR ROOF DRIP SIDE FINISH MOULDING RH |
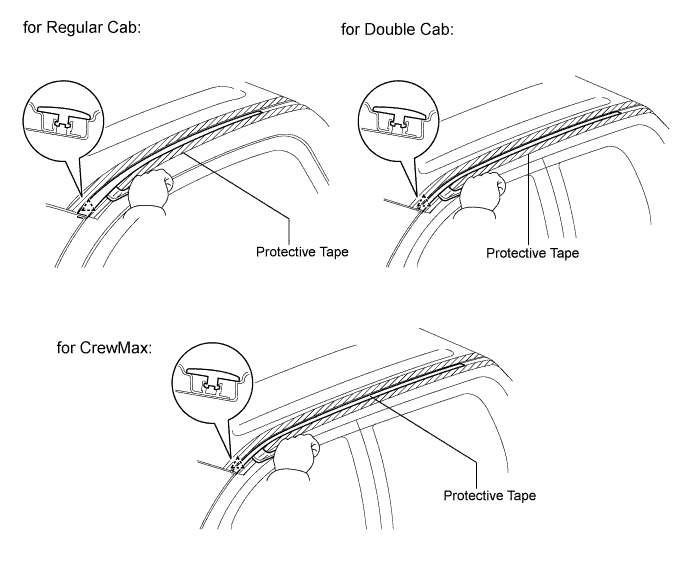
| 23. REMOVE ROOF DRIP SIDE FINISH MOULDING LH |
Put protective tape around the moulding.
Using a moulding remover, detach the clip and remove the moulding.
| 24. REMOVE ROOF DRIP SIDE FINISH MOULDING RH |
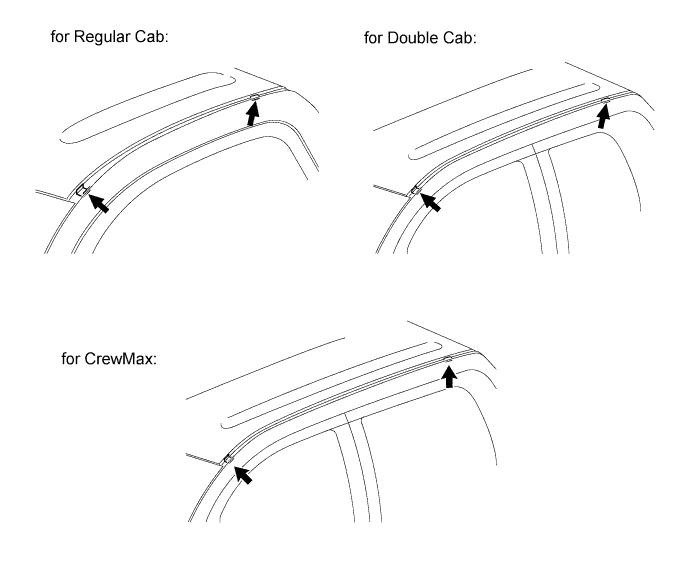
| 25. REMOVE ROOF DRIP SIDE FINISH MOULDING CLIP |
Remove the 2 roof drip side finish moulding clips.
| 26. REMOVE OUTSIDE WINDSHIELD MOULDING |
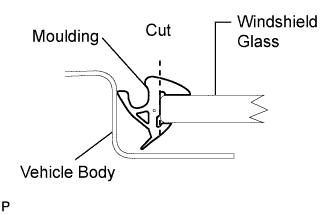 |
Using a knife, cut off the moulding as shown in the illustration.
Remove the remaining moulding.
| 27. REMOVE UPPER WINDSHIELD OUTSIDE MOULDING |
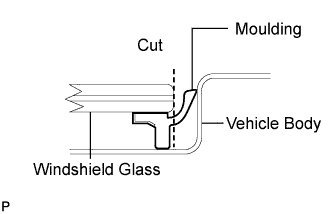 |
Using a knife, cut off the moulding as shown in the illustration.
Remove the remaining moulding.
| 28. REMOVE WINDSHIELD GLASS |
 |
w/ Windshield Deicer:
Remove the clip and disconnect the connector.
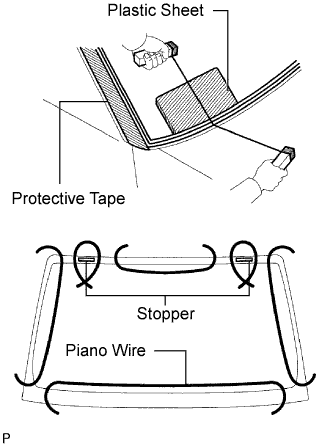
Apply protective tape to the outer surface of the vehicle body to prevent scratches.
From the interior, insert a piano wire between the vehicle body and glass as shown in the illustration.
Tie objects that can serve as handles (for example, wooden blocks) to both wire ends.
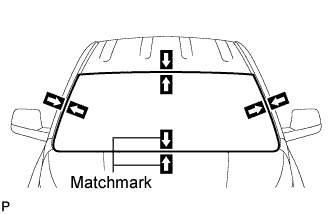 |
Place matchmarks over the glass and vehicle body on the locations indicated in the illustration.
Cut through the adhesive by pulling the piano wire around the glass.
Disengage the stoppers.
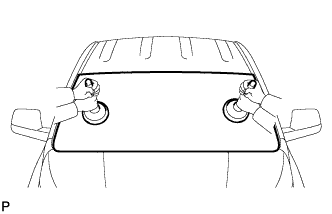 |
Using suction cups, remove the glass.
| 29. CLEAN WINDSHIELD GLASS |
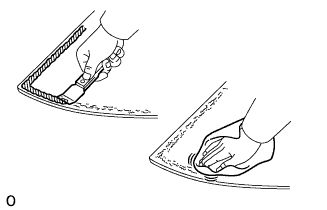 |
Using a scraper, remove the damaged stoppers, dams and adhesive sticking to the glass.
Clean the outer edges of the glass with non-residue solvent.
| 30. CLEAN VEHICLE BODY |
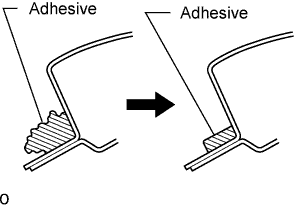 |
Clean and shape the contact surface of the vehicle body.
On the contact surface of the vehicle body, use a knife to cut away excess adhesive as shown in the illustration.
Clean the contact surface of the vehicle body with cleaner.