Home › ENGINE · 1GR-FE › ENGINE MECHANICAL › CYLINDER HEAD GASKET (for Bank 2)

CYLINDER HEAD GASKET (for Bank 2) > INSTALLATION

for Preparation Click here


1. INSTALL NO. 2 CYLINDER HEAD GASKET
  1. Remove any old packing (FIPG) material and be careful not to drop any oil on the contact surfaces of the cylinder head and cylinder block.


    A076275E07
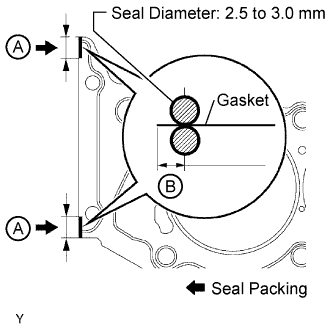
  1. Apply seal packing to a new cylinder head gasket as shown in the illustration.

    Seal packing:
    Toyota Genuine Seal Packing Black, Three Bond 1207B or equivalent

    Standard seal diameter:
    2.5 to 3.0 mm (0.0984 to 0.118 in.)

    Seal packing application range 
    A
    10 to 15 mm (0.394 to 0.591 in.)
    B
    1.25 to 1.5 mm (0.0492 to 0.0591 in.)

    HINT:
    1. Remove any oil from the contact surface.
    2. Install the cylinder head gasket within 3 minutes after applying the seal packing.
    3. Do not add engine oil within 2 hours of installation.


    A076272E02
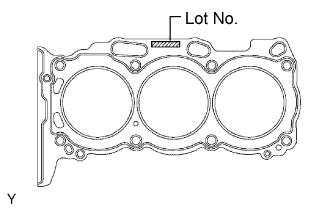
  1. Place the cylinder head gasket on the cylinder block surface with the front face of the Lot No. stamp upward.

    NOTICE:
    Be careful of the installation direction.


2. INSTALL CYLINDER HEAD SUB-ASSEMBLY LH
  1. Place the cylinder head on the cylinder head gasket.

    NOTICE:
    1. Ensure that no oil is on the mounting surface of the cylinder head.
    2. Gently place the cylinder head in order not to damage the gasket with the bottom part of the cylinder head.

  1. Install the 8 cylinder head bolts and plate washers.

    HINT:
    1. The cylinder head bolts are tightened in 3 progressive steps.
    2. If any cylinder head bolt is broken or deformed, replace it.


    1. Apply a light coat of engine oil to the threads and under the heads of the cylinder head bolts.

    2. Install the plate washer to the cylinder head bolt.


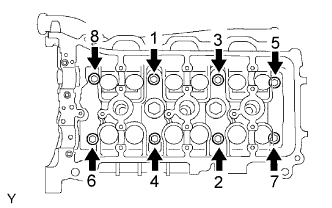
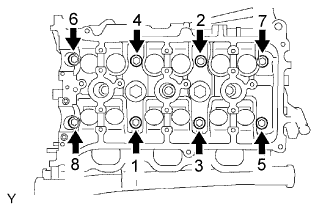
  1. Step 1:


      A076277E01
    1. Using a 10 mm bi-hexagon wrench, install and uniformly tighten the 8 cylinder head bolts with the plate washers in several steps in the sequence shown in the illustration.

      Torque:
      36 N*m{ 367 kgf*cm , 27 ft.*lbf }

      If any one of the cylinder head bolts does not meet the torque specification, replace the cylinder head bolt.


  1. Step 2:


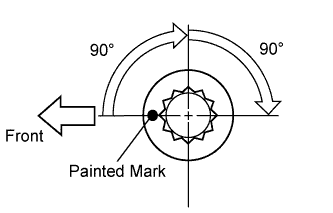
      A132162E01
    1. Mark the cylinder head bolt heads with paint as shown in the illustration.

    2. Tighten the cylinder head bolts another 90° in the sequence shown in step 1.

  1. Step 3:

    1. Tighten the cylinder head bolts by an additional 90° in the sequence shown in step 1.

  1. Check that the painted marks are now facing rearward.


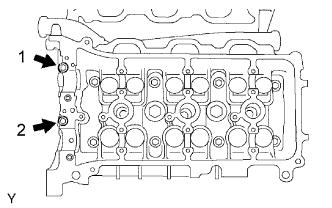
    A072969E05
  1. Install the 2 bolts in the order shown in the illustration.

    1. Apply a light coat of engine oil to the threads of the cylinder head bolts.

    2. Install the 2 cylinder head bolts. Using several steps, tighten the bolts uniformly in the sequence shown in the illustration.

      Torque:
      30 N*m{ 306 kgf*cm , 22 ft.*lbf }


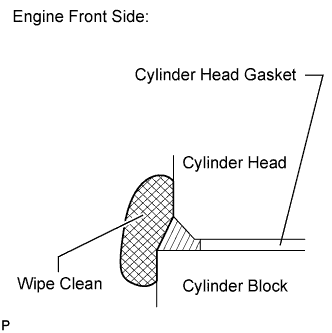
    A151149E02
  1. Seal packing will seep out from the engine's front side. Thoroughly wipe off seeped out seal packing.


3. INSTALL NO. 3 CAMSHAFT AND NO. 4 CAMSHAFT

NOTICE:
As the thrust clearance of the camshaft is small, the camshaft must be kept level while it is being installed. If the camshaft is not kept level, the portion of the cylinder head which receives the shaft thrust may crack or be damaged, causing the camshaft to seize or break. To avoid this, the following steps should be carried out.


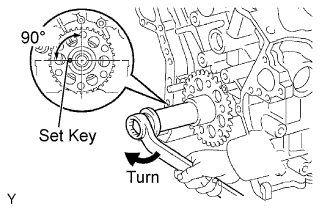
    A076280E02
  1. Set the crankshaft position.

    1. Install the crankshaft pulley set bolt, turn the crankshaft, and set the crankshaft set key into the left horizontal position.

      NOTICE:
      Setting the crankshaft at a wrong angle can cause the piston head and valve head to come into contact with each other when the camshaft is installed, causing damage. Always set the crankshaft at the correct angle.

  1. Apply a light coat of engine oil to the thrust portions and journals of the camshafts.


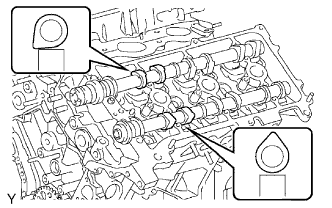
    A076284E06
  1. Place the 2 camshafts onto the cylinder head with the cam lobes of the No. 2 cylinder facing each direction as shown in the illustration.

  1. Apply a light coat of engine oil to the 8 bearing caps.


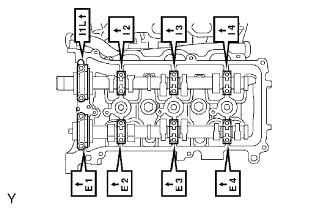
    A076285E06
  1. Install the 8 bearing caps in their proper locations.

  1. Apply a light coat of engine oil to the threads and under the heads of the 16 bearing cap bolts.


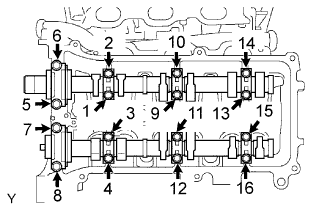
    A072968E14
  1. Uniformly install the 16 bearing cap bolts in several steps in the order shown in the illustration.

    Torque:
    for 10 mm head:
    9.0 N*m{ 92 kgf*cm , 80 in.*lbf }
    for 12 mm head:
    24 N*m{ 245 kgf*cm , 18 ft.*lbf }


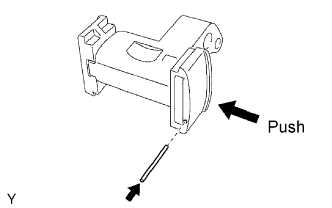
4. INSTALL NO. 3 CHAIN TENSIONER ASSEMBLY


    A076289E01
  1. While pushing in the tensioner, insert a pin of φ 1.0 mm (0.0394 in.) into the hole to fix it.


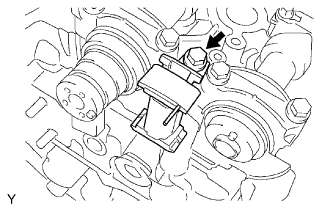
    A072965E01
  1. Install the No. 3 chain tensioner with the bolt.

    Torque:
    21 N*m{ 214 kgf*cm , 15 ft.*lbf }


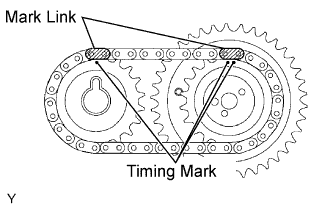
5. INSTALL CAMSHAFT TIMING GEARS AND NO. 2 CHAIN


    A076290E05
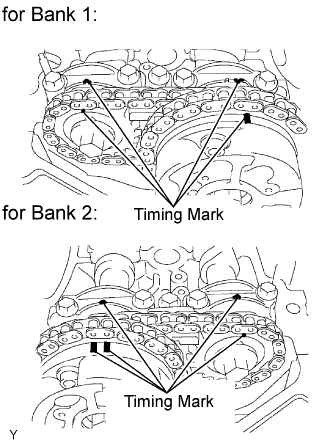
  1. Align the mark links (yellow) of the No. 2 chain with the timing marks (1-dot mark and 2-dot mark) of the camshaft timing gear and sprocket as shown in the illustration.


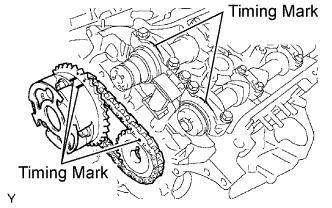
    G038111E02
  1. Align the timing marks on the camshaft timing gear and sprocket with the timing marks on the bearing caps, and install the camshaft timing gear and sprocket with the No. 2 chain to the camshafts.

  1. Temporarily install the camshaft timing gear bolt and camshaft timing sprocket bolt.

    NOTICE:
    Do not push the camshaft timing gear assembly to the camshaft forcibly when installing it.


    G038112E01
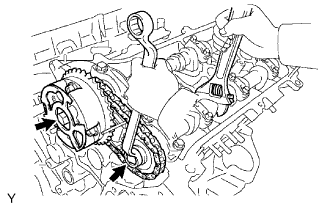
  1. Hold the hexagonal portion of the camshaft with a wrench, and tighten the 2 bolts.

    Torque:
    100 N*m{ 1020 kgf*cm , 74 ft.*lbf }

  1. Remove the pin from the No. 3 chain tensioner.


6. INSTALL NO. 1 CHAIN VIBRATION DAMPER


    A076292E01
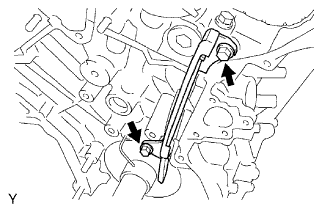
  1. Install the No. 1 chain vibration damper with the 2 bolts.

    Torque:
    19 N*m{ 194 kgf*cm , 14 ft.*lbf }


7. INSTALL CHAIN TENSIONER SLIPPER


8. INSTALL NO. 1 CHAIN TENSIONER ASSEMBLY


    A158631E01
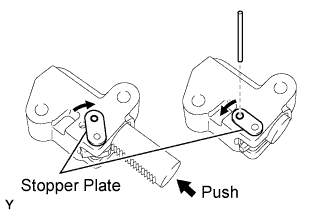
  1. While turning the stopper plate of the tensioner clockwise, push in the plunger of the tensioner as shown in the illustration.

  1. While turning the stopper plate of the tensioner counterclockwise, insert a bar of φ 3.5 mm (0.138 in.) into the holes on the stopper plate and tensioner to fix the stopper plate.

  1. Install the chain tensioner with the 2 bolts.

    Torque:
    10 N*m{ 102 kgf*cm , 7 ft.*lbf }


9. INSTALL NO. 1 CHAIN


    G038065E10
  1. Set the No. 1 cylinder to TDC / compression.

    1. Align the timing marks of the camshaft timing gears and sprockets with the timing marks of the bearing caps.


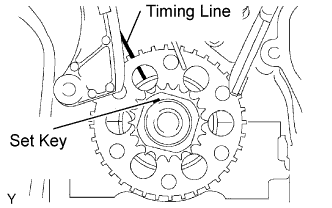
    2. A076296E03
    3. Install the crankshaft pulley set bolt, and turn the crankshaft to align the crankshaft set key with the timing line of the cylinder block.


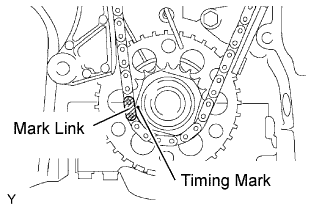
    A076297E04
  1. Align the mark link (yellow) with the timing mark of the crankshaft timing gear.


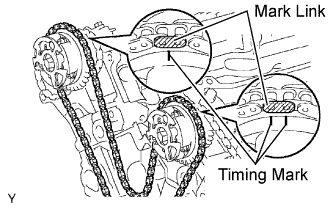
    G038092E03
  1. Align the mark links (orange) with the timing marks of the camshaft timing gears, and install the No. 1 chain.


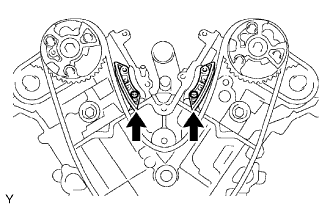
10. INSTALL NO. 2 CHAIN VIBRATION DAMPER


    G036844E01
  1. Install the 2 No. 2 chain vibration dampers.


11. INSTALL NO. 1 IDLE GEAR SHAFT
  1. Apply a light coat of engine oil to the rotating surface of the No. 1 idle gear shaft.


    A076299E03
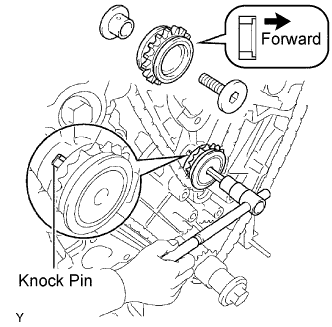
  1. Temporarily install the No. 1 idle gear shaft and No. 1 idle gear with the No. 2 idle gear shaft while aligning the knock pin of the No. 1 idle gear shaft with the knock pin groove of the cylinder block.

    NOTICE:
    Be careful of the idle gear direction.

  1. Using a 10 mm hexagon wrench, tighten the No. 2 idle gear shaft.

    Torque:
    60 N*m{ 612 kgf*cm , 44 ft.*lbf }

  1. Remove the bar from the chain tensioner.


12. INSTALL FRONT CRANKSHAFT OIL SEAL


    A076300E03
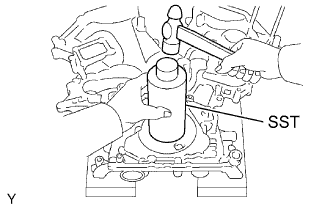
  1. Using SST and a hammer, tap in a new oil seal until its surface is flush with the timing chain cover edge.

    SST
    09226-10010  

  1. Apply MP grease to the oil seal lip.


13. INSTALL TIMING CHAIN COVER SUB-ASSEMBLY
  1. Remove any old packing (FIPG) material and be careful not to drop any oil on the contact surfaces of the timing chain cover, cylinder head and cylinder block.


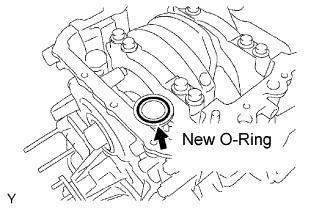
    G038103E02
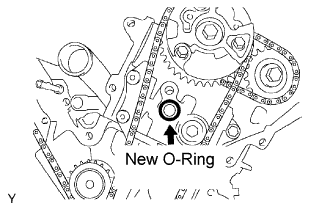
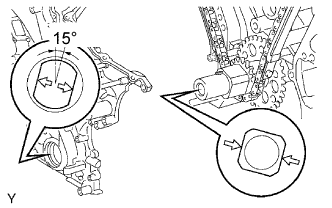
  1. Install a new O-ring to the cylinder head for bank 2 shown in the illustration.


    G038104E02
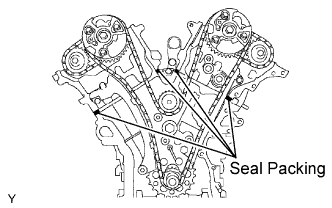
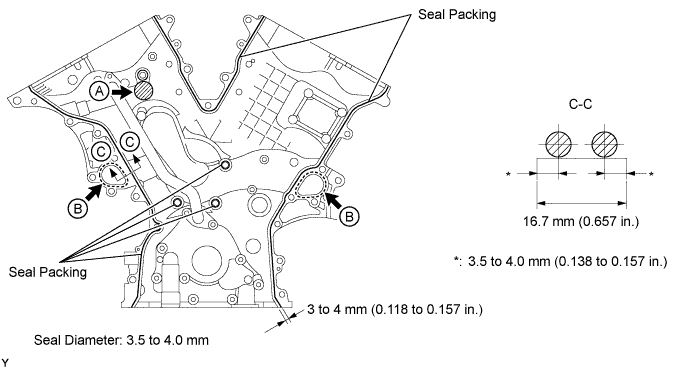
  1. Apply seal packing as shown in the illustration.

    Seal packing:
    Toyota Genuine Seal Packing Black, Three Bond 1207B or equivalent

    Standard seal diameter:
    3.0 to 4.0 mm (0.118 to 0.157 in.)


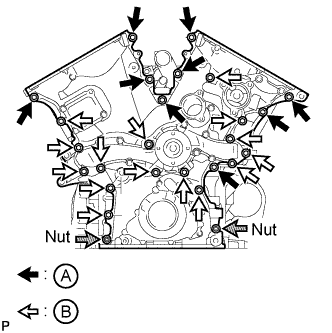
  1. Apply seal packing in a continuous line to the timing chain cover as shown in the illustration.


    A158650E01

    Seal packing:
    for water related part:
    Toyota Genuine Seal Packing 1282B, Three Bond 1282B or equivalent
    for oil related part:
    Toyota Genuine Seal Packing Black, Three Bond 1207B or equivalent

    Standard seal diameter:
    3.0 to 4.0 mm (0.118 to 0.157 in.)

    HINT:
    Water related part is "B" shown in the illustration.

    NOTICE:
    1. Install the timing chain cover within 3 minutes after applying seal packing. After installing it, the timing chain cover bolts and nuts must be tightened within 15 minutes. Otherwise the seal packing must be removed and reapplied.
    2. Do not apply seal packing to "A" shown in the illustration.


    A076304E03
  1. Align the key way of the oil pump drive rotor with the rectangular portion of the crankshaft timing gear, and slide the timing chain cover into place.


    A158566E01
  1. Install the timing chain cover with the 24 bolts labeled A and B, and 2 nuts. Tighten the bolts and nuts uniformly in several steps.

    Torque:
    23 N*m{ 235 kgf*cm , 17 ft.*lbf }

    NOTICE:
    1. Make sure not to wrap the No. 1 chain and slipper over the timing chain cover seal line.
    2. After installing the timing chain cover, install the water pump within 15 minutes.

    Bolt length:
    Item
    Quantity
    Length
    A
    9
    25 mm (0.984 in.)
    B
    15
    55 mm (2.17 in.)

    NOTICE:
    Make sure that there is no oil on the bolt threads.


14. INSTALL OIL FILTER BRACKET SUB-ASSEMBLY
  1. Set a new O-ring to the timing chain cover.


    A151244
  1. Install the oil filter bracket with the 3 bolts and 2 nuts.

    Torque:
    19 N*m{ 194 kgf*cm , 14 ft.*lbf }


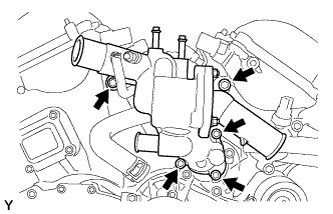
15. INSTALL WATER INLET HOUSING


    A134567E01
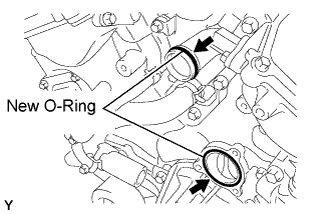
  1. Apply soapy water to a new O-ring, install it to the water outlet pipe.

  1. Install a new O-ring to the water pump.

  1. Install a new gasket to the water pump.


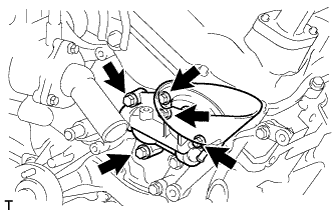
    A134568
  1. Install the water inlet with the 5 bolts.

    Torque:
    9.0 N*m{ 92 kgf*cm , 80 in.*lbf }


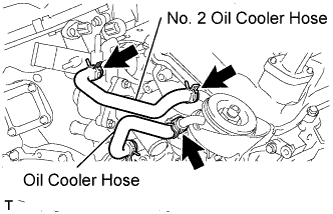
16. CONNECT OIL COOLER HOSE


A151242E02


17. CONNECT NO. 2 OIL COOLER HOSE


18. INSTALL OIL PAN SUB-ASSEMBLY
  1. Remove any old packing (FIPG) material and be careful not to drop any oil on the contact surfaces of the cylinder block, rear oil seal retainer and oil pan.


    A076306E03
  1. Install a new O-ring to the oil pan.


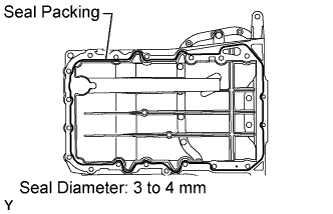
    A134571E03
  1. Apply seal packing in a continuous line as shown in the illustration.

    Seal packing:
    Toyota Genuine Seal Packing Black, Three Bond 1207B or equivalent

    Standard seal diameter:
    3 to 4 mm (0.118 to 0.157 in.)

    NOTICE:
    1. Remove any oil from the contact surface.
    2. Install the oil pan within 3 minutes after applying seal packing.
    3. Do not start the engine for at least 2 hours after installing.


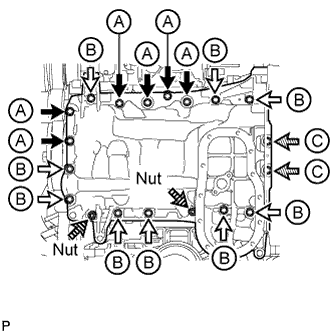
    A151272E02
  1. Install the oil pan with the 17 bolts (A, B and C) and 2 nuts. Tighten the bolts and nuts uniformly in several steps.

    Torque:
    for bolt A, B and nut:
    21 N*m{ 214 kgf*cm , 15 ft.*lbf }
    for bolt C:
    10 N*m{ 102 kgf*cm , 7 ft.*lbf }

    Standard bolt length 
    Item
    Quantity
    Length
    A
    6
    25 mm (0.984 in.)
    B
    9
    45 mm (1.77 in.)
    C
    2
    14 mm (0.551 in.)


19. INSTALL OIL STRAINER SUB-ASSEMBLY


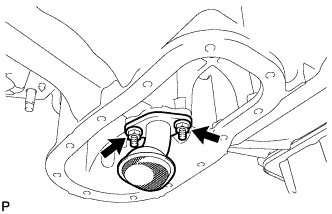
    A151271
  1. Install a new gasket and the oil strainer with the 2 nuts.

    Torque:
    9.0 N*m{ 92 kgf*cm , 80 in.*lbf }


20. INSTALL NO. 2 OIL PAN SUB-ASSEMBLY


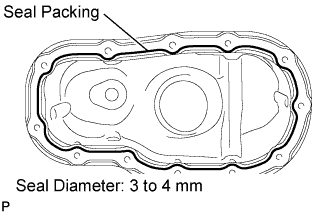
    A151274E02
  1. Apply seal packing in a continuous line as shown in the illustration.

    Seal packing:
    Toyota Genuine Seal Packing Black, Three Bond 1207B or equivalent

    Standard seal diameter:
    3 to 4 mm (0.118 to 0.157 in.)

    NOTICE:
    1. Remove any oil from the contact surface.
    2. Install the oil pan No. 2 within 3 minutes after applying seal packing.
    3. Do not start the engine for at least 2 hours after the installation.


    A151269E01
  1. Install the No. 2 oil pan with the 10 bolts and 2 nuts. Tighten the bolts and nuts uniformly in several steps.

    Torque:
    for bolt:
    9.0 N*m{ 92 kgf*cm , 81 in.*lbf }
    for nut:
    10 N*m{ 102 kgf*cm , 7 ft.*lbf }


21. INSTALL CRANKSHAFT PULLEY


    A076309E03
  1. Using SST, install the pulley set bolt.

    SST
    09213-54015   (91651-60855)
    09330-00021  

    Torque:
    250 N*m{ 2549 kgf*cm , 184 ft.*lbf }


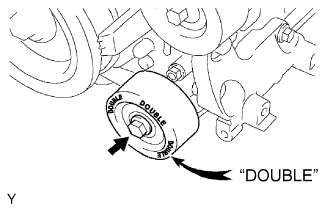
22. INSTALL NO. 1 IDLER PULLEY SUB-ASSEMBLY


    A076438E01
  1. Install the No. 1 idler pulley with the bolt.

    Torque:
    54 N*m{ 551 kgf*cm , 40 ft.*lbf }

    HINT:
    "DOUBLE" is marked on the No. 1 idler pulley to distinguish it from the No. 2 idler pulley.


23. INSTALL NO. 2 IDLER PULLEY SUB-ASSEMBLY

NOTICE:
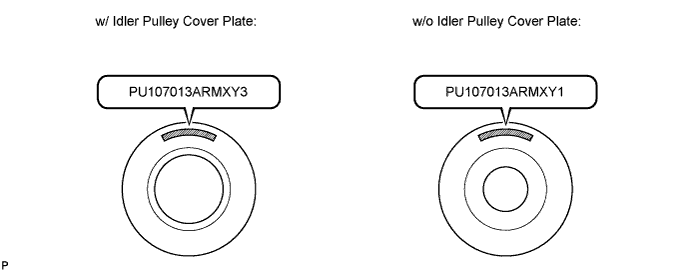
The installation of the No. 2 idler pulleys differs depending on the mark on the No. 2 idler pulleys shown in the illustration.
A191316E01

HINT:
Use the same procedure for both No. 2 idler pulleys.


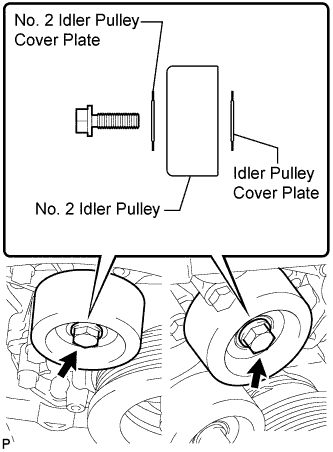
  1. w/ Idler Pulley Cover Plate (PU107013ARMXY3):


      A191314E01
    1. Install the idler pulley cover plate, idler pulley and No. 2 idler pulley cover plate with the bolt.

      Torque:
      54 N*m{ 551 kgf*cm , 40 ft.*lbf }

      NOTICE:
      1. If it is necessary to replace the pulley or either plate, replace the No. 2 idler pulley cover plate, No. 2 idler pulley and idler pulley cover plate as a set with new parts.
      2. When replacing parts, make sure to replace the No. 2 idler pulley with a new pulley marked "PU107013ARMXY3".


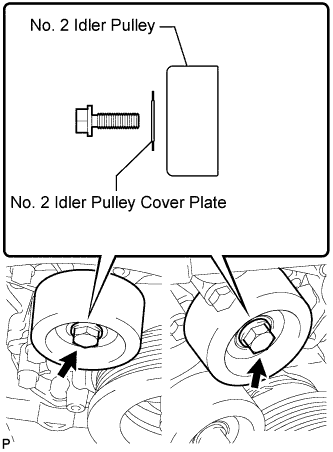
  1. w/o Idler Pulley Cover Plate (PU107013ARMXY1):


      A191315E01
    1. Install the idler pulley and No. 2 idler pulley cover plate with the bolt.

      Torque:
      54 N*m{ 551 kgf*cm , 40 ft.*lbf }

      NOTICE:
      1. If it is necessary to replace the pulley or plate, replace both the pulley and plate with a set of new parts that includes a No. 2 idler pulley cover plate, No. 2 idler pulley and idler pulley cover plate.
      2. When replacing parts, make sure to replace the No. 2 idler pulley with a new pulley marked "PU107013ARMXY3".


24. INSTALL CYLINDER HEAD COVER SUB-ASSEMBLY RH
  1. Place the cylinder head on the cylinder head gasket.

    NOTICE:
    1. Ensure that no oil is on the mounting surface of the cylinder head.
    2. Gently place the cylinder head in order not to damage the gasket with the bottom part of the cylinder head.

  1. Install the 8 cylinder head bolts and plate washers.

    HINT:
    1. The cylinder head bolts are tightened in 3 progressive steps.
    2. If any cylinder head bolt is broken or deformed, replace it.


    1. Apply a light coat of engine oil to the threads and under the heads of the cylinder head bolts.

    2. Install the plate washer to the cylinder head bolt.


  1. Step 1:


      A076273E02
    1. Using a 10 mm bi-hexagon wrench, install and uniformly tighten the 8 cylinder head bolts with the plate washers in several steps in the sequence shown in the illustration.
      Torque:
      36 N*m{ 367 kgf*cm , 27 ft.*lbf }

      If any one of the cylinder head bolts does not meet the torque specification, replace the cylinder head bolt.


  1. Step 2:


      A132162E01
    1. Mark the cylinder head bolt heads with paint as shown in the illustration.
    2. Tighten the cylinder head bolts another 90° in the sequence shown in step 1.

  1. Step 3:

    1. Tighten the cylinder head bolts by an additional 90° in the sequence shown in step 1.

  1. Check that the painted marks are now facing rearward.


    A151149E02
  1. Seal packing will seep out from the engine's front side. Thoroughly wipe off seeped out seal packing.


25. INSTALL CYLINDER HEAD COVER SUB-ASSEMBLY LH
  1. Place the cylinder head on the cylinder head gasket.

    NOTICE:
    1. Ensure that no oil is on the mounting surface of the cylinder head.
    2. Gently place the cylinder head in order not to damage the gasket with the bottom part of the cylinder head.

  1. Install the 8 cylinder head bolts and plate washers.

    HINT:
    1. The cylinder head bolts are tightened in 3 progressive steps.
    2. If any cylinder head bolt is broken or deformed, replace it.


    1. Apply a light coat of engine oil to the threads and under the heads of the cylinder head bolts.

    2. Install the plate washer to the cylinder head bolt.


  1. Step 1:


      A076277E01
    1. Using a 10 mm bi-hexagon wrench, install and uniformly tighten the 8 cylinder head bolts with the plate washers in several steps in the sequence shown in the illustration.
      Torque:
      36 N*m{ 367 kgf*cm , 27 ft.*lbf }

      If any one of the cylinder head bolts does not meet the torque specification, replace the cylinder head bolt.


  1. Step 2:


      A132162E01
    1. Mark the cylinder head bolt heads with paint as shown in the illustration.
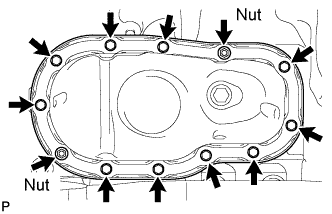
    2. Tighten the cylinder head bolts another 90° in the sequence shown in step 1.
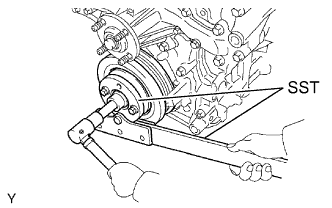
  1. Step 3:

    1. Tighten the cylinder head bolts by an additional 90° in the sequence shown in step 1.

  1. Check that the painted marks are now facing rearward.


    A072969E05
  1. Install the 2 bolts in the order shown in the illustration.

    1. Apply a light coat of engine oil to the threads of the cylinder head bolts.

    2. Install the 2 cylinder head bolts. Using several steps, tighten the bolts uniformly in the sequence shown in the illustration.

      Torque:
      30 N*m{ 306 kgf*cm , 22 ft.*lbf }


    A151149E02
  1. Seal packing will seep out from the engine's front side. Thoroughly wipe off seeped out seal packing.


26. INSTALL ENGINE OIL LEVEL DIPSTICK GUIDE


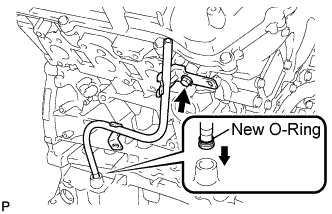
    A158543E01
  1. Install a new O-ring to the dipstick guide.

  1. Apply a light coat of engine oil to the O-ring.

  1. Push the dipstick guide end into the guide hole.

  1. Install the dipstick guide with the bolt.

    Torque:
    9.0 N*m{ 92 kgf*cm , 80 in.*lbf }


27. INSTALL V-RIBBED BELT TENSIONER ASSEMBLY


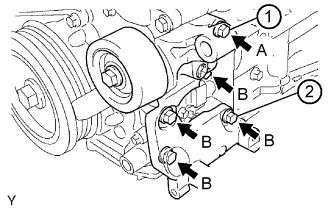
    A076445E04
  1. Temporarily install the V-ribbed belt tensioner with the 5 bolts.

  1. Install the V-ribbed belt tensioner by tightening bolt 1 and 2 in numerical order.

    Torque:
    36 N*m{ 367 kgf*cm , 27 ft.*lbf }

  1. Tighten the other bolts.

    Torque:
    36 N*m{ 367 kgf*cm , 27 ft.*lbf }

    Bolt length:
    Item
    Length
    A
    70 mm (2.76 in.)
    B
    33 mm (1.30 in.)


28. INSTALL REAR WATER BY-PASS JOINT


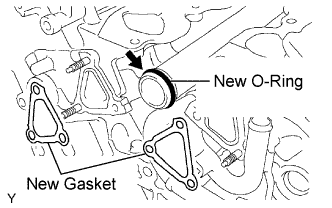
    A076535E03
  1. Install a new O-ring to the water outlet pipe, and set 2 new gaskets to the water ports LH and RH.

  1. Apply soapy water to the O-ring.


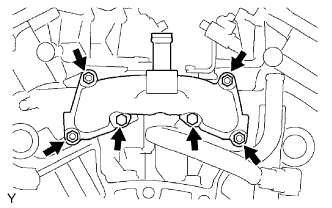
    A076534E01
  1. Install the rear water by-pass joint with the 2 bolts and 4 nuts.

    Torque:
    9.0 N*m{ 92 kgf*cm , 80 in.*lbf }

  1. Connect the engine coolant temperature sensor connector.


29. INSTALL HEATER WATER PIPE SUB-ASSEMBLY


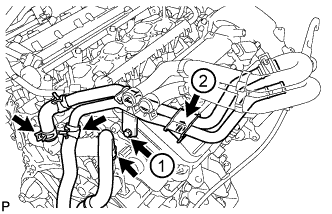
    A158634E01
  1. Temporarily install the heater water pipe, and then tighten the 2 bolts in the order shown in the illustration.

    Torque:
    9.8 N*m{ 100 kgf*cm , 87 in.*lbf }

  1. Connect the 3 water hoses.


30. INSTALL OIL CONTROL VALVE FILTER


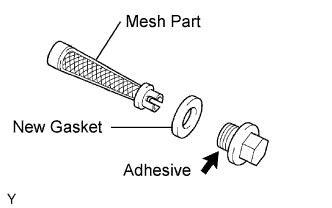
    A076312E04
  1. Install 2 new gaskets to 2 new unions.

  1. Insert new filters to the unions.

  1. Apply adhesive to 2 or 3 threads of the unions.

    Adhesive:
    Toyota Genuine Adhesive 1344, Three Bond 1344 or equivalent


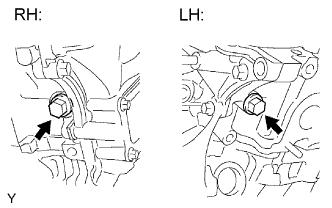
    A072942E06
  1. Install the unions to each cylinder head.

    Torque:
    62 N*m{ 632 kgf*cm , 46 ft.*lbf }


31. CONNECT HEATER WATER PIPE SUB-ASSEMBLY
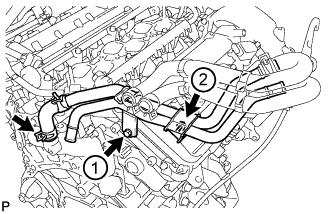
  1. Connect the heater water by-pass pipe's hose to the rear water by-pass joint.


    A151267E02
  1. Temporarily install the heater water pipe, and then tighten the 2 bolts in the order shown in the illustration.

    Torque:
    9.8 N*m{ 100 kgf*cm , 87 in.*lbf }


32. INSTALL CAMSHAFT TIMING OIL CONTROL VALVE ASSEMBLY


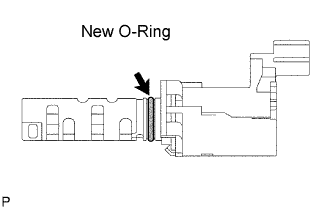
    A093611E01
  1. Apply a light coat of engine oil to a new O-ring of the oil control valve.


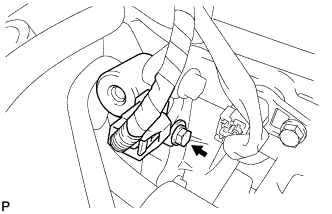
    A111700E01
  1. Install the oil control valve with the bolt.

    Torque:
    10 N*m{ 102 kgf*cm , 7 ft.*lbf }

    NOTICE:
    Be careful that the O-ring is not cracked when installing the oil control valve.

  1. Connect the oil control valve connector.


33. INSTALL VVT SENSOR


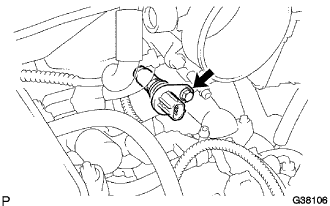
    G038106
  1. Apply a light coat of engine oil to the O-ring of the VVT sensor.

  1. Install the VVT sensor with the bolt.

    Torque:
    8.0 N*m{ 82 kgf*cm , 71 in.*lbf }

  1. Connect the sensor connector.


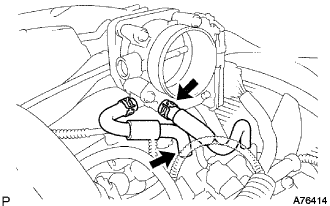
    A076414
  1. Connect the No. 4 and No. 5 water by-pass hoses.


34. INSTALL SPARK PLUG
  1. Using a 16 mm plug wrench, install the 6 spark plugs.

    Torque:
    20 N*m{ 204 kgf*cm , 15 ft.*lbf }


35. INSTALL IGNITION COIL ASSEMBLY


    A151791
  1. Install the 6 ignition coils with the 6 bolts.

    Torque:
    9.0 N*m{ 92 kgf*cm , 80 in.*lbf }

  1. Connect the 6 ignition coil connectors.


36. INSTALL ENGINE ASSEMBLY
  1. Install the engine assembly to the vehicle (Click here).