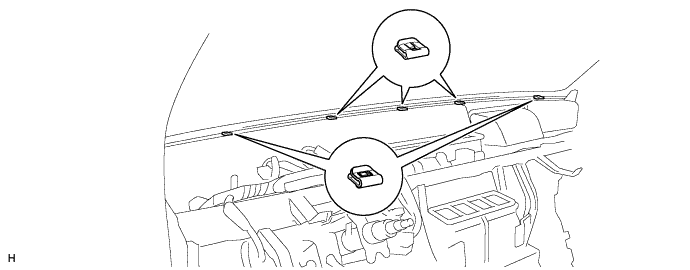
INSTRUMENT PANEL SAFETY PAD (for Floor Shift Type) > REMOVAL |
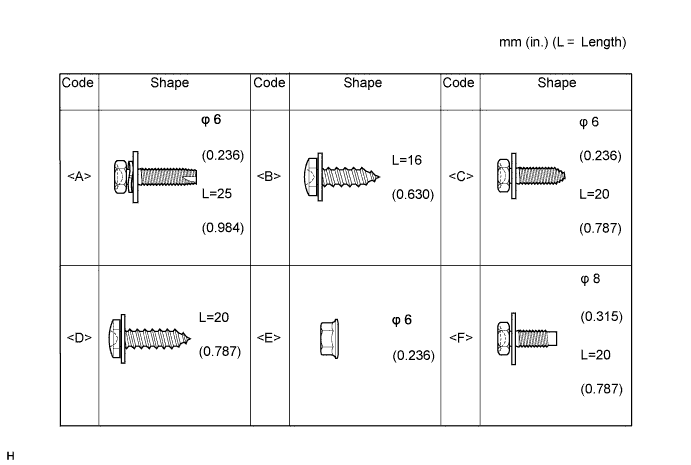
| 1. TABLE OF BOLT, SCREW AND NUT |
| 2. DISCONNECT CABLE FROM NEGATIVE BATTERY TERMINAL |
Turn the ignition switch OFF and disconnect the cable from the negative (-) battery terminal.
| 3. REMOVE LOWER NO. 2 STEERING WHEEL COVER |
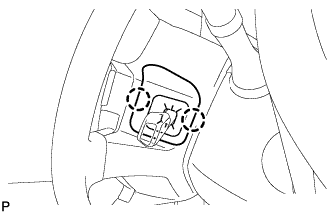 |
w/ Cruise Control:
Using a screwdriver, remove the No. 2 steering wheel cover.
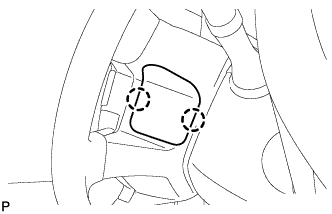 |
w/o Cruise Control:
Using a screwdriver, remove the No. 2 steering wheel cover.
| 4. REMOVE LOWER NO. 3 STEERING WHEEL COVER |
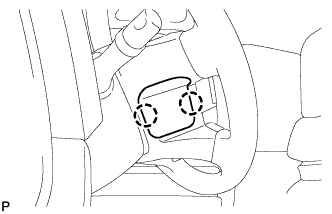 |
Using a screwdriver, remove the steering wheel cover.
| 5. REMOVE STEERING PAD (w/o Steering Pad Switch) |
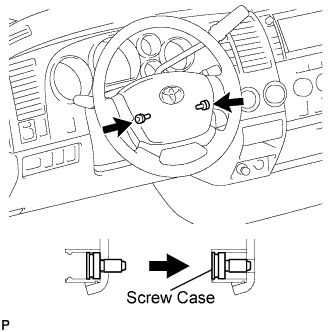 |
Using a T30 "TORX" socket wrench, loosen the 2 screws until the groove along the screw circumference catches on the screw case.
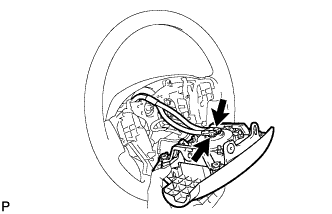 |
Pull out the steering pad from the steering wheel, as shown in the illustration. Then support the steering pad with one hand.
Disconnect the 2 connectors and remove the steering pad.
| 6. REMOVE STEERING PAD (w/ Steering Pad Switch) |
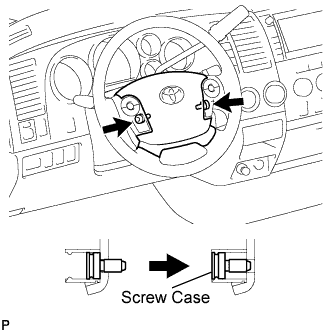 |
Using a T30 "TORX" socket wrench, loosen the 2 screws until the groove along the screw circumference catches on the screw case.
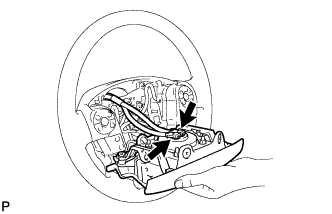 |
Pull out the steering pad from the steering wheel, as shown in the illustration. Then support the steering pad with one hand.
Disconnect the 2 connectors and remove the steering pad.
| 7. REMOVE STEERING WHEEL ASSEMBLY |
Remove the steering wheel set nut.
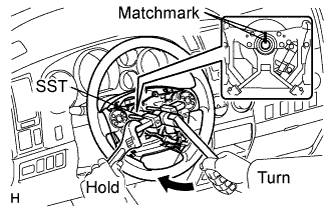 |
Put matchmarks on the steering wheel and main shaft.
Using SST, remove the steering wheel.
| 8. REMOVE LOWER STEERING COLUMN COVER (for Manual Tilt and Manual Telescopic Steering Column) |
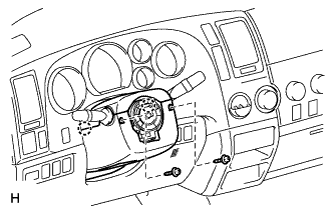 |
Remove the 2 screws.
Detach the 2 claws to remove the lower steering column cover.
| 9. REMOVE LOWER STEERING COLUMN COVER (for Power Tilt and Power Telescopic Steering Column) |
|
Remove the 2 screws.
Detach the 2 claws to remove the lower steering column cover.
| 10. REMOVE UPPER STEERING COLUMN COVER (for Manual Tilt and Manual Telescopic Steering Column) |
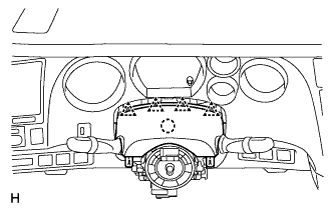 |
Detach the 4 clips.
Detach the claw to remove the upper steering column cover.
| 11. REMOVE UPPER STEERING COLUMN COVER (for Power Tilt and Power Telescopic Steering Column) |
|
Detach the 4 clips.
Detach the claw to remove the upper steering column cover.
| 12. REMOVE TILT AND TELESCOPIC MANUAL SWITCH (for Power Tilt and Power Telescopic Steering Column) |
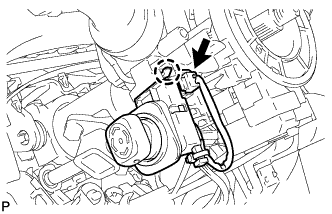 |
Disconnect the connector.
Using a screwdriver, detach the claw and pull out the tilt and telescopic switch.
| 13. REMOVE TURN SIGNAL SWITCH ASSEMBLY WITH SPIRAL CABLE SUB-ASSEMBLY |
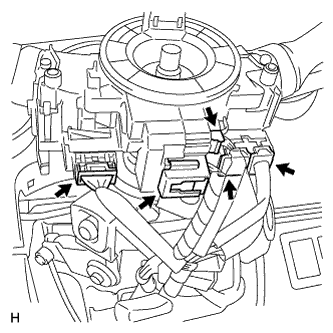 |
Disconnect the 5 connectors from the turn signal switch with spiral cable.
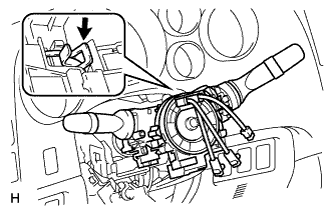 |
Using pliers, grip the claws of the clamp and remove the turn signal switch with spiral cable from the steering column.
| 14. REMOVE FRONT DOOR SCUFF PLATE LH (for Regular Cab) |
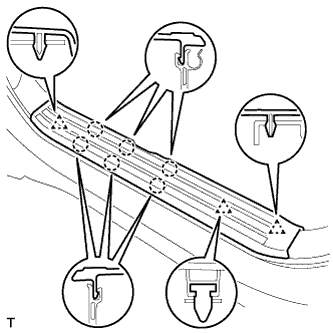 |
Detach the 6 claws and 3 clips, and remove the scuff plate.
| 15. REMOVE FRONT DOOR SCUFF PLATE LH (for Double Cab, CrewMax) |
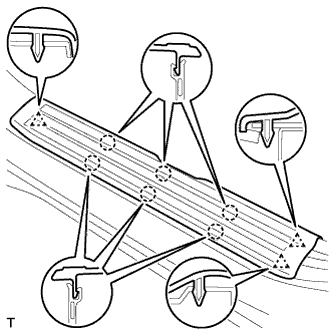 |
Detach the 6 claws and 3 clips, and remove the scuff plate.
| 16. REMOVE COWL SIDE TRIM BOARD LH |
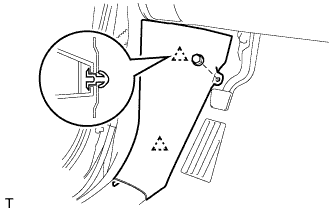 |
Remove the clip.
Detach the 2 clips and remove the cowl side trim board.
| 17. REMOVE FRONT DOOR OPENING TRIM WEATHERSTRIP LH (for Regular Cab) |
| 18. REMOVE FRONT DOOR OPENING TRIM WEATHERSTRIP LH (for Double Cab, CrewMax) |
| 19. REMOVE FRONT PILLAR GARNISH LH |
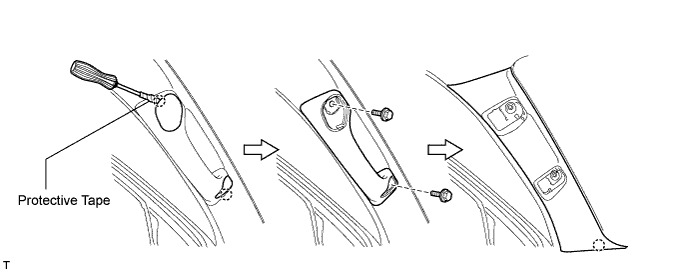
Using a screwdriver, detach the 2 claws and remove the 2 assist grip plugs.
Remove the 2 bolts and assist grip.
Detach the claw and remove the front pillar garnish.
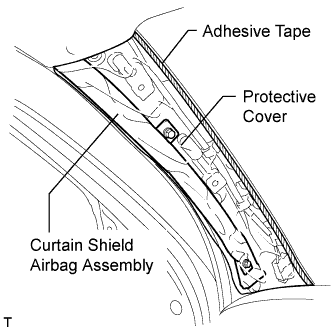 |
Protect the curtain shield airbag.
Thoroughly cover the airbag with a cloth or nylon sheet and fix the ends of the cover with adhesive tape, as shown in the illustration.
| 20. REMOVE INSTRUMENT SIDE PANEL LH |
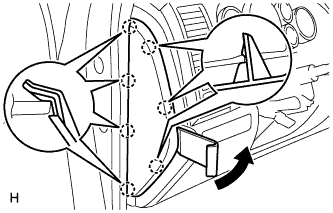 |
Using a moulding remover, detach the 7 claws and remove the side panel.
| 21. REMOVE LOWER INSTRUMENT PANEL FINISH PANEL SUB-ASSEMBLY LH |
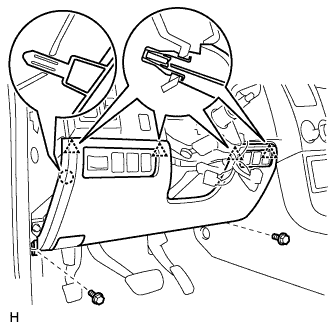 |
Remove the hood lock control lever.
Remove the 2 bolts.
Detach the 4 clips and claw.
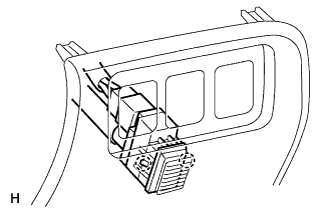 |
for Automatic Air Conditioning System:
Detach the 2 claws and remove the sensor.
Remove the finish panel and then disconnect the connectors.
| 22. REMOVE SHIFT LEVER KNOB SUB-ASSEMBLY |
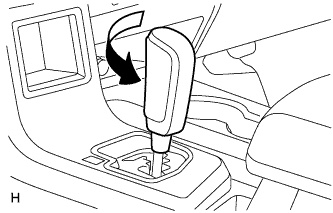 |
Twist the shift lever knob in the direction indicated by the arrow and remove it.
| 23. REMOVE UPPER CONSOLE PANEL SUB-ASSEMBLY |
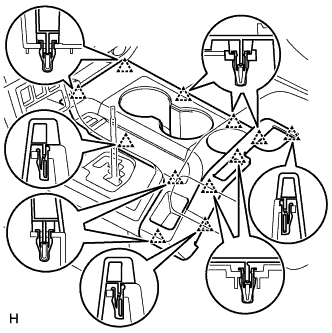 |
Detach the 12 clips and remove the console panel.
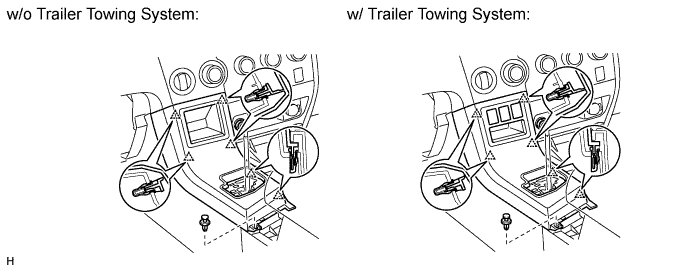
| 24. REMOVE REAR UPPER CONSOLE PANEL SUB-ASSEMBLY |
Remove the clip.
Detach the 6 clips and remove the console panel.
w/Trailer Towing System:
Disconnect the connector
| 25. REMOVE REAR CONSOLE END PANEL SUB-ASSEMBLY |
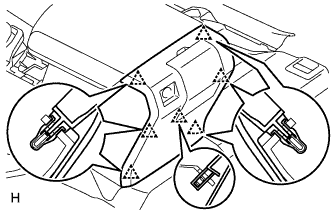 |
Using a moulding remover, detach the 7 clips and remove the end panel.
except Regular Cab:
Disconnect the connector.
| 26. REMOVE CONSOLE BOX CARPET |
| 27. REMOVE REAR CONSOLE BOX ASSEMBLY |
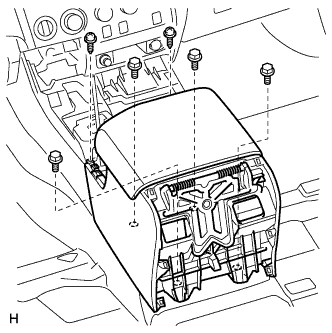 |
Remove the 2 screws.
Remove the 4 bolts and rear console box.
| 28. REMOVE FRONT CONSOLE BOX |
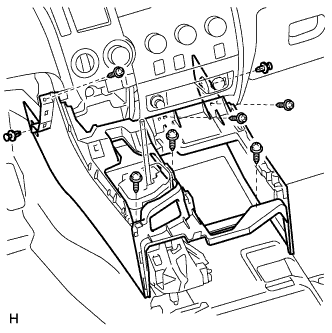 |
Remove the 2 clips.
Remove the 6 screws and front console box.
| 29. REMOVE INSTRUMENT CLUSTER FINISH PANEL ASSEMBLY |
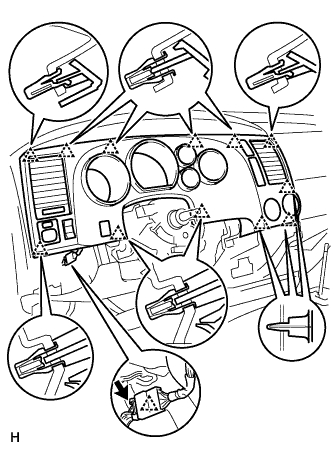 |
Disconnect the connector and clamp.
Detach the 12 clips and remove the finish panel.
| 30. REMOVE COMBINATION METER ASSEMBLY |
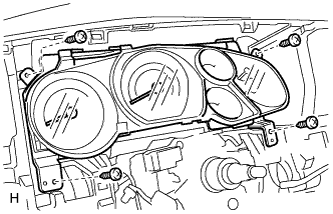 |
Remove the 4 screws.
Disconnect the connector and clamp, and remove the combination meter.
| 31. REMOVE CENTER LOWER INSTRUMENT PANEL FINISH PANEL |
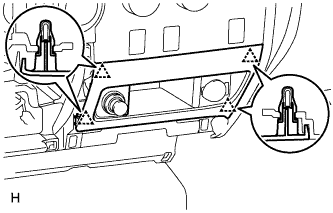 |
Detach the 4 clips.
Remove the finish panel and then disconnect the connectors.
| 32. REMOVE INTEGRATION CONTROL AND PANEL ASSEMBLY (for Manual Air Conditioning System) |
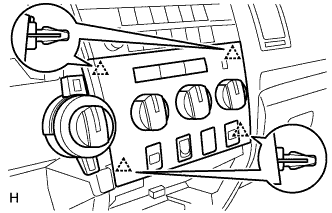 |
Detach the 4 clips.
Remove the panel and then disconnect the connectors.
| 33. REMOVE INTEGRATION CONTROL AND PANEL ASSEMBLY (for Automatic Air Conditioning System) |
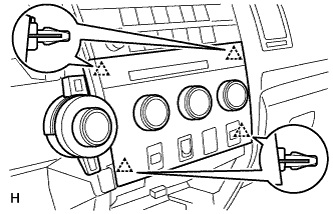 |
Detach the 4 clips.
Remove the panel and then disconnect the connectors.
| 34. REMOVE RADIO RECEIVER ASSEMBLY WITH BRACKET |
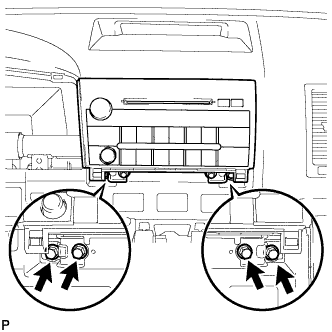 |
Remove the 4 bolts.
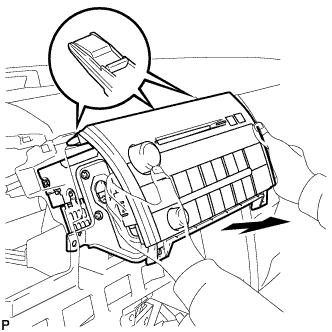 |
Pull the radio receiver to detach the 3 clips on the backside of the radio receiver.
Disconnect the connectors and remove the radio receiver.
| 35. REMOVE NAVIGATION RECEIVER ASSEMBLY WITH BRACKET (w/ Navigation System) |
| 36. REMOVE INSTRUMENT SIDE PANEL RH |
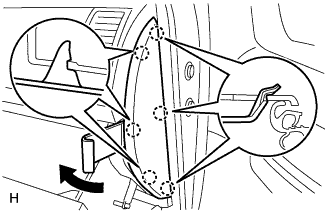 |
Using a moulding remover, detach the 6 claws and remove the side panel.
| 37. REMOVE FRONT DOOR SCUFF PLATE RH (for Regular Cab) |
| 38. REMOVE FRONT DOOR SCUFF PLATE RH (for Double Cab, CrewMax) |
| 39. REMOVE COWL SIDE TRIM BOARD RH |
| 40. REMOVE FRONT DOOR OPENING TRIM WEATHERSTRIP RH (for Regular Cab) |
| 41. REMOVE FRONT DOOR OPENING TRIM WEATHERSTRIP RH (for Double Cab, CrewMax) |
| 42. REMOVE FRONT PILLAR GARNISH RH |
| 43. REMOVE LOWER INSTRUMENT PANEL FINISH PANEL SUB-ASSEMBLY RH |
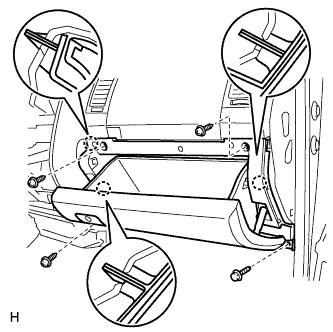 |
Remove the bolt.
Remove the 3 screws.
Detach the 3 claws and remove the finish panel.
| 44. REMOVE NO. 2 INSTRUMENT PANEL BOX DOOR SUB-ASSEMBLY |
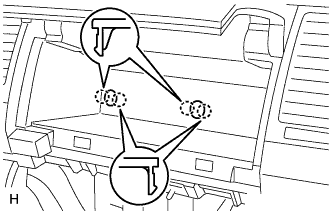 |
Using a screwdriver, detach the 4 claws to remove the 2 instrument panel hole covers.
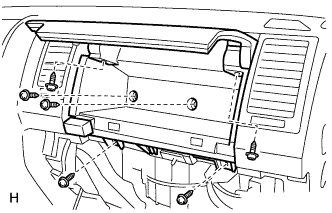 |
Remove the 6 screws and box door.
| 45. REMOVE GLOVE BOX LIGHT ASSEMBLY |
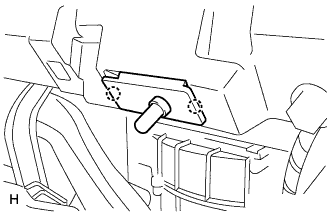 |
Detach the 2 claws.
Remove the box light and then disconnect the connector.
| 46. REMOVE INSTRUMENT PANEL SPEAKER PANEL SUB-ASSEMBLY |
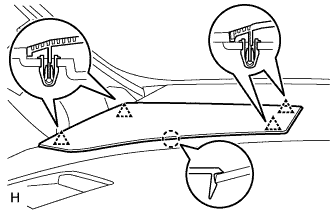 |
Using a screwdriver, detach the 4 clips and claw, and remove the speaker panel.
| 47. REMOVE FRONT NO. 2 SPEAKER ASSEMBLY LH |
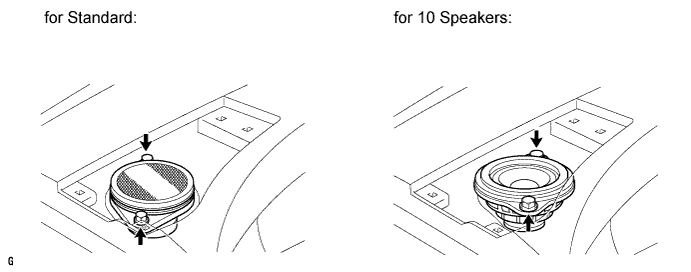
Remove the 2 bolts.
Remove the speaker and disconnect the connector.
| 48. REMOVE NO. 2 INSTRUMENT PANEL SPEAKER PANEL SUB-ASSEMBLY |
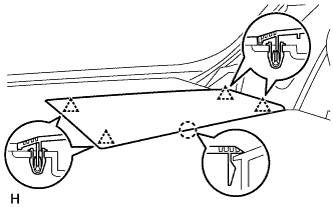 |
Using a screwdriver, detach the 4 clips and claw, and remove the speaker panel.
| 49. REMOVE FRONT NO. 2 SPEAKER ASSEMBLY RH |
Remove the 2 bolts.
Remove the speaker and disconnect the connector.
| 50. REMOVE NO. 3 INSTRUMENT PANEL SPEAKER PANEL SUB-ASSEMBLY |
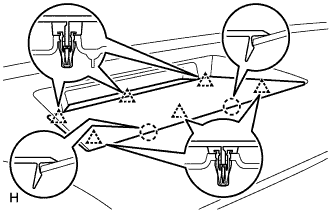 |
Using a screwdriver, detach the 6 clips and 2 claws, and remove the speaker panel.
| 51. REMOVE FRONT NO. 4 SPEAKER ASSEMBLY (for 10 Speaker Models) |
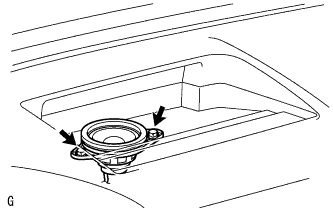 |
Remove the 2 bolts.
Remove the speaker and disconnect the connector.
| 52. REMOVE NO. 1 INSTRUMENT PANEL SAFETY PAD INSERT |
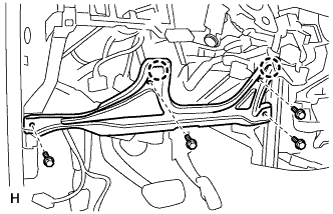 |
Remove the 4 bolts.
Detach the 2 claws.
Remove the safety pad and then disconnect the connector.
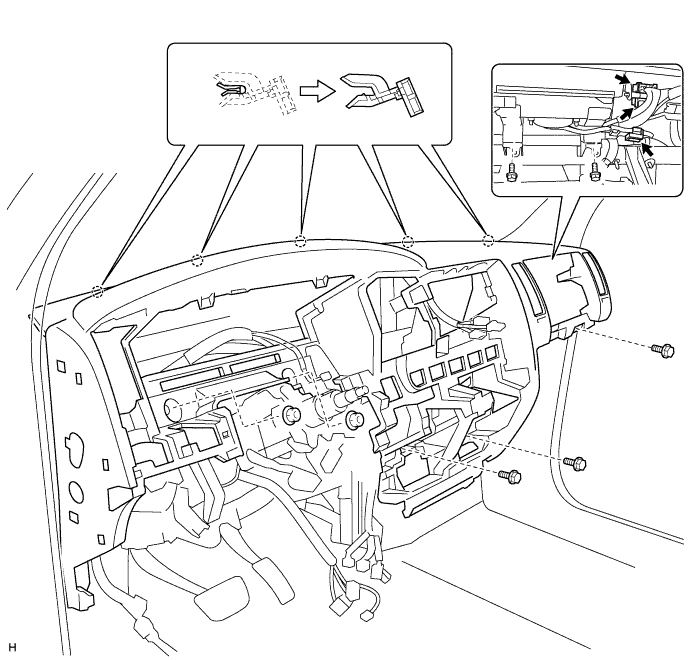
| 53. REMOVE INSTRUMENT PANEL SUB-ASSEMBLY |
Detach the connectors from the clamps and disconnect the connectors.
Remove the bolt and wire harness.
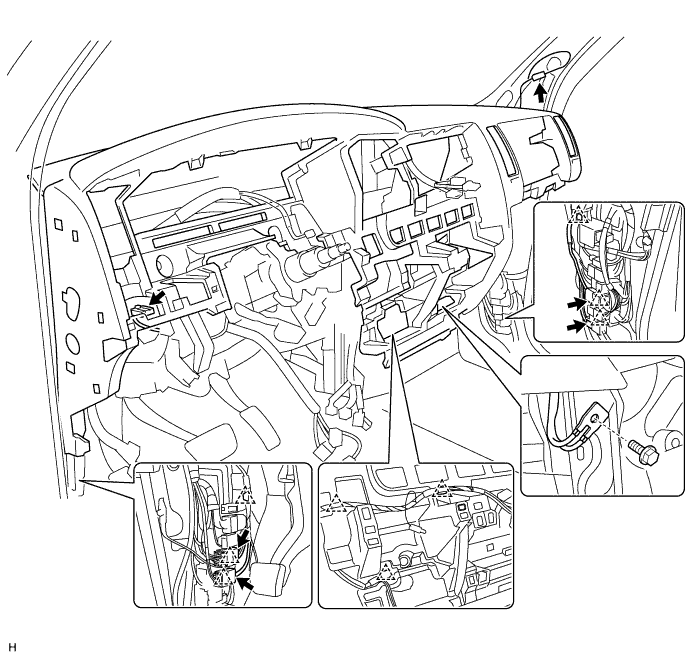
Remove the 2 passenger airbag bolts.
Remove the 3 bolts and 2 nuts.
Detach the 5 claws and remove the instrument panel.
| 54. REMOVE NO. 3 INSTRUMENT PANEL STAY |
Detach the 5 claws and remove the 5 stays.