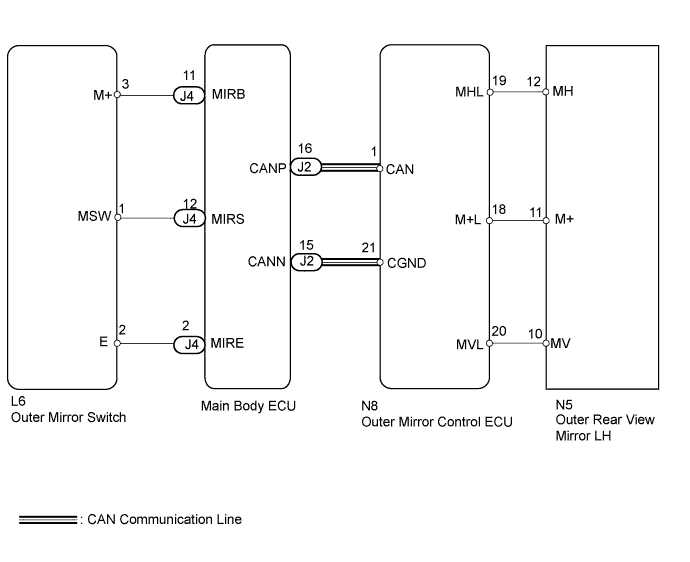
POWER MIRROR CONTROL SYSTEM (w/ Memory) > Driver Side Power Mirror cannot be Adjusted with Power Mirror Switch |
| 1.CHECK DTC |
Use the Techstream to check if the CAN communication system is functioning normally (Click here).
| Result | Proceed to |
| CAN DTC is not output | A |
| CAN DTC is output | B |
|
| ||||
| A | |
 |
| 2.READ VALUE USING TECHSTREAM (OUTER MIRROR SWITCH) |
Check the DATA LIST for proper functioning of the outer mirror switch.
| Tester Display | Measurement Item/Range | Normal Condition | Diagnostic Note |
| Mirror selection SW (Left) | Mirror master switch signal for LH mirror / ON or OFF | ON: Switch is in L position OFF: Switch is OFF or in R position | - |
| Mirror position SW (Right) | Mirror control switch signal (RIGHT) / ON or OFF | ON: RIGHT switch is ON OFF: Any switch except RIGHT is ON or all switches are OFF | - |
| Mirror position SW (Left) | Mirror control switch signal (LEFT) / ON or OFF | ON: LEFT switch is ON OFF: Any switch except LEFT is ON or all switches are OFF | - |
| Mirror position SW (UP) | Mirror control switch signal (UP) / ON or OFF | ON: UP switch is ON OFF: Any switch except UP is ON or all switches are OFF | - |
| Mirror position SW (Down) | Mirror control switch signal (DOWN) / ON or OFF | ON: DOWN switch is ON OFF: Any switch except DOWN is ON or all switches are OFF | - |
|
| ||||
| OK | |
|
| 3.INSPECT OUTER REAR VIEW MIRROR LH |
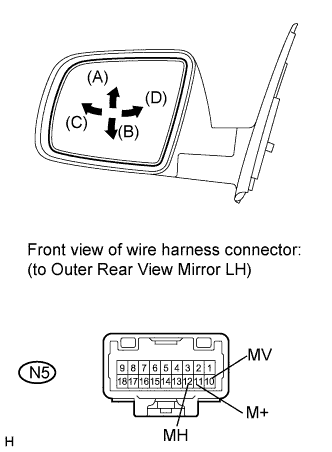 |
Remove the mirror LH (Click here).
Apply battery voltage and check the operation of the power mirror.
| Measurement Condition | Specified Condition |
| Battery positive (+) → Terminal 10 (MV) Battery negative (-) → Terminal 11 (M+) | Turns upward (A) |
| Battery negative (-) → Terminal 10 (MV) Battery positive (+) → Terminal 11 (M+) | Turns downward (B) |
| Battery positive (+) → Terminal 12 (MH) Battery negative (-) → Terminal 11 (M+) | Turns left (C) |
| Battery negative (-) → Terminal 12 (MH) Battery positive (+) → Terminal 11 (M+) | Turns right (D) |
|
| ||||
| OK | |
|
| 4.CHECK HARNESS AND CONNECTOR (OUTER MIRROR CONTROL ECU - OUTER REAR VIEW MIRROR LH) |
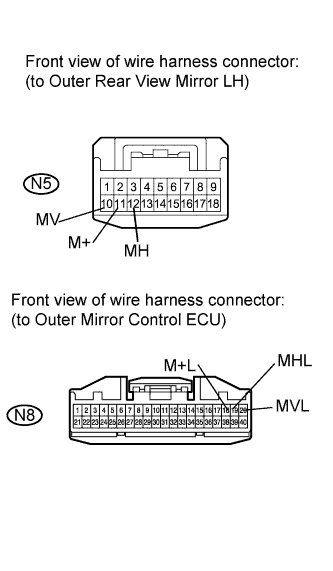 |
Disconnect the N8 ECU connector.
Disconnect the N5 mirror connector.
Measure the resistance according to the value(s) in the table below.
| Tester Connection | Condition | Specified Condition |
| N8-18 (M+L) - N5-11 (M+) | Always | Below 1 Ω |
| N8-19 (MHL) - N5-12 (MH) | ||
| N8-20 (MVL) - N5-10 (MV) | ||
| N5-11 (M+) - Body ground | Always | 10 kΩ or higher |
| N5-12 (MH) - Body ground | ||
| N5-10 (MV) - Body ground |
|
| ||||
| OK | ||
 | ||
| ||
| 5.INSPECT OUTER MIRROR SWITCH ASSEMBLY |
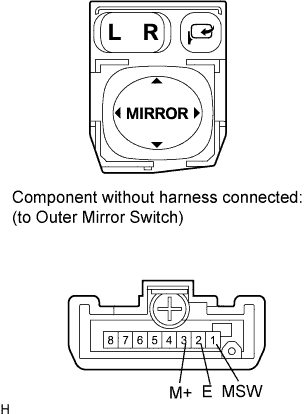 |
Remove the switch (Click here).
Measure the resistance according to the value(s) in the table below.
| Tester Connection | Switch Condition | Specified Condition |
| 3 (M+) - 2 (E) | UP switch pushed | 100 Ω |
| DOWN switch pushed | 470 Ω | |
| LEFT switch pushed | 800 Ω | |
| RIGHT switch pushed | 250 Ω | |
| 1 (MSW) - 2 (E) | No switches pushed | 10 kΩ or higher |
| L switch pushed | 100 Ω |
|
| ||||
| OK | |
|
| 6.CHECK HARNESS AND CONNECTOR (OUTER MIRROR SWITCH - MAIN BODY ECU) |
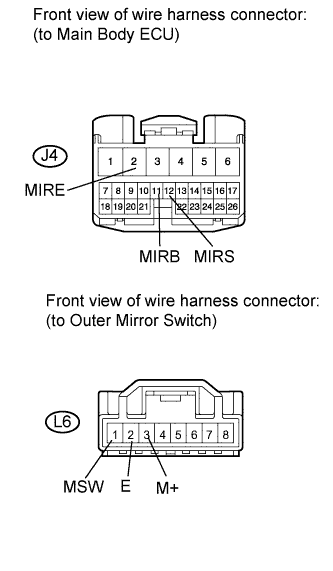 |
Disconnect the J4 ECU connector.
Disconnect the L6 switch connector.
Measure the resistance according to the value(s) in the table below.
| Tester Connection | Condition | Specified Condition |
| J4-2 (MIRE) - L6-2 (E) | Always | Below 1 Ω |
| J4-11 (MIRB) - L6-3 (M+) | Always | Below 1 Ω |
| J4-12 (MIRS) - L6-1 (MSW) | Always | Below 1 Ω |
| L6-3 (M+) - Body ground | Always | 10 kΩ or higher |
| L6-2 (E) - Body ground | Always | 10 kΩ or higher |
| L6-1 (MSW) - Body ground | Always | 10 kΩ or higher |
|
| ||||
| OK | ||
| ||
| ||

