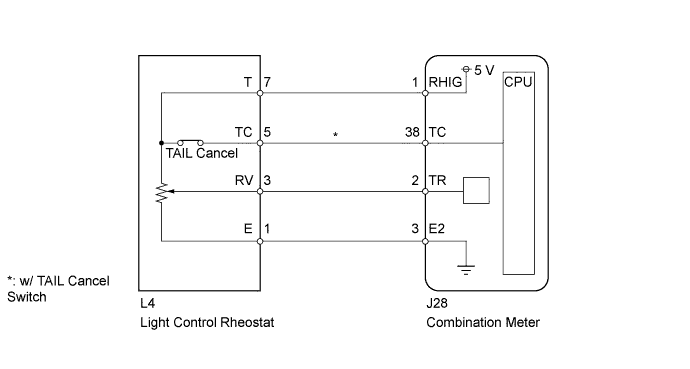
METER / GAUGE SYSTEM > Operating Light Control Rheostat does not Change Light Brightness |
| 1.READ VALUE USING TECHSTREAM (LIGHT CONTROL RHEOSTAT) |
Operate the Techstream according to the display and select "Data List" (Click here).
| Tester Display | Measurement Item/Range | Normal Condition | Diagnostic Note |
| TAIL Cancel SW* | TAIL cancel switch condition/ON or OFF | ON: TAIL cancel switch ON OFF: TAIL cancel switch OFF | - |
| Rheostat value | Light control rheostat switch input/Min.: 0, Max.: 100 | Light control rheostat switch is Dark (0) → Bright (100) | Unit: % |
|
| ||||
| OK | ||
 | ||
| ||
| 2.INSPECT LIGHT CONTROL RHEOSTAT |
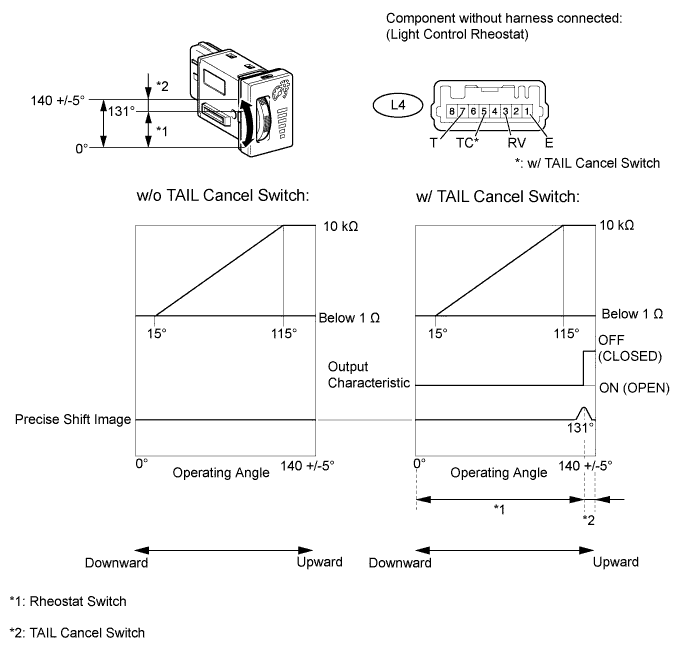
Remove the light control rheostat (Click here).
Measure the resistance according to the table below.
| Tester Connection | Switch Condition | Specified Condition |
| 3 (RV) - 1 (E) | Downward → Upward | See illustration |
| 7 (T) - 1 (E) | Downward → Upward | 10 kΩ or higher |
| Tester Connection | Switch Condition | Specified Condition |
| 3 (RV) - 1 (E) | Downward → Upward | See illustration |
| 5 (TC) - 1 (E) | Downward → Upward | 10 kΩ or higher |
| 7 (T) - 1 (E) |
|
| ||||
| OK | |
 |
| 3.CHECK HARNESS AND CONNECTOR (COMBINATION METER - LIGHT CONTROL RHEOSTAT) |
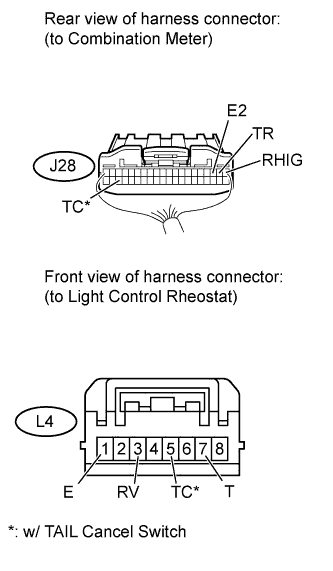 |
Disconnect the J28 meter connector.
Disconnect the L4 rheostat connector.
Measure the resistance according to the value(s) in the table below.
| Tester Connection | Condition | Specified Condition |
| J28-1 (RHIG) - L4-7 (T) | Always | Below 1 Ω |
| J28-2 (TR) - L4-3 (RV) | ||
| J28-3 (E2) - L4-1 (E) |
| Tester Connection | Condition | Specified Condition |
| J28-1 (RHIG) - L4-7 (T) | Always | Below 1 Ω |
| J28-2 (TR) - L4-3 (RV) | ||
| J28-3 (E2) - L4-1 (E) | ||
| J28-38 (TC) - L4-5 (TC) |
|
| ||||
| OK | ||
| ||
| ||

