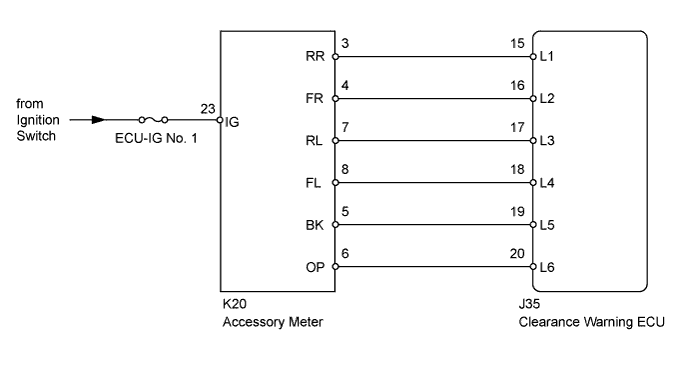
INTUITIVE PARKING ASSIST SYSTEM > Indicator Circuit |
| 1.CHECK FUSE (ECU-IG No. 1) |
Remove the ECU-IG No. 1 fuse from the main body ECU.
Measure the resistance according to the value(s) in the table below.
| Tester Connection | Condition | Specified Condition |
| ECU-IG No. 1 fuse | Always | Below 1 Ω |
|
| ||||
| OK | |
 |
| 2.CHECK HARNESS AND CONNECTOR (ACCESSORY METER - BATTERY) |
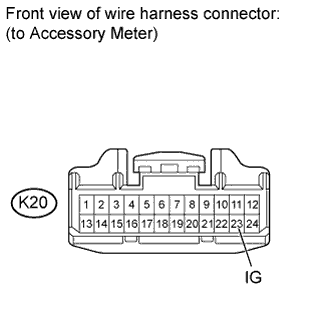 |
Disconnect the K20 meter connector.
Measure the voltage according to the value(s) in the table below.
| Tester Connection | Switch Condition | Specified Condition |
| K20-23 (IG) - Body ground | Ignition switch ON | 11 to 14 V |
|
| ||||
| OK | |
|
| 3.CHECK HARNESS AND CONNECTOR (ACCESSORY METER - ECU) |
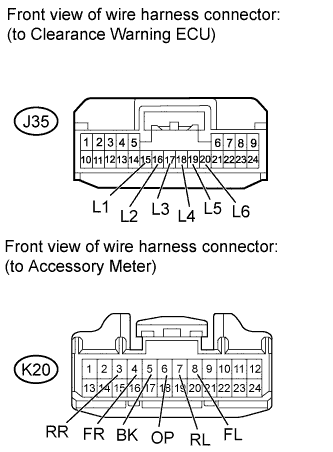 |
Disconnect the J35 ECU connector.
Disconnect the K20 meter connector.
Measure the resistance according to the value(s) in the table below.
| Tester Connection | Condition | Specified Condition |
| J35-15 (L1) - K20-3 (RR) | Always | Below 1 Ω |
| J35-16 (L2) - K20-4 (FR) | Always | Below 1 Ω |
| J35-17 (L3) - K20-7 (RL) | Always | Below 1 Ω |
| J35-18 (L4) - K20-8 (FL) | Always | Below 1 Ω |
| J35-19 (L5) - K20-5 (BK) | Always | Below 1 Ω |
| J35-20 (L6) - K20-6 (OP) | Always | Below 1 Ω |
| J35-15 (L1) - Body ground | Always | 10 kΩ or higher |
| J35-16 (L2) - Body ground | Always | 10 kΩ or higher |
| J35-17 (L3) - Body ground | Always | 10 kΩ or higher |
| J35-18 (L4) - Body ground | Always | 10 kΩ or higher |
| J35-19 (L5) - Body ground | Always | 10 kΩ or higher |
| J35-20 (L6) - Body ground | Always | 10 kΩ or higher |
|
| ||||
| OK | |
|
| 4.REPLACE ACCESSORY METER ASSEMBLY |
Replace the accessory meter with a normally functioning or new accessory meter (Click here).
Check that the accessory meter indicator operates normally.
|
| ||||
| OK | ||
 | ||
| ||
