POWER WINDOW REGULATOR MOTOR (for Front Door) > REMOVAL |
| 1. DISCONNECT CABLE FROM NEGATIVE BATTERY TERMINAL |
| 2. REMOVE FRONT DOOR INSIDE HANDLE BEZEL PLUG LH |
for Regular Cab:
Remove the front door inside handle bezel plug LH .
for Double Cab:
Remove the front door inside handle bezel plug LH .
for CrewMax:
Remove the front door inside handle bezel plug LH .
| 3. REMOVE FRONT UPPER ARMREST BASE PANEL LH |
for Regular Cab:
Remove the front upper armrest base panel LH .
for Double Cab:
Remove the front upper armrest base panel LH .
for CrewMax:
Remove the front upper armrest base panel LH .
| 4. REMOVE FRONT LOWER DOOR FRAME BRACKET GARNISH LH |
for Regular Cab:
Remove the front lower door frame bracket garnish LH .
for Double Cab:
Remove the front lower door frame bracket garnish LH .
for CrewMax:
Remove the front lower door frame bracket garnish LH .
| 5. REMOVE COURTESY LIGHT ASSEMBLY |
for Regular Cab:
Remove the courtesy light assembly .
for Double Cab:
Remove the courtesy light assembly .
for CrewMax:
Remove the courtesy light assembly .
| 6. REMOVE FRONT DOOR TRIM BOARD SUB-ASSEMBLY LH |
for Regular Cab:
Remove the front door trim board sub-assembly LH .
for Double Cab:
Remove the front door trim board sub-assembly LH .
for CrewMax:
Remove the front door trim board sub-assembly LH .
| 7. REMOVE FRONT NO. 1 SPEAKER ASSEMBLY |
for Regular Cab:
Remove the front No. 1 speaker assembly .
for Double Cab:
Remove the front No. 1 speaker assembly .
for CrewMax:
Remove the front No. 1 speaker assembly .
| 8. REMOVE FRONT NO. 1 DOOR TRIM BRACKET |
for Regular Cab:
Remove the front No. 1 door trim bracket .
for Double Cab:
Remove the front No. 1 door trim bracket .
for CrewMax:
Remove the front No. 1 door trim bracket .
| 9. REMOVE FRONT DOOR SERVICE HOLE COVER LH |
for Regular Cab:
Remove the front door service hole cover LH .
for Double Cab:
Remove the front door service hole cover LH .
for CrewMax:
Remove the front door service hole cover LH .
| 10. REMOVE FRONT DOOR GLASS SUB-ASSEMBLY LH |
for Regular Cab:
Remove the front door glass sub-assembly LH .
for Double Cab:
Remove the front door glass sub-assembly LH .
for CrewMax:
Remove the front door glass sub-assembly LH .
| 11. REMOVE FRONT DOOR WINDOW REGULATOR SUB-ASSEMBLY LH |
for Regular Cab:
Remove the front door window regulator sub-assembly .
for Double Cab:
Remove the front door window regulator sub-assembly .
for CrewMax:
Remove the front door window regulator sub-assembly .
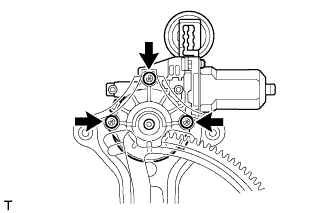
| 12. REMOVE FRONT POWER WINDOW REGULATOR MOTOR ASSEMBLY LH |
|
Using a T25 "TORX" driver, remove the 3 screws and motor.