Home › ENGINE ยท 3UR-FE › EMISSION CONTROL › AIR SWITCHING VALVE

AIR SWITCHING VALVE > INSTALLATION

for Preparation Click here


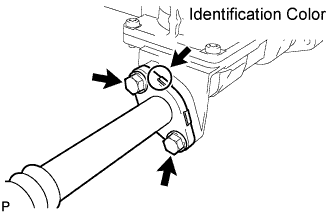
1. INSTALL NO. 3 AIR TUBE


    A158585E01
  1. Install a new gasket and the No. 3 air tube with the 2 bolts.

    Torque:
    10 N*m{ 102 kgf*cm , 7 ft.*lbf }

    NOTICE:
    Make sure the gasket's claws are not caught between the air tube and air switching valve.

    HINT:
    The identification color on the flange is orange.
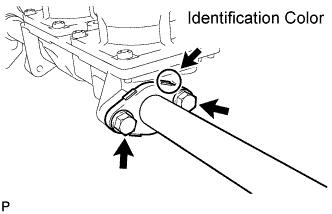


2. INSTALL NO. 2 AIR TUBE


    A158584E01
  1. Install a new gasket and the No. 2 air tube with the 2 bolts.

    Torque:
    10 N*m{ 102 kgf*cm , 7 ft.*lbf }

    NOTICE:
    Make sure the gasket's claws are not caught between the air tube and air switching valve.

    HINT:
    The identification color on the flange is blue.


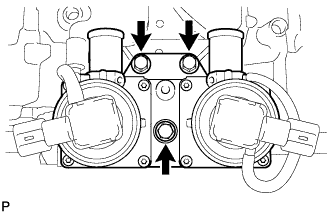
3. INSTALL AIR SWITCHING VALVE ASSEMBLY


    A158586
  1. Install the air switching valve with the 3 bolts.

    Torque:
    21 N*m{ 214 kgf*cm , 15 ft.*lbf }

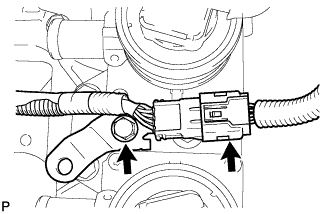
  1. Connect the 2 air switching valve connectors.


    A158583
  1. Install the bracket with the bolt.

    Torque:
    8.0 N*m{ 82 kgf*cm , 71 in.*lbf }

  1. Connect the knock sensor connector.


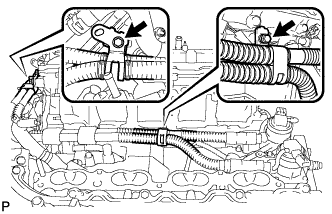
4. INSTALL AIR TUBE
  1. Connect the 2 No. 1 air hoses to the air tube.


    A158582
  1. Connect the air tube to the air switching valve, and install the air tube with the 2 bolts.

    Torque:
    10 N*m{ 102 kgf*cm , 7 ft.*lbf }


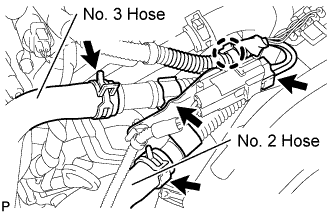
    A158575E01
  1. Connect the air pump connector clamp's holder.

  1. Attach the wire harness claw.

  1. Connect the air pump connector.

  1. Connect the No. 2 and No. 3 hose.


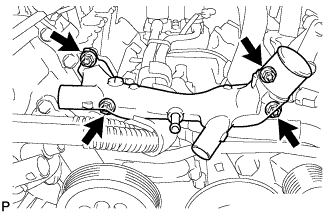
5. INSTALL FRONT WATER BY-PASS JOINT


    A158579
  1. Install 2 new gaskets and the front water by-pass joint with the 4 nuts.

    Torque:
    21 N*m{ 214 kgf*cm , 15 ft.*lbf }

  1. Connect the engine coolant temperature sensor connector.


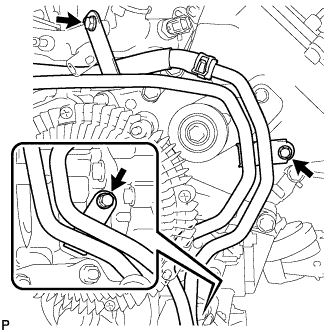
6. CONNECT NO. 2 WATER BY-PASS PIPE SUB-ASSEMBLY


    A158578
  1. Connect the No. 2 water by-pass pipe with the 3 bolts.

    Torque:
    10 N*m{ 102 kgf*cm , 7 ft.*lbf }


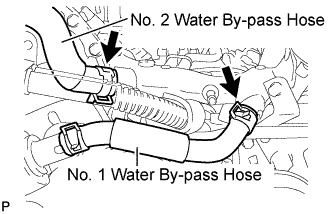
7. CONNECT NO. 2 WATER BY-PASS HOSE


    A158577E01
  1. Connect the No. 2 water by-pass hose to the water by-pass joint.


8. CONNECT NO. 1 WATER BY-PASS HOSE
  1. Connect the No. 1 water by-pass hose to the water by-pass joint and water inlet housing.


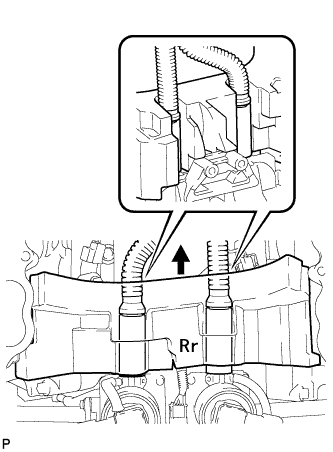
9. INSTALL NO. 1 ENGINE COVER


A158656

NOTICE:
Make sure that the No. 1 engine cover is level with the top surface of the intake port of the cylinder head for 1 and 2.

HINT:
  1. Align the No. 1 engine cover cutouts with the air tube.
  2. Align the No. 1 engine cover with the air switching valve surface and cylinder head wall.


10. CONNECT FUEL TUBE CLAMP


    A158580
  1. Connect the fuel tube clamp to the bracket.


11. INSTALL NO. 2 ENGINE COVER


A158538

NOTICE:
Make sure that the No. 2 engine cover is level with the top surface of the intake port if the cylinder head.

HINT:
  1. Align the No. 2 engine cover cutout with the air tube.
  2. Align the No. 2 engine cover with the front water by-pass joint and cylinder head wall.


12. INSTALL INTAKE MANIFOLD
  1. Install the intake manifold (Click here).


13. INSTALL EXHAUST MANIFOLD SUB-ASSEMBLY
  1. Install the exhaust manifold (Click here).