 |
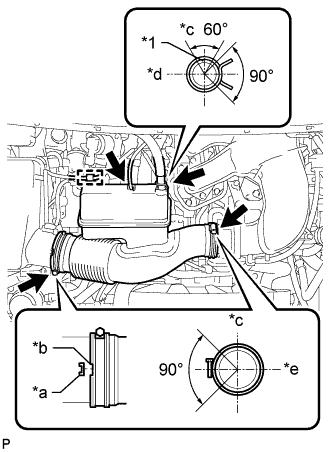
Install the air cleaner hose with the 2 clamps.
- Torque:
- 4.0 N*m{ 41 kgf*cm , 35 in.*lbf }
| *1 | Paint Mark |
| *a | Protrusion |
| *b | Groove |
| *c | Top |
| *d | RH |
| *e | Front |
CAMSHAFT OIL CONTROL VALVE > INSTALLATION |
| 1. INSTALL CAMSHAFT TIMING OIL CONTROL VALVE ASSEMBLY (for Exhaust Side of Bank 2) |
Apply a light coat of engine oil to a new O-ring and install it to the oil control valve.
Install the oil control valve with the bolt.
Connect the camshaft timing oil control valve connector.
Install the No. 1 surge tank stay (Click here).
| 2. INSTALL CAMSHAFT TIMING OIL CONTROL VALVE ASSEMBLY (for Intake Side of Bank 2) |
Apply a light coat of engine oil to a new O-ring and install it to the oil control valve.
Install the oil control valve with the bolt.
Connect the oil control valve connector.
| 3. INSTALL CAMSHAFT TIMING OIL CONTROL VALVE ASSEMBLY (for Exhaust Side of Bank 1) |
Apply a light coat of engine oil to a new O-ring and install it to the oil control valve.
Install the oil control valve with the bolt.
Connect the oil control valve connector.
| 4. INSTALL CAMSHAFT TIMING OIL CONTROL VALVE ASSEMBLY (for Intake Side of Bank 1) |
Apply a light coat of engine oil to a new O-ring and install it to the oil control valve.
Install the oil control valve with the bolt.
Connect the oil control valve connector.
| 5. INSTALL AIR CLEANER HOSE ASSEMBLY |
|
Install the air cleaner hose with the 2 clamps.
| *1 | Paint Mark |
| *a | Protrusion |
| *b | Groove |
| *c | Top |
| *d | RH |
| *e | Front |
Connect the vacuum hose and ventilation hose.
Attach the wire harness clamp.