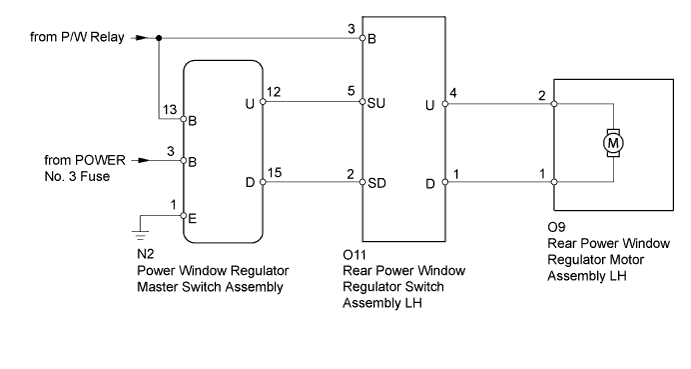
POWER WINDOW CONTROL SYSTEM (w/ Jam Protection Function) > Rear Power Window LH does not Operate with Rear Power Window Switch LH |
| 1.CHECK HARNESS AND CONNECTOR (REAR SWITCH LH - BATTERY) |
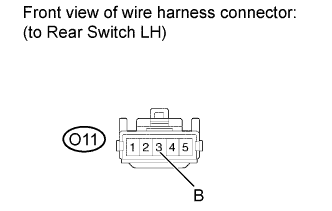 |
Disconnect the O11 switch connector.
Measure the voltage according to the value(s) in the table below.
| Tester Connection | Switch Condition | Specified Condition |
| O11-3 (B) - Body ground | Ignition switch ON | 11 to 14 V |
|
| ||||
| OK | |
 |
| 2.INSPECT REAR POWER WINDOW REGULATOR SWITCH ASSEMBLY LH |
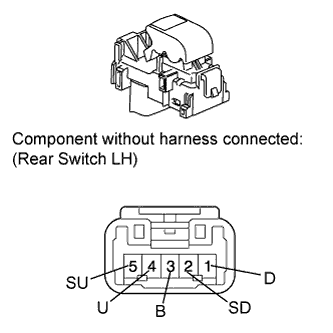 |
Remove the rear switch LH (Click here).
Measure the resistance according to the value(s) in the table below.
| Tester Connection | Switch Condition | Specified Condition |
| 4 (U) - 3 (B) | UP | Below 1 Ω |
| 1 (D) - 2 (SD) | UP | Below 1 Ω |
| 4 (U) - 5 (SU) | OFF | Below 1 Ω |
| 1 (D) - 2 (SD) | OFF | Below 1 Ω |
| 4 (U) - 5 (SU) | DOWN | Below 1 Ω |
| 1 (D) - 3 (B) | DOWN | Below 1 Ω |
|
| ||||
| OK | |
|
| 3.CHECK HARNESS AND CONNECTOR (REAR SWITCH LH - REAR MOTOR LH) |
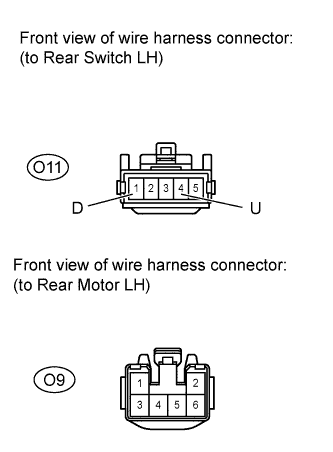 |
Disconnect the O11 switch connector.
Disconnect the O9 motor connector.
Measure the resistance according to the value(s) in the table below.
| Tester Connection | Condition | Specified Condition |
| O11-1 (D) - O9-1 | Always | Below 1 Ω |
| O11-4 (U) - O9-2 | Always | Below 1 Ω |
| O11-1 (D) - Body ground | Always | 10 kΩ or higher |
| O11-4 (U) - Body ground | Always | 10 kΩ or higher |
|
| ||||
| OK | |
|
| 4.INSPECT REAR POWER WINDOW REGULATOR MOTOR ASSEMBLY LH |
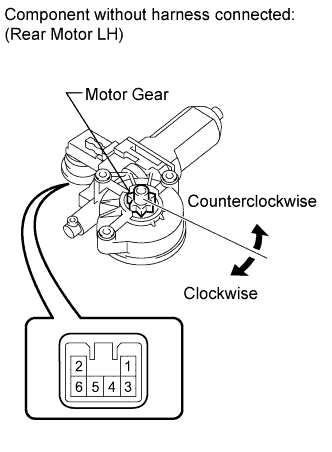 |
Remove the rear motor LH (Click here).
Apply battery voltage to connector terminals 1 and 2.
Check that the motor gear rotates smoothly as follows.
| Measurement Condition | Specified Condition |
| Battery positive (+) → 1 Battery negative (-) → 2 | Motor gear rotates counterclockwise |
| Battery positive (+) → 2 Battery negative (-) → 1 | Motor gear rotates clockwise |
|
| ||||
| OK | |
|
| 5.CHECK HARNESS AND CONNECTOR (MASTER SWITCH - REAR SWITCH LH) |
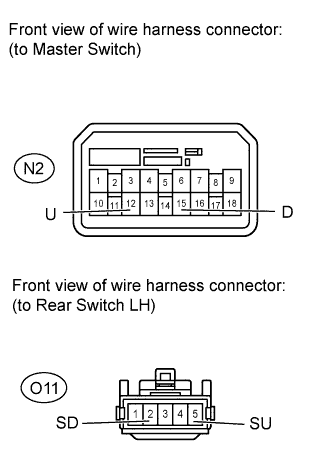 |
Disconnect the N2 master switch connector.
Disconnect the O11 switch connector.
Measure the resistance according to the value(s) in the table below.
| Tester Connection | Condition | Specified Condition |
| N2-12 (U) - O11-5 (SU) | Always | Below 1 Ω |
| N2-15 (D) - O11-2 (SD) | Always | Below 1 Ω |
| N2-12 (U) - Body ground | Always | 10 kΩ or higher |
| N2-15 (D) - Body ground | Always | 10 kΩ or higher |
|
| ||||
| OK | ||
 | ||
| ||
