OIL COOLER > INSTALLATION |
| 1. INSTALL OIL COOLER TUBE (w/ Trailer Towing System) |
|
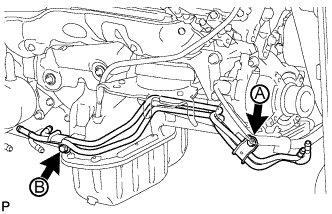
Temporarily install the oil cooler tube to the engine with bolt A. Install bolt B and tighten it to the specified torque. Then tighten bolt A to the specified torque.
| 2. INSTALL NO. 2 OIL COOLER TUBE (w/ Trailer Towing System) |
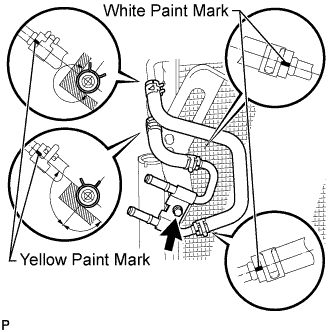 |
Install the No. 4 oil cooler inlet hose and No. 4 oil cooler outlet hose to the No. 2 oil cooler tube.
Install the No. 2 oil cooler tube together with the 2 oil cooler hoses with the bolt.
Connect the No. 4 oil cooler inlet hose and No. 4 oil cooler outlet hose to the cooler condenser.
| 3. INSTALL COOLER CONDENSER ASSEMBLY (AIR COOLED OIL COOLER) (w/ Trailer Towing System) |
Install the cooler condenser (Click here).
| 4. INSTALL OIL COOLER ACCESSORY ASSEMBLY (w/ Trailer Towing System) |
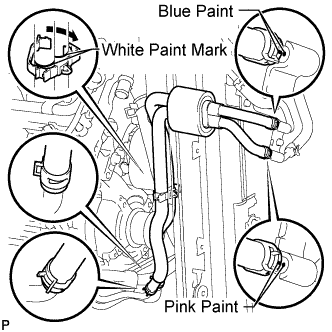 |
Install the oil cooler accessory assembly to the oil cooler tube, and then pass the 2 hoses through the No. 1 flexible hose clamp and close the clamp as shown in the illustration.
Connect the 2 hoses to the No. 2 oil cooler tube.
| 5. INSTALL TRANSMISSION OIL COOLER ASSEMBLY (w/ Trailer Towing System) |
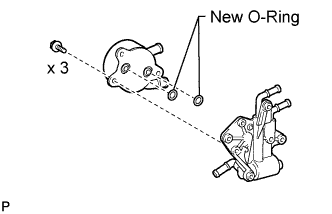 |
Coat 2 new O-rings with ATF and install them to the grooves of the transmission oil cooler.
Install the oil cooler to the transmission oil thermostat with the 3 bolts.
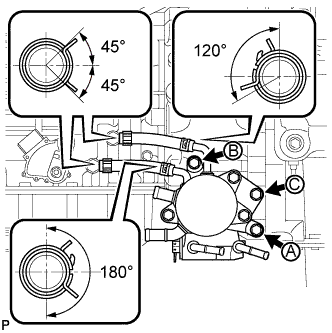 |
Install the 2 No. 1 transmission oil cooler hoses to the transmission oil thermostat.
Connect the 2 No. 1 transmission oil cooler hoses to the transmission.
Temporarily install the transmission oil cooler together with the transmission oil thermostat with bolt C. Temporarily install bolt A and bolt B. Tighten the bolts in alphabetical order.
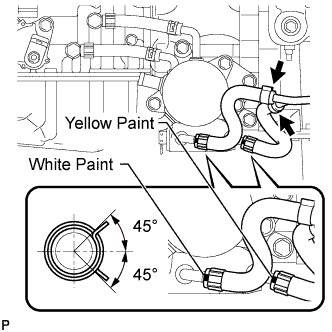 |
Connect the No. 2 transmission oil cooler inlet hose and No. 2 transmission oil cooler outlet hose to the oil cooler tube.
Install the No. 2 transmission oil cooler inlet hose and No. 2 transmission oil cooler outlet hose to the transmission oil thermostat.
| 6. INSTALL TRANSMISSION OIL COOLER ASSEMBLY (w/o Trailer Towing System) |
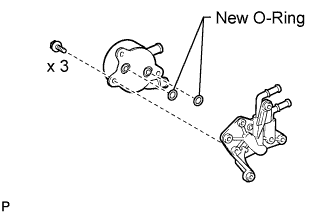 |
Coat 2 new O-rings with ATF and install them to the grooves of the transmission oil cooler.
Install the transmission oil cooler to the transmission oil cooler spacer with the 3 bolts.
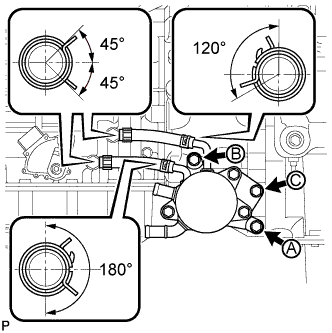 |
Install the 2 No. 1 transmission oil cooler hoses to the transmission oil cooler spacer.
Connect the 2 No. 1 transmission oil cooler hoses to the transmission.
Temporarily install the transmission oil cooler together with the transmission oil cooler spacer with bolt C. Temporarily install bolt A and bolt B. Tighten the bolts in alphabetical order.
| 7. CONNECT WATER BY-PASS PIPE ASSEMBLY |
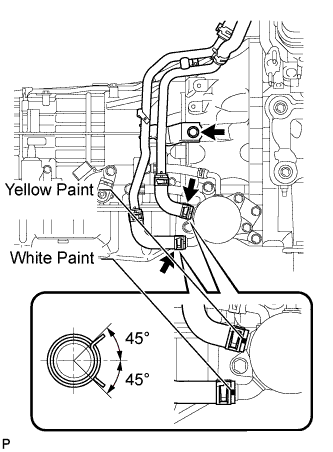 |
Connect the 2 water by-pass hoses to the transmission oil cooler and connect the water by-pass pipe with the bolt.
| 8. INSTALL FRONT EXHAUST PIPE ASSEMBLY |
for Regular Cab Standard Deck:
Install the front exhaust pipe (Click here).
except Regular Cab Standard Deck:
Install the front exhaust pipe (Click here).
| 9. ADD ENGINE COOLANT |
Add engine coolant.
| Item | Specified Condition |
| w/ Trailer Towing System | 13.2 liters (13.9 US qts, 11.6 Imp. qts) |
| w/o Trailer Towing System | 12.1 liters (12.8 US qts, 10.6 Imp. qts) |
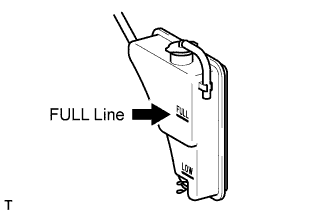 |
Slowly pour coolant into the radiator reservoir until it reaches the FULL line.
Install the reservoir cap.
Press the inlet and outlet radiator hoses several times by hand, and then check the coolant level. If the coolant level is low, add coolant.
Install the radiator cap.
Start the engine and warm it up until the thermostat opens.
Maintain the engine speed at 2000 to 2500 rpm.
Press the inlet and outlet radiator hoses several times by hand to bleed air.
Stop the engine, and wait until the engine coolant cools down to ambient temperature.
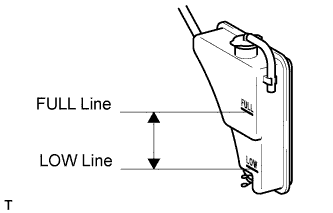 |
Check that the coolant level is between the FULL and LOW lines.
If the coolant level is below the LOW line, repeat all of the procedures above.
If the coolant level is above the FULL line, drain coolant so that the coolant level is between the FULL and LOW lines.
| 10. ADJUST AUTOMATIC TRANSMISSION FLUID LEVEL |
Adjust the automatic transmission fluid level (Click here).
| 11. INSPECT FOR COOLANT LEAK |
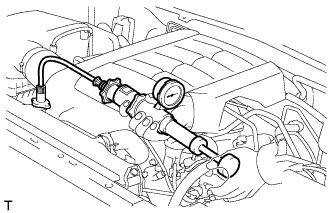 |
Fill the radiator with coolant and attach a radiator cap tester.
Warm up the engine.
Using the radiator cap tester, increase the pressure inside the radiator to 118 kPa (1.2 kgf/cm2, 17 psi), and check that the pressure does not drop.
If the pressure drops, check the hoses, radiator and water pump for leaks. If no external leaks are found, check the heater core, cylinder block and head.
| 12. INSPECT FOR EXHAUST GAS LEAK |
| 13. INSPECT FOR AUTOMATIC TRANSMISSION FLUID LEAK |