Home › ENGINE · 3UR-FE › ENGINE CONTROL SYSTEM › SFI SYSTEM

DTC    P0136    Oxygen Sensor Circuit Malfunction (Bank 1 Sensor 2)

DTC    P0137    Oxygen Sensor Circuit Low Voltage (Bank 1 Sensor 2)

DTC    P0138    Oxygen Sensor Circuit High Voltage (Bank 1 Sensor 2)

DTC    P0139    Oxygen Sensor Circuit Slow Response (Bank 1 Sensor 2)

DTC    P013A    Oxygen Sensor Slow Response - Rich to Lean Bank 1 Sensor 2

DTC    P013C    Oxygen Sensor Slow Response - Rich to Lean Bank 2 Sensor 2

DTC    P0156    Oxygen Sensor Circuit Malfunction (Bank 2 Sensor 2)

DTC    P0157    Oxygen Sensor Circuit Low Voltage (Bank 2 Sensor 2)

DTC    P0158    Oxygen Sensor Circuit High Voltage (Bank 2 Sensor 2)

DTC    P0159    Oxygen Sensor Circuit Slow Response (Bank 2 Sensor 2)

for Preparation Click here


DESCRIPTION

HINT:
  1. Sensor 2 refers to the sensor mounted behind the Three-way catalytic converter (TWC) and located far from the engine assembly.

A three-way catalytic converter (TWC) is used in order to convert the carbon monoxide (CO), hydrocarbon (HC), and nitrogen oxides (NOx) into less harmful substances. To allow the TWC to function effectively, it is necessary to keep the air-fuel ratio of the engine near the stoichiometric air-fuel ratio. For helping the ECM to deliver accurate air-fuel ratio control, a Heated Oxygen (HO2) sensor becomes used.
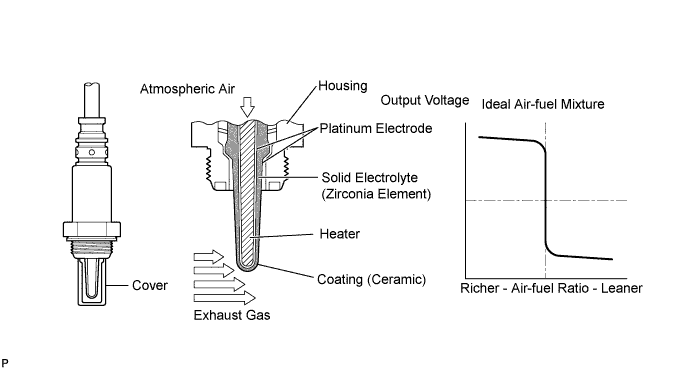
The HO2 sensor is located behind the TWC, and detects the oxygen concentration in the exhaust gas. Since the sensor is integrated with the heater that heats the sensing portion, it is possible to detect the oxygen concentration even when the intake air volume is low (the exhaust gas temperature is low).
When the air-fuel ratio becomes lean, the oxygen concentration in the exhaust gas is rich. The HO2 sensor informs the ECM that the post-TWC air-fuel ratio is lean (low voltage, i.e. less than 0.45 V).
Conversely, when the air-fuel ratio is richer than the stoichiometric air-fuel level, the oxygen concentration in the exhaust gas becomes lean. The HO2 sensor informs the ECM that the post-TWC air-fuel ratio is rich (high voltage, i.e. more than 0.45 V). The HO2 sensor has the property of changing its output voltage drastically when the air-fuel ratio is close to the stoichiometric level.
The ECM uses the supplementary information from the HO2 sensor to determine whether the air-fuel ratio after the TWC is rich or lean, and adjusts the fuel injection time accordingly. Thus, if the HO2 sensor is working improperly due to internal malfunctions, the ECM is unable to compensate for deviations in the primary air-fuel ratio control.

A115539E07


DTC Code
DTC Detection Condition
Trouble Area
P0136
P0156
  1. Abnormal voltage output:
    During active air-fuel ratio control, following conditions (a) and (b) met for certain period of time (2 trip detection logic):
    1. (a) Heated Oxygen (HO2) sensor voltage does not decrease to less than 0.21 V
    1. (b) HO2 sensor voltage does not increase to more than 0.66 V
  1. Low impedance:
    1. Sensor impedance less than 5 Ω for more than 30 seconds when ECM presumes sensor to be warmed up and operating normally (2 trip detection logic)
  1. HO2 sensor (for Bank 1, 2) circuit
  2. HO2 sensor (for Bank 1, 2)
  3. Air-fuel Ratio (A/F) sensor (for Bank 1, 2)
  4. Integration relay
  5. Gas leakage from exhaust system
P0137
P0157
  1. Low voltage (open):
    During active air-fuel ratio control, following conditions (a) and (b) met for certain period of time (2 trip detection logic):
    1. (a) HO2 sensor voltage output less than 0.21 V
    1. (b) Target air-fuel ratio rich
  1. High impedance:
    1. Sensor impedance 50 kΩ or more for more than 90 seconds when ECM presumes sensor to be warmed up and operating normally (2 trip detection logic)
  1. HO2 sensor (for Bank 1, 2) circuit
  2. HO2 sensor (for Bank 1, 2)
  3. Integration relay
  4. Gas leakage from exhaust system
  5. Air fuel ratio sensor
P0138
P0158
  1. Extremely high voltage (short):
    1. HO2 sensor voltage output exceeds 1.2 V for more than 10 seconds (2 trip detection logic)
  1. HO2 sensor (for Bank 1, 2) circuit
  2. HO2 sensor (for Bank 1, 2)
  3. Air-Fuel ratio (A/F) sensor (for Bank 1, 2)
  4. ECM
P0139
P0159
The HO2 sensor voltage does not drop below 0.2 V immediately after fuel cut starts (2 trip detection logic).
  1. HO2 sensor (for Bank 1, 2 Sensor 2) circuit
  2. HO2 sensor (for Bank 1, 2 Sensor 2)
  3. ECM
P013A
P013C
The HO2 sensor voltage does not drop from 0.35 V to 0.2 V immediately after fuel cut starts (1 trip detection logic).
  1. HO2 sensor (for Bank 1, 2 Sensor 2) circuit
  2. HO2 sensor (for Bank 1, 2 Sensor 2)
  3. ECM

For Mexico Models 
DTC Code
DTC Detection Condition
Trouble Area
P0136
P0156
Not applicable
None
P0137
P0157
  1. Low voltage (open):
    During active air-fuel ratio control, following conditions (a) and (b) met for certain period of time (2 trip detection logic)
    1. (a) HO2 sensor voltage output less than 0.21 V
    1. (b) Target air-fuel ratio rich
  1. HO2 sensor (bank 1, 2 sensor 2) circuit
  2. HO2 sensor (bank 1, 2 sensor 2)
  3. HO2 sensor heater (bank 1, 2 sensor 2)
  4. Integration relay
  5. Gas leakage from exhaust system
P0138
P0158
Not applicable
None
P0139
P0159
Not applicable
None

MONITOR DESCRIPTION

  1. Active Air-Fuel Ratio Control
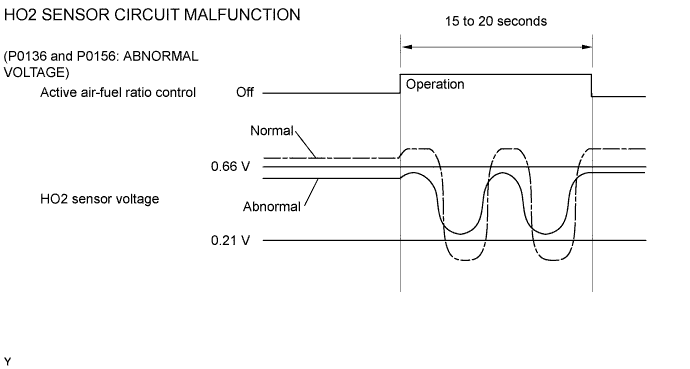
    The ECM usually performs air-fuel ratio feedback control so that the Air-Fuel Ratio (A/F) sensor output indicates a near stoichiometric air-fuel level. This vehicle includes active air-fuel ratio control in addition to regular air-fuel ratio control. The ECM performs active air-fuel ratio control to detect any deterioration in the Three-Way Catalytic Converter (TWC) and Heated Oxygen (HO2) sensor malfunctions (refer to the diagram below).
    Active air-fuel ratio control is performed for approximately 15 to 20 seconds while driving with a warm engine. During active air-fuel ratio control, the air-fuel ratio is forcibly regulated to become lean or rich by the ECM. If the ECM detects a malfunction, a DTC is set.
  1. Abnormal Voltage Output of HO2 Sensor (DTC P0136 and P0156)
    While the ECM is performing active air-fuel ratio control, the air-fuel ratio is forcibly regulated to become rich or lean. If the sensor is not functioning properly, the voltage output variation is small. For example, when the HO2 sensor voltage does not decrease to less than 0.21 V and does not increase to more than 0.66 V during active air-fuel ratio control, the ECM determines that the sensor voltage output is abnormal and sets DTC P0136 or P0156.

    A115540E39

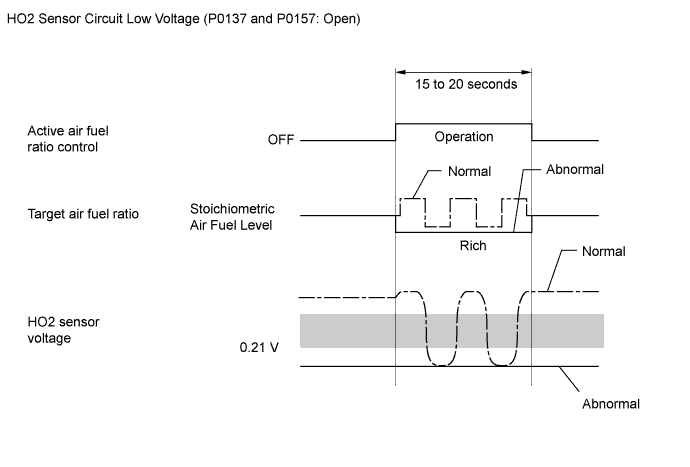
  1. Open in Heated Oxygen (HO2) Sensor Circuit (DTC P0137 and P0157)
    During active air-fuel ratio control, the ECM calculates the Oxygen Storage Capacity (OSC)* of the Three- Way Catalytic Converter (TWC) by forcibly regulating the air-fuel ratio to become rich or lean. If the HO2 sensor has an open, or the voltage output of the sensor noticeably decreases, the OSC indicates an extraordinarily high value. Even if the ECM attempts to continue regulating the air-fuel ratio to become rich or lean, the HO2 sensor output does not change.
    While performing active air-fuel ratio control, when the target air-fuel ratio is rich and the HO2 sensor voltage output is 0.21 V or less (lean), the ECM interprets this as an abnormally low sensor output voltage and stores DTC P0137 or P0157.

    HINT:
    *: The TWC has the capability to store oxygen. The OSC and the emission purification capacity of the TWC are mutually related. The ECM determines whether the catalyst has deteriorated based on the calculated OSC value .


    A234468E33

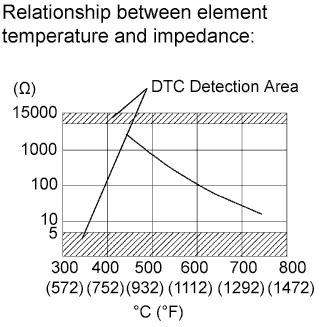
  1. High or Low Impedance of Heated Oxygen (HO2) Sensor (DTC P0136 and P0156 or P0137 and P157)
    A076841E13
    During normal air-fuel ratio feedback control, there are small variations in the exhaust gas oxygen concentration. In order to continuously monitor the slight variations in the HO2 sensor signal while the engine is running, the impedance* of the sensor is measured by the ECM. The ECM determines that there is a malfunction in the sensor when the measured impedance deviates from the standard range.
    *: The effective resistance in an alternating current electrical circuit.

    HINT:
    1. The impedance cannot be measured using an ohmmeter.
    2. DTC P0136 and P0156 indicate the deterioration of the HO2 sensor. The ECM sets this DTC by calculating the impedance of the sensor when the typical enabling conditions are satisfied (2 driving cycles).
    3. DTC P0137 and P0157 indicate an open or short circuit in the HO2 sensor (2 driving cycles). The ECM sets this DTC when the impedance of the sensor exceeds the threshold 50 kΩ.

  1. Extremely High Output Voltage of Heated Oxygen (HO2) Sensor (DTC P0138 or P0158)
    The ECM continuously monitors the HO2 sensor output voltage while the engine is running. DTC P0138 or P0158 is stored if the HO2 sensor voltage output is more than 1.2 V for 10 seconds or more.
  1. Heated Oxygen Sensor Output Voltage During Fuel Cut (P0139 or P0159)
    The sensor output voltage drops to below 0.2 V (extremely lean status) immediately when the vehicle decelerates and fuel cut is operating. If the voltage does not drop to below 0.2 V when accumulated intake air mass is more than 16.6 g, the system determines that the sensor response has deteriorated, illuminates the MIL and stores a DTC.
  1. Abnormal Voltage Output of Heated Oxygen Sensor during Fuel Cut from Rich Condition (P013A and P013C)
    If the sensor output voltage does not drop from 0.35 to 0.2 V immediately when the vehicle decelerates and fuel cut is operating, the ECM illuminates the MIL and stores a DTC.

MONITOR STRATEGY


Related DTCs
P0136: Heated oxygen sensor (for Bank 1) output voltage (Abnormal voltage output)
P0136: Heated oxygen sensor (for Bank 1) impedance (Low)
P0137: Heated oxygen sensor (for Bank 1) output voltage (Low voltage)
P0137: Heated oxygen sensor (for Bank 1) impedance (High)
P0138: Heated oxygen sensor (for Bank 1) output voltage (High voltage)
P0138: Heated oxygen sensor (for Bank 1) output voltage (Extremely high)
P0139: Heated oxygen sensor output voltage during fuel cut (for Bank 1)
P013A: Heated oxygen sensor response rate during fuel cut from rich condition
P013C: Heated oxygen sensor response rate during fuel cut from rich condition
P0156: Heated oxygen sensor (for Bank 2) output voltage (Abnormal voltage output)
P0156: Heated oxygen sensor (for Bank 2) impedance (Low)
P0157: Heated oxygen sensor (for Bank 2) output voltage (Low voltage)
P0157: Heated oxygen sensor (for Bank 2) impedance (High)
P0158: Heated oxygen sensor (for Bank 2) output voltage (High voltage)
P0158: Heated oxygen sensor (for Bank 2) output voltage (Extremely high)
P0159: Heated oxygen sensor output voltage during fuel cut (for Bank 2)
Required Sensors/Components (Main)
Heated oxygen sensor
Required Sensors/Components (Related)
Crankshaft position sensor, engine coolant temperature sensor, mass air flow meter and throttle position sensor
Frequency of Operation
Once per driving cycle: Active air-fuel ratio control detection, Heated oxygen sensor voltage (During fuel cut)
Continuous: Other
Duration
20 seconds: Active air-fuel ratio control detection
90 seconds: Heated oxygen sensor impedance (High)
30 seconds: Heated oxygen sensor impedance (Low)
10 seconds: Output voltage (Stuck high)
7 seconds: Heated oxygen sensor voltage (During fuel cut)
7 seconds: Heated oxygen sensor response rate during fuel cut from rich condition
MIL Operation
2 driving cycles: P0136, P0137, P0138, P0139, P0156, P0157, P0158 and P0159
1 driving cycle: P013A and P013C
Sequence of Operation
None

TYPICAL ENABLING CONDITIONS


All: 
Monitor runs whenever following DTCs not present
P0016, P0018 (VVT System - Misalignment)
P0017, P0019 (Exhaust VVT System - Misalignment)
P0031, P0032, P0051, P0052, P101D, P103D (Air fuel ratio sensor heater)
P0037, P0038, P0057, P0058, P102D, P105D (Rear oxygen sensor heater)
P0102, P0103 (Mass air flow meter)
P0112, P0113 (Intake air temperature sensor)
P0115, P0117, P0118 (Engine coolant temperature sensor)
P0120, P0121, P0122, P0123, P0220, P0222, P0223, P2135 (Throttle position sensor)
P0125 (Insufficient coolant temperature for closed loop fuel control)
P0128 (Thermostat)
P0171, P0172, P0174, P0175 (Fuel system)
P0301 - P0308 (Misfire)
P0335 (Crankshaft position sensor)
P1340 (Camshaft position sensor)
P0451, P0452, P0453 (EVAP system)
P0412, P0415, P0418, P0419, P1613, P1614 (Secondary air injection system control)
P2440 - P2447 (Secondary air injection system)
P0500, P0722 (Vehicle Speed Sensor)
P014C, P014D, P014E, P014F, P015A, P015B, P015C, P015D, P2195, P2196, P2197, P2198, P2237, P2238, P2239, P2240, P2241, P2242, P2252, P2253, P2255, P2256 (Front oxygen/Air fuel ratio sensor)
P219A, P219B, P219C, P219D, P219E, P219F, P21A0, P21A1, P21A2, P21A3 (Air-fuel ratio imbalance)

Heated Oxygen Sensor Output Voltage (Abnormal Voltage Output and Low Voltage): 
Active air-fuel ratio control
Executing
Active air-fuel ratio control begins when all of following conditions met:
-
Battery voltage
11 V or more
Atmospheric pressure
76 kPa (570 mmHg) or more
Engine coolant temperature
75°C (167°F) or more
Intake air temperature
-10°C (14°F) or more
Idling
OFF
Engine RPM
Less than 3200 rpm
A/F sensor status
Activated
Fuel system status
Closed loop
Engine load
10 to 75%

Heated Oxygen Sensor Impedance (Low): 
Battery voltage
11 V or more
Estimated rear HO2 sensor temperature
Less than 700°C (1292°F)
ECM monitor
Completed
DTC P0607
Not set

Heated Oxygen Sensor Impedance (High): 
Battery voltage
11 V or more
Estimated rear HO2 sensor temperature
450 to 750°C (842 to 1382°F)
DTC P0607
Not set

Heated Oxygen Sensor Output Voltage (Extremely High): 
Battery voltage
11 V or more
Time after engine start
2 seconds or more

Heated Oxygen Sensor Output Voltage during fuel cut: 
Engine coolant temperature
75°C (167°F) or higher
Estimated catalyst temperature
400°C (752°F) or higher
Fuel cut
ON

Heated Oxygen Sensor Response Rate during Fuel Cut from Rich Condition: 
Battery voltage
11 V or higher
Engine coolant temperature
75°C (167°F) or higher
Estimated catalyst temperature
400°C (752°F) or higher
Fuel cut
ON

TYPICAL MALFUNCTION THRESHOLDS


Heated Oxygen Sensor Output Voltage (Abnormal Voltage Output): 
Either of following conditions met:
-
1. All of following conditions (a), (b) and (c) met
-
(a) Commanded air-fuel ratio
14.3 or less
(b) Rear HO2 sensor voltage
0.21 to 0.66 V
(c) OSC (Oxygen Storage Capacity of Catalyst)
2.1 g or more

Heated Oxygen Sensor Output Voltage (Low): 
All of following conditions (a), (b) and (c) met
-
(a) Commanded air-fuel ratio
14.3 or less
(b) Rear HO2 sensor voltage
Less than 0.21 V
(c) OSC
2.1 g or more

Heated Oxygen Sensor Impedance (Low): 
Duration of following condition met
30 seconds or more
Heated oxygen sensor impedance
Less than 5 Ω

Heated Oxygen Sensor Impedance (High): 
Duration of following condition met
90 seconds or more
Heated oxygen sensor impedance
15 kΩ or more

Heated Oxygen Sensor Output Voltage (Extremely High): 
Duration of following condition met
10 seconds or more
Heated oxygen sensor voltage
1.2 V or more

Heated Oxygen Sensor Output Voltage during fuel cut: 
Total airflow volume reached after start of fuel-cut while heated oxygen sensor voltage remains at 0.2 V or higher
More than 16.6 g

Heated Oxygen Sensor Response Rate during Fuel Cut from Rich Condition: 
Duration that heated oxygen sensor voltage drops from 0.35 to 0.2 V during fuel cut (Normalized)
0.5 second or more

COMPONENT OPERATING RANGE


Duration of following condition met
30 seconds or more
Heated oxygen sensor voltage
Varies between 0.1 and 0.9 V

MONITOR RESULT

Refer to CHECKING MONITOR STATUS (Click here).

CONFIRMATION DRIVING PATTERN

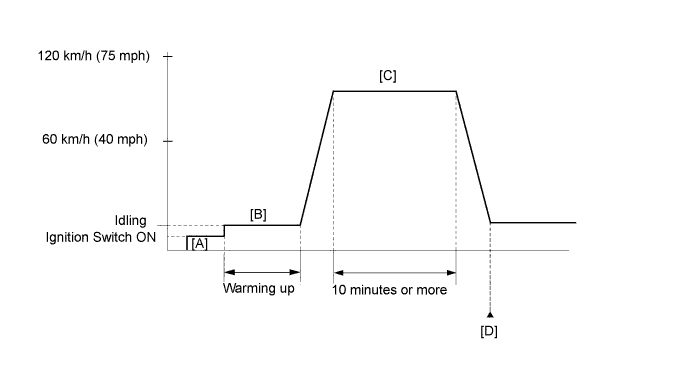
  1. P0136, P0137, P0138, P0156, P0157 and P0158

A199376E01

  1. Connect the Techstream to the DLC3.
  2. Turn the ignition switch to ON and turn the Techstream on.
  3. Clear the DTCs (even if no DTCs are stored, perform the clear DTC operation).
  4. Turn the ignition switch off and wait for at least 30 seconds.
  5. Turn the ignition switch to ON and turn the Techstream on [A].
  6. Start the engine and warm it up until the ECT reaches 75°C (167°F) or higher [B].
  7. With the transmission in 4th gear or higher, drive the vehicle at 60 to 120 km/h (40 to 75 mph) for 10 minutes or more [C].
  8. Enter the following menus: Powertrain / Engine and ECT / Trouble Codes [D].
  9. Read the Pending DTCs.

    HINT:
    1. If a pending DTC is output, the system is malfunctioning.
    2. If a pending DTC is not output, perform the following procedure.

  10. Enter the following menus: Powertrain / Engine and ECT / Utility / All Readiness.
  11. Input the DTC: P0136, P0137, P0138, P0156, P0157, or P0158.
  12. Check the DTC judgment result.

    Tester Display
    Description
    NORMAL
    1. DTC judgment completed
    2. System normal
    ABNORMAL
    1. DTC judgment completed
    2. System abnormal
    INCOMPLETE
    1. DTC judgment not completed
    2. Perform driving pattern after confirming DTC enabling conditions
    N/A
    1. Unable to perform DTC judgment
    2. Number of DTCs which do not fulfill DTC preconditions has reached ECU's memory limit

    CAUTION:
    When performing the confirmation driving pattern, obey all speed limits and traffic laws.

    HINT:
    1. If the judgment result shows ABNORMAL, the system has a malfunction.
    2. If the judgment result shows INCOMPLETE or N/A, perform steps [C] and [D].

  13. If no pending DTC is output, perform a universal trip and check for permanent DTCs (Click here).

    HINT:
    1. If a permanent DTC is output, the system is malfunctioning.
    2. If no permanent DTC is output, the system is normal.

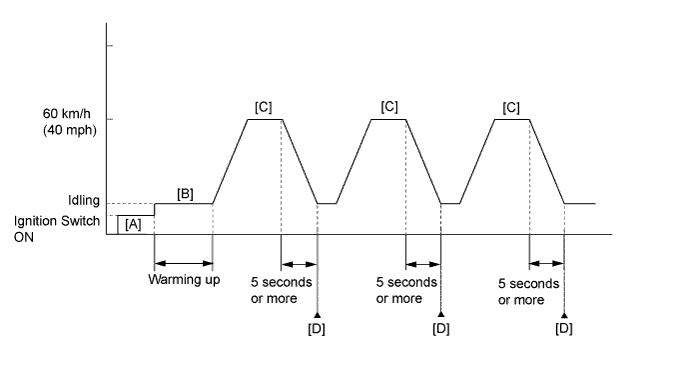
  1. P0139, P013A, P013C and P0159

A284467E12

  1. Connect the Techstream to the DLC3.
  2. Turn the ignition switch to ON and turn the Techstream on.
  3. Clear the DTCs (even if no DTCs are stored, perform the clear DTC operation).
  4. Turn the ignition switch off and wait for at least 30 seconds.
  5. Turn the ignition switch to ON and turn the Techstream on.
  6. Enter the following menus: Powertrain / Engine and ECT / Monitor / Current Monitor.
  7. Check that Catalyst Efficiency / Current is Incomplete.
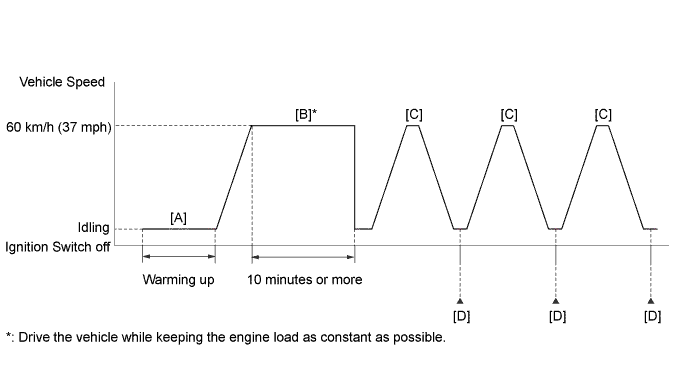
  8. Start the engine and warm it up until the engine coolant temperature is 75°C (167°F) or higher [A].
  9. Drive the vehicle at approximately 60 km/h (37 mph) for 10 minutes or more [B].

    CAUTION:
    When performing the confirmation driving pattern, obey all speed limits and traffic laws.

    HINT:
    Drive the vehicle while keeping the engine load as constant as possible.

  10. Drive the vehicle at 60 km/h (37 mph), and then decelerate the vehicle by releasing the accelerator pedal for 5 seconds or more to perform the fuel-cut [C].

    CAUTION:
    When performing the confirmation driving pattern, obey all speed limits and traffic laws.

  11. Enter the following menus: Powertrain / Engine and ECT / Monitor / Current Monitor / O2 Sensor / RL F/C B1S2, RL F/C B2S2 [D].
  12. Check the Test Value for RL F/C B1S2, RL F/C B2S2.

    HINT:
    If Test Value displays 0, perform step [C] until it displays a value larger than 0, as the O2 sensor monitor is not finished.

  13. Enter the following menus: Powertrain / Engine and ECT / Trouble Codes.
  14. Read the pending DTC [D].

    HINT:
    1. If a pending DTC is output, the system is malfunctioning.
    2. If a pending DTC is not output, perform the following procedure.

  15. Enter the following menus: Powertrain / Engine and ECT / Utility / All Readiness.
  16. Input the DTC: P0139, P013A, P013C or P0159.
  17. Check the DTC judgment result.

    Tester Display
    Description
    NORMAL
    1. DTC judgment completed
    2. System normal
    ABNORMAL
    1. DTC judgment completed
    2. System abnormal
    INCOMPLETE
    1. DTC judgment not completed
    2. Perform driving pattern after confirming DTC enabling conditions
    N/A
    1. Unable to perform DTC judgment
    2. Number of DTCs which do not fulfill DTC preconditions has reached ECU's memory limit

    HINT:
    1. If the judgment result shows ABNORMAL, the system has a malfunction.
    2. If the judgment result shows NORMAL, the system is normal.
    3. If the judgment result shows INCOMPLETE or N/A, drive the vehicle with the shift lever in S, and then perform step [C] again.

  18. If no pending DTC is output, perform a universal trip and check for permanent DTCs (Click here).

    HINT:
    1. If a permanent DTC is output, the system is malfunctioning.
    2. If no permanent DTC is output, the system is normal.


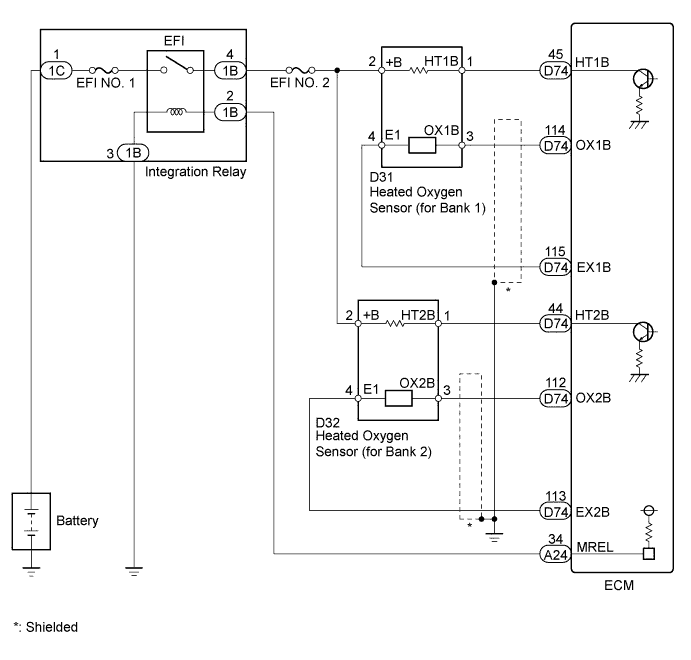
WIRING DIAGRAM


A167571E01


INSPECTION PROCEDURE

HINT:
Malfunctioning areas can be identified by performing the Control the Injection Volume for A/F sensor function provided in the Active Test. The Control the Injection Volume for A/F sensor function can help to determine whether the Air-Fuel Ratio (A/F) sensor, Heated Oxygen (HO2) sensor and other potential trouble areas are malfunctioning.
The following instructions describe how to conduct the Control the Injection Volume for A/F sensor operation using the Techstream.
  1. Connect the Techstream to the DLC3.
  2. Start the engine and turn the Techstream on.
  3. Warm up the engine at an engine speed of 2500 rpm for approximately 90 seconds.
  4. Enter the following menus: Powertrain / Engine and ECT / Active Test / Control the Injection Volume for A/F sensor.
  5. Perform the Active Test operation with the engine in an idling condition (press the RIGHT or LEFT button to change the fuel injection volume).
  6. Monitor the output voltages of the A/F and HO2 sensors (AFS Voltage B1S1 and O2S B1S2 or AFS Voltage B2S1 and O2S B2S2) displayed on the Techstream.

HINT:
  1. Change the fuel injection volume within the range of -12.5% to +12.5%.
  2. The air fuel ratio sensor has an output delay of a few seconds and the heated oxygen sensor has a maximum output delay of approximately 20 seconds.
  3. If the sensor output voltage does not change (almost no reaction) while performing the Active Test, the sensor may be malfunctioning.


Display Item (Sensor)
Injection Volume
Status
Voltage
AFS Voltage B1S1 or AFS Voltage B2S1
(A/F)
+12.5%
Rich
Less than 3.1 V
AFS Voltage B1S1 or AFS Voltage B2S1
(A/F)
-12.5%
Lean
More than 3.4 V
O2S B1S2 or O2S B2S2
(HO2)
+12.5%
Rich
More than 0.55 V
O2S B1S2 or O2S B2S2
(HO2)
-12.5%
Lean
Less than 0.4 V

NOTICE:
The Air-Fuel Ratio (A/F) sensor has an output delay of a few seconds and the Heated Oxygen (HO2) sensor has a maximum output delay of approximately 20 seconds.


Case
Air Fuel Ratio Sensor (Sensor 1) Output Voltage
Heated Oxygen Sensor (Sensor 2) Output Voltage
Main Suspected Trouble Area
1
A150787E08
A151324E08
A150787E08
A150788E06
-
2
A150787E08
A150790E01
A150787E08
A150788E06
  1. Air fuel ratio sensor
  2. Air fuel ratio sensor heater
  3. Air fuel ratio sensor circuit
3
A150787E08
A151324E08
A150787E08
A150790E01
  1. Heated oxygen sensor
  2. Heated oxygen sensor heater
  3. Heated oxygen sensor circuit
4
A150787E08
A150790E01
A150787E08
A150790E01
  1. Fuel injector assembly
  2. Fuel pressure
  3. Gas leak from exhaust system (air-fuel ratio extremely rich or lean)
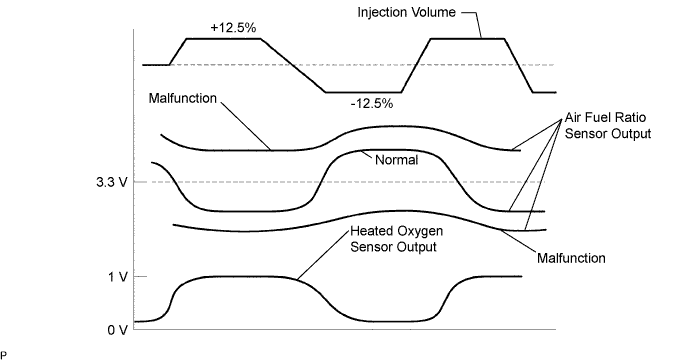
  1. Following the Control the Injection Volume for A/F sensor procedure enables technicians to check and graph the voltage outputs of both the A/F and HO2 sensors.
  2. To display the graph, enter the following menus: Powertrain / Engine and ECT / Active Test / Control the Injection Volume for A/F Sensor / A/F Control System /AFS Voltage B1S1 and O2S B1S2 or AFS Voltage B2S1 and O2S B2S2.

NOTICE:
Inspect the fuses for circuits related to this system before performing the following inspection procedure.

HINT:
  1. Read freeze frame data using the Techstream. Freeze frame data records the engine condition when malfunctions are detected. When troubleshooting, freeze frame data can help determine if the vehicle was moving or stationary, if the engine was warmed up or not, if the air-fuel ratio was lean or rich, and other data from the time the malfunction occurred.
  2. If the OX1B wire from the ECM connector is short-circuited to the +B wire, DTC P0136 will be set.
  3. If the OX2B wire from the ECM connector is short-circuited to the +B wire, DTC P0156 will be set.
  4. Bank 1 refers to the bank that includes the No. 1 cylinder*.
    *: The No. 1 cylinder is the cylinder which is farthest from the transmission.
  5. Bank 2 refers to the bank that does not include the No. 1 cylinder.
  6. Sensor 1 refers to the sensor closest to the engine assembly.
  7. Sensor 2 refers to the sensor farthest away from the engine assembly.

1.READ OUTPUT DTC
  1. Connect the Techstream to the DLC3.

  1. Turn the ignition switch to ON and turn the Techstream on.

  1. Enter the following menus: Powertrain / Engine and ECT / Trouble Codes.

  1. Read DTCs.

    Result 
    Result
    Proceed to
    P0138 or P0158 is output
    A
    P0137 or P0157 is output
    B
    P0136 or P0156 is output
    C
    P0139, P013A, P013C or P0159 is output
    D
    P0136, P0137, P0138, P0156, P0157 or P0158 and other DTCs are output
    E


B
Go to step 6

C
Go to step 4

D
Go to step 15

E
GO TO DTC CHART (Click here)
A


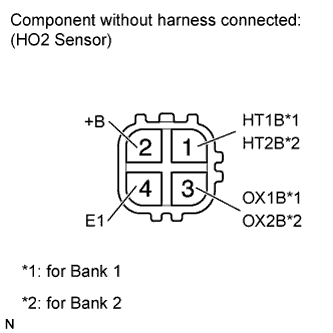
2.INSPECT OXYGEN SENSOR (CHECK FOR SHORT)


    A117841E92
  1. Disconnect the D31 or D32 HO2 sensor connector.

  1. Measure the resistance according to the value(s) in the table below.
    Standard resistance 
    Tester Connection
    Condition
    Specified Condition
    2 (+B) - 3 (OX1B)
    Always
    10 kΩ or higher
    2 (+B) - 3 (OX2B)
    Always
    10 kΩ or higher
    2 (+B) - 4 (E1)
    Always
    10 kΩ or higher

    HINT:
    Perform "Inspection After Repair" after replacing the heated oxygen sensor (Click here).


NG
REPLACE HEATED OXYGEN SENSOR (Click here)
OK


3.CHECK HARNESS AND CONNECTOR
  1. Turn the ignition switch off and wait for 5 minutes.

  1. Disconnect the D74 ECM connector.

  1. Measure the resistance according to the value(s) in the table below.

    Standard resistance:

    Tester Connection
    Condition
    Specified Condition
    D74-45 (HT1B) - D74-114 (OX1B)
    Always
    10 kΩ or higher
    D74-44 (HT2B) - D74-112 (OX2B)
    Always
    10 kΩ or higher


NG
REPAIR OR REPLACE HARNESS OR CONNECTOR
OK

REPLACE ECM (Click here)  

4.READ VALUE USING TECHSTREAM (CONTROL THE INJECTION VOLUME FOR A/F SENSOR)
  1. Connect the Techstream to the DLC3.

  1. Turn the ignition switch ON and turn the Techstream on.

  1. Start the engine.

  1. Warm up the engine.

  1. Enter the following menus: Powertrain / Engine and ECT / Active Test / Control the Injection Volume for A/F Sensor.

  1. Change the fuel injection volume using the Techstream, monitoring the voltage output of HO2 sensors displayed on the Techstream.

    HINT:
    1. Change the fuel injection volume within the range of - 12.5% and +12.5%.
    2. The A/F sensor has an output delay of a few seconds and the heated oxygen sensor has a maximum output delay of approximately 20 seconds.
    3. If the sensor output voltage does not change (almost no reaction) while performing the Active Test, the sensor may be malfunctioning.

    Standard voltage:
    Fluctuates between 0.4 V or less and 0.5 V or more.


NG
Go to step 6
OK


5.PERFORM ACTIVE TEST USING TECHSTREAM (CONTROL THE INJECTION VOLUME FOR A/F SENSOR)
  1. Connect the Techstream to the DLC3.

  1. Start the engine and turn the Techstream on.

  1. Warm up the engine.

  1. Enter the following menus: Powertrain / Engine and ECT / Active Test / Control the Injection Volume for A/F Sensor.

  1. Change the fuel injection volume using the Techstream, and monitor the voltage output of Air-Fuel Ratio (A/F) and HO2 sensors displayed on the Techstream.

HINT:
  1. Change the fuel injection volume within the range of - 12.5% and +12.5%.
  2. The A/F sensor is displayed as AFS Voltage B1S1 or AFS Voltage B2S1, and the HO2 sensor is displayed as O2S B1S2 or O2S B2S2 on the Techstream.
  3. The A/F sensor has an output delay of a few seconds and the heated oxygen sensor has a maximum output delay of approximately 20 seconds.

  4. If the sensor output voltage does not change (almost no reaction) while performing the Active Test, the sensor may be malfunctioning.

    Result 
    Display Item (Sensor)
    Voltage Variation
    Proceed to
    AFS Voltage B1S1 (A/F)
    AFS Voltage B2S1 (A/F)
    Alternating between more and less than 3.3 V
    OK
    Remains at more than 3.3 V
    NG
    Remains at less than 3.3 V
    NG

    HINT:
    A normal HO2 sensor voltage (O2S B1 S2 or O2S B2 S2) reacts in accordance with increases and decreases in fuel injection volumes. When the A/F sensor voltage remains at either less or more than 3.3 V despite the HO2 sensor indicating a normal reaction, the A/F sensor is malfunctioning.


    A087979E46


NG
Go to step 12
OK

CHECK EXTREMELY RICH OR LEAN ACTUAL AIR FUEL RATIO AND REPAIR CAUSE (FUEL INJECTOR, FUEL PRESSURE, GAS LEAK FROM SYSTEM, ETC.) 

6.CHECK FOR EXHAUST GAS LEAK
  1. Check for exhaust gas leak.

    OK:
    No gas leakage.

    HINT:
    Perform "Inspection After Repair" after repairing or replacing the exhaust system (Click here).


NG
REPAIR OR REPLACE EXHAUST GAS LEAK POINT
OK


7.INSPECT HEATED OXYGEN SENSOR (HEATER RESISTANCE)
  1. Inspect the heated oxygen sensor (Click here).

    HINT:
    Perform "Inspection After Repair" after replacing the heated oxygen sensor (Click here).


NG
REPLACE HEATED OXYGEN SENSOR (Click here)
OK


8.CHECK HARNESS AND CONNECTOR (HEATED OXYGEN SENSOR - ECM)
  1. Disconnect the D31 or D32 HO2 sensor connector.

  1. Disconnect the D74 ECM connector.

  1. Measure the resistance according to the value(s) in the table below.

    Standard resistance:

    Tester Connection
    Condition
    Specified Condition
    D31-1 (HT1B) - D74-45 (HT1B)
    Always
    Below 1 Ω
    D31-3 (OX1B) - D74-114 (OX1B)
    Always
    Below 1 Ω
    D31-4 (E1) - D74-115 (EX1B)
    Always
    Below 1 Ω
    D32-1 (HT2B) - D74-44 (HT2B)
    Always
    Below 1 Ω
    D32-3 (OX2B) - D74-112 (OX2B)
    Always
    Below 1 Ω
    D32-4 (E1) - D74-113 (EX2B)
    Always
    Below 1 Ω
    D31-1 (HT1B) or D74-45 (HT1B) - Body ground
    Always
    10 kΩ or higher
    D31-3 (OX1B) or D74-114 (OX1B) - Body ground
    Always
    10 kΩ or higher
    D32-1 (HT2B) or D74-44 (HT2B) - Body ground
    Always
    10 kΩ or higher
    D32-3 (OX2B) or D74-112 (OX2B) - Body ground
    Always
    10 kΩ or higher


NG
REPAIR OR REPLACE HARNESS OR CONNECTOR
OK


9.REPLACE HEATED OXYGEN SENSOR
  1. Replace the heated oxygen sensor (Click here).

    HINT:
    Perform "Inspection After Repair" after replacing the heated oxygen sensor (Click here).


NEXT


10.PERFORM CONFIRMATION DRIVING PATTERN
  1. Refer to the confirmation driving pattern for P0136, P0137, P0138, P0156, P0157 and P0158.


NEXT


11.CHECK WHETHER DTC OUTPUT RECURS (DTC P0136, P0137, P0138, P0156, P0157 OR P0158)
  1. Connect the Techstream to the DLC3.

  1. Turn the Techstream on.

  1. Enter the following menus: Powertrain / Engine and ECT / Utility / All Readiness.

  1. Input DTC: P0136, P0137, P0138, P0156, P0157 or P0158.

  1. Check the DTC Monitor is NORMAL. If DTC Monitor is INCOMPLETE, perform the driving pattern adding the vehicle speed.

    Result 
    Display (DTC Output)
    Proceed to
    NORMAL
    (No DTC output)
    A
    ABNORMAL
    (P0136, P0137, P0138, P0156, P0157 or P0158 detected)
    B

    HINT:
    Perform "Inspection After Repair" after replacing the air fuel ratio sensor (Click here).


B
END
A

REPLACE AIR FUEL RATIO SENSOR (Click here)  

12.REPLACE AIR FUEL RATIO SENSOR
  1. Replace the air fuel ratio sensor (Click here).

    HINT:
    Perform "Inspection After Repair" after replacing the air fuel ratio sensor (Click here).


NEXT


13.PERFORM CONFIRMATION DRIVING PATTERN
  1. Refer to the confirmation driving pattern for P0136, P0137, P0138, P0156, P0157 and P0158.


NEXT


14.CHECK WHETHER DTC OUTPUT RECURS (DTC P0136, P0138, P0156 OR P0158)
  1. Connect the Techstream to the DLC3.

  1. Turn the Techstream on.

  1. Enter the following menus: Powertrain / Engine and ECT / Utility / All Readiness.

  1. Input DTC: P0136, P0137, P0138, P0156, P0157 or P0158.

  1. Check the DTC Monitor is NORMAL. If DTC Monitor is INCOMPLETE, perform the driving pattern adding the vehicle speed.

    Result 
    Display (DTC Output)
    Proceed to
    ABNORMAL
    (P0136, P0138, P0156 or P0158 detected)
    A
    NORMAL
    (No DTC output)
    B

    HINT:
    Perform "Inspection After Repair" after replacing the heated oxygen sensor (Click here).


B
END
A

REPLACE HEATED OXYGEN SENSOR (Click here)  

15.CHECK FOR EXHAUST GAS LEAK
  1. Check for exhaust gas leak.

    OK:
    No gas leakage.

    HINT:
    Perform "Inspection After Repair" after repairing or replacing the exhaust system (Click here).


NG
REPAIR OR REPLACE EXHAUST GAS LEAK POINT
OK


16.CHECK HARNESS AND CONNECTOR (CHECK FOR SHORT)
  1. Turn the ignition switch off and wait for 5 minutes.

  1. Disconnect the D74 ECM connector.

  1. Measure the resistance according to the value(s) in the table below.

    Standard resistance:

    Tester Connection
    Condition
    Specified Condition
    D74-45 (HT1B) - D74-114 (OX1B)
    Always
    10 kΩ or higher
    D74-44 (HT2B) - D74-112 (OX2B)
    Always
    10 kΩ or higher


NG
REPAIR OR REPLACE HARNESS OR CONNECTOR
OK


17.PERFORM CONFIRMATION DRIVING PATTERN
  1. Perform the Confirmation Driving Pattern (P0139, P013A, P013C and P0159).


NEXT


18.READ DTC OUTPUT (DTC P0139, P013A, P013C OR P0159 IS OUTPUT AGAIN)

A199377E01

  1. Connect the Techstream to the DLC3.

  1. Clear the DTCs.

  1. Start the engine. [A]

  1. Warm up the engine until the engine coolant temperature reaches 75°C (167°F) or more. [B]

  1. Drive the vehicle 40 mph (60 km/h) and decelerate the vehicle for 5 seconds or more. [C]

  1. Turn the Techstream on.

  1. Enter the following menus: Powertrain / Engine and ECT / Utility / All Readiness. [D]

  1. Input DTCs: P0139 or P0159.

  1. INCOMPLETE, perform the drive pattern adding the vehicle speed and using the second gear to decelerate the vehicle.

    Result 
    Result
    Proceed to
    ABNORMAL
    (DTC P0139, P013A, P013C or P0159 is output)
    A
    NORMAL
    (No DTC output)
    B

    HINT:
    Perform "Inspection After Repair" after replacing the heated oxygen sensor (Click here).


B
CHECK FOR INTERMITTENT PROBLEMS (Click here)
A

REPLACE HEATED OXYGEN SENSOR (Click here)