 |
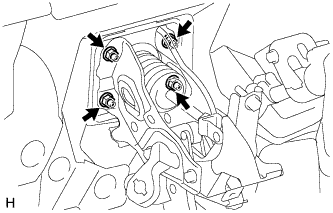
Install the brake booster with the 4 nuts.
- Torque:
- 15 N*m{ 155 kgf*cm , 11 ft.*lbf }
BRAKE BOOSTER > INSTALLATION |
| 1. INSTALL BRAKE VACUUM CHECK VALVE ASSEMBLY |
| 2. INSTALL BRAKE BOOSTER ASSEMBLY |
Install the clevis.
Install a new brake booster gasket to the brake booster.
|
Install the brake booster with the 4 nuts.
| 3. INSTALL PUSH ROD PIN |
Apply a light coat of lithium soap base glycol grease to the inner surface of the hole on the brake pedal lever.
Set the push rod clevis in place, insert the push rod pin from outside the vehicle and then install a new clip.
| 4. INSTALL LOWER NO. 1 INSTRUMENT PANEL AIRBAG ASSEMBLY |
Install the lower No. 1 instrument panel airbag assembly (Click here).
| 5. CONNECT BRAKE BOOSTER CONNECTOR |
Connect the 2 brake booster connectors to the brake booster.
| 6. CONNECT VACUUM HOSE ASSEMBLY |
Connect the vacuum hose onto the check valve.
| 7. INSTALL BRAKE MASTER CYLINDER SUB-ASSEMBLY |
Install the brake master cylinder (Click here).
| 8. CHECK AND ADJUST BRAKE PEDAL |
Check and adjust brake pedal (Click here).
| 9. CHECK BRAKE BOOSTER |
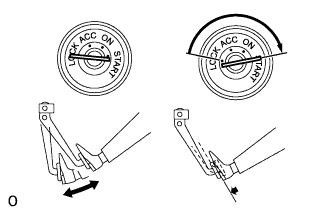 |
OPERATING CHECK
Depress the brake pedal several times with the engine off and check that there is no change in the pedal reserve distance.
Depress the brake pedal and start the engine. If the pedal goes down slightly, operation is normal.
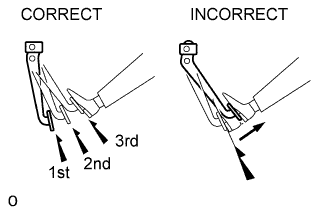 |
AIRTIGHTNESS CHECK
Start the engine and stop it after 1 or 2 minutes. Depress the brake pedal several times slowly.
If the pedal goes down farthest the 1st time, but gradually rises after the 2nd or 3rd time, the booster is airtight.
Depress the brake pedal while the engine is running, and stop the engine with the pedal depressed. If there is no change in the pedal reserve travel after holding the pedal for 30 seconds, the booster is airtight.
| 10. CONNECT CABLE TO NEGATIVE BATTERY TERMINAL |
| 11. BLEED BRAKE SYSTEM |
Bleed brake master cylinder
Remove the brake master cylinder reservoir filler cap assembly.
Add brake fluid into the reservoir between MAX and MIN level on the brake fluid reservoir.
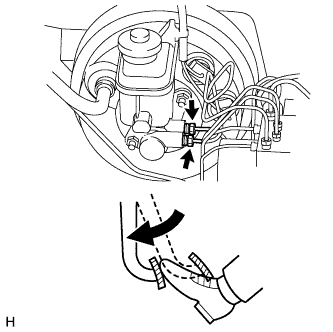 |
Using a union nut wrench, disconnect the 2 brake lines from the master cylinder.
Slowly depress and hold the brake pedal.
Block the outer holes with your fingers, and release the pedal.
Repeat the 2 previous steps 3 or 4 times.
Using a union nut wrench, connect the 2 brake lines to the master cylinder.
Bleed brake line
Connect a vinyl tube to the bleeder plug of the front disc brake cylinder RH.
Depress the brake pedal several times, and then loosen the bleeder plug with the pedal depressed.*1
When fluid stops coming out, tighten the bleeder plug, and then release the brake pedal.*2
Repeat *1 and *2 until all the air in the brake fluid is completely bled out and the new brake fluid comes out.
Tighten the bleeder plug completely.
Replace the brake fluid from the front disc brake cylinder LH using the same procedure as for RH.
Connect a vinyl tube to the bleeder plug of the rear disc brake cylinder RH.
Depress the brake pedal several times, and then loosen the bleeder plug with the pedal depressed.*1
When fluid stops coming out, tighten the bleeder plug, and then release the brake pedal.*2
Repeat *1 and *2 until all the air in the brake fluid is completely bled out and the new brake fluid comes out.
Tighten the bleeder plug completely.
Replace the brake fluid from the rear disc brake cylinder LH using the same procedure as for RH.
Bleed VSC actuator assembly
Depress the brake pedal more than 20 times with the engine off.
Connect the Techstream to the DLC3, and turn the ignition switch on.
Select AIR BLEEDING on the Techstream.
Bleed the air out of the suction line.
Bleed the air out of the pressure reduction line.
Clear the DTCs (Click here).
Inspect for brake fluid leak.
Check and adjust brake fluid level in reservoir .
If any DTC is set, perform the troubleshooting for the DTC
Check the DTC (Click here).