Home › ENGINE ยท 1UR-FE › LUBRICATION › OIL PUMP

OIL PUMP > INSTALLATION

for Preparation Click here


1. INSTALL WATER INLET PIPE
  1. Apply soapy water to 2 new O-rings and install them to the water inlet pipe.

  1. Install the water inlet pipe to the No. 1 heat exchanger cover.


2. INSTALL TIMING CHAIN COVER SUB-ASSEMBLY
  1. Apply a light coat of engine oil to a new oil pump gasket.

  1. Install the oil pump gasket to the cylinder block.

  1. Apply a light coat of engine oil to a new O-ring.

  1. Install the O-ring to the oil pan sub-assembly.


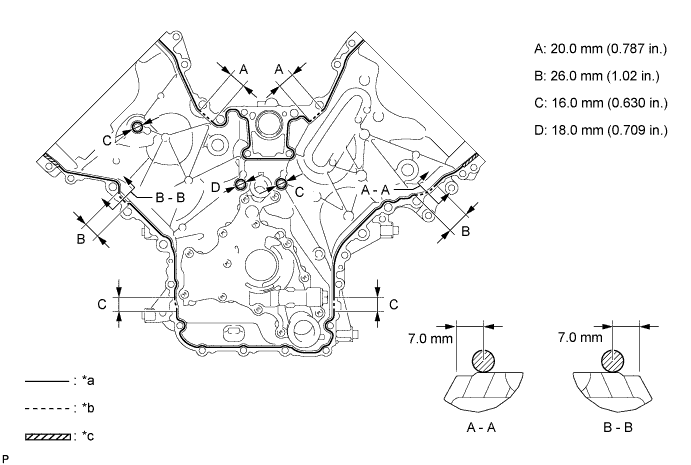
  1. Apply seal packing in a continuous line to the timing chain cover sub-assembly as shown in the following illustration.


    A210030E08


    Text in Illustration 
    *a
    Continuous Line Area
    *b
    Dashed Line Area
    *c
    Diagonal Line Area
    -
    -

    Seal packing:
    Toyota Genuine Seal Packing Black, Three Bond 1207B or equivalent


    1. A150825E09

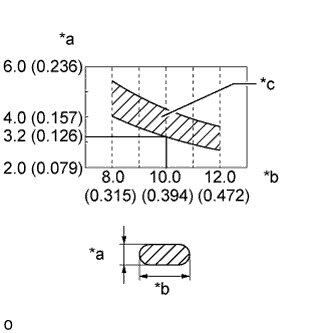
      Apply Seal Packing As Follows:
      Area
      Seal Packing Diameter
      Application Position from Inside Edge of Cover
      Continuous Line Area
      3.0 to 4.0 mm (0.118 to 0.157 in.)
      2.5 mm (0.0984 in.)
      Dashed Line Area
      6.4 mm (0.252 in.) or more, or within OK area shown in illustration
      7.0 mm (0.276 in.)
      Diagonal Line Area
      3.0 to 4.0 mm (0.118 to 0.157 in.)
      5.5 mm (0.217 in.)

    Text in Illustration 
    *a
    Seal Packing Thickness
    *b
    Seal Packing Width
    *c
    OK Area

    NOTICE:
    1. When the contact surfaces are wet, wipe them with an oil-free cloth before applying seal packing.
    2. Install the timing chain cover sub-assembly within 3 minutes and tighten the bolts within 10 minutes after applying seal packing.
    3. Do not start the engine for at least 2 hours after installing.


    A210031
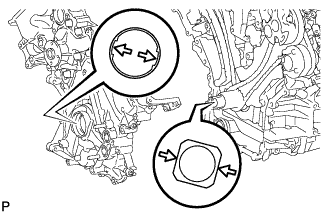
  1. Align the oil pump drive rotor spline and crankshaft as shown in the illustration and install the timing chain cover sub-assembly.


    A210026E05
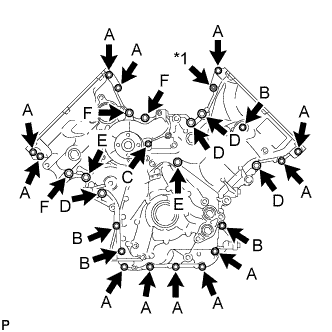
  1. Temporarily install the 26 bolts and nut.

    Standard Bolt:
    Item
    Length
    Thread Diameter
    Bolt A
    25 mm (0.984 in.)
    8 mm (0.315 in.)
    Bolt B
    55 mm (2.17 in.)
    8 mm (0.315 in.)
    Bolt C
    70 mm (2.76 in.)
    8 mm (0.315 in.)
    Bolt D
    35 mm (1.38 in.)
    10 mm (0.394 in.)
    Bolt E
    55 mm (2.17 in.)
    10 mm (0.394 in.)
    Bolt F
    80 mm (3.15 in.)
    10 mm (0.394 in.)

    Text in Illustration 
    *1
    Nut

    NOTICE:
    Make sure that there is no oil on the bolt threads.


    A214837E01
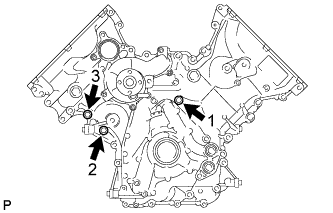
  1. Tighten the 3 bolts in several steps in the sequence shown in the illustration.

    Torque:
    47 N*m{ 479 kgf*cm , 35 ft.*lbf }


    A210020E01
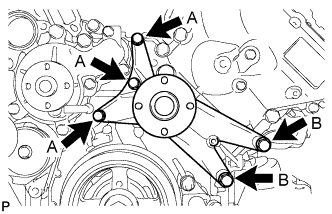
  1. Temporarily install the fan bracket assembly with the 5 bolts to the timing chain cover sub-assembly.

    Standard Bolt:
    Item
    Length
    Thread Diameter
    Bolt A
    70 mm (2.76 in.)
    8 mm (0.315 in.)
    Bolt B
    80 mm (3.15 in.)
    10 mm (0.394 in.)

  1. Temporarily install the V-ribbed belt tensioner assembly with the bolt and 6 mm hexagon bolt to the timing chain cover sub-assembly.


    A214838E01
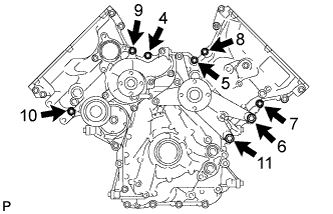
  1. Tighten the 8 bolts labeled 4 to 11 in several steps in the sequence shown in the illustration.

    Torque:
    47 N*m{ 479 kgf*cm , 35 ft.*lbf }


    A214839E01
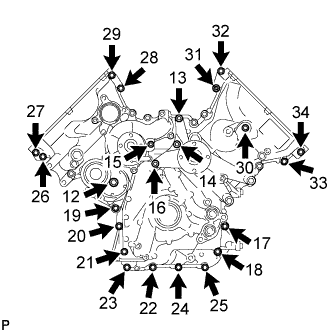
  1. Tighten the 22 bolts and nut labeled 12 to 34 in several steps in the sequence shown in the illustration.

    Torque:
    23 N*m{ 235 kgf*cm , 17 ft.*lbf }


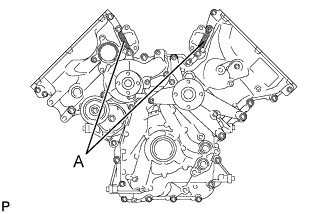
    NOTICE:
    A210033E01
    After the installation, if the seal packing has seeped out at the areas labeled A shown in the illustration, wipe it off.


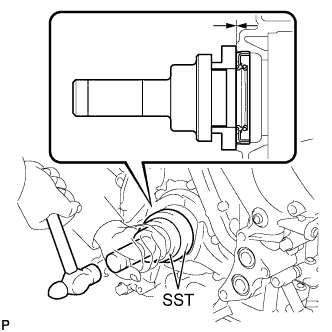
3. INSTALL FRONT CRANKSHAFT OIL SEAL


    A163995E01
  1. Apply MP grease to the lip of a new oil seal.

  1. Using SST and a hammer, tap in the oil seal to a depth between 0 to 1.0 mm (0 to 0.0394 in.) from the timing chain cover edge.

    SST
    09223-22010  
    09506-35010  

    NOTICE:
    1. Keep the lip free from foreign matter.
    2. Do not tap oil seal at an angle.


4. INSTALL CYLINDER HEAD COVER SUB-ASSEMBLY LH
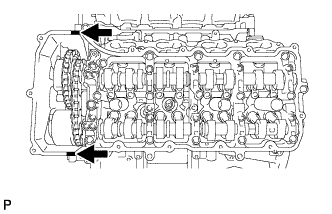
  1. Install 5 new gaskets to the No. 2 camshaft bearing cap and No. 3 camshaft bearing cap.

  1. Install the cylinder head cover gasket LH to the cylinder head cover sub-assembly LH.

    NOTICE:
    Remove any oil from the contact surface.


    A291560E01
  1. Apply seal packing as shown in the illustration.

    Seal packing:
    Toyota Genuine Seal Packing Black, Three Bond 1207B or equivalent

    Text in Illustration 
    V100135
    Seal Packing

    NOTICE:
    1. Remove any oil from the contact surface.
    2. Install the cylinder head cover sub-assembly LH within 3 minutes and tighten the bolts within 15 minutes after applying seal packing.


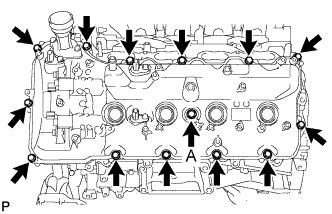
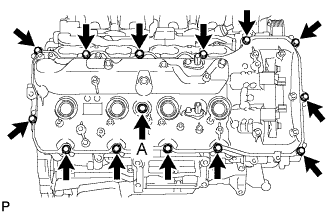
    A210022E01
  1. Install the cylinder head cover sub-assembly LH and a new seal washer with the 14 bolts.

    Torque:
    for bolt A:
    21 N*m{ 214 kgf*cm , 15 ft.*lbf }
    except bolt A:
    12 N*m{ 122 kgf*cm , 9 ft.*lbf }

    NOTICE:
    Do not start the engine for at least 2 hours after the installation.


5. INSTALL CYLINDER HEAD COVER SUB-ASSEMBLY RH
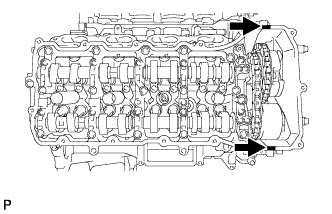
  1. Install 5 new gaskets to the No. 1 camshaft bearing cap and No. 3 camshaft bearing cap.

  1. Install the cylinder head cover gasket RH to the cylinder head cover sub-assembly RH.

    NOTICE:
    Remove any oil from the contact surface.


    A291561E01
  1. Apply seal packing as shown in the illustration.

    Seal packing:
    Toyota Genuine Seal Packing Black, Three Bond 1207B or equivalent

    Text in Illustration 
    V100135
    Seal Packing

    NOTICE:
    1. Remove any oil from the contact surface.
    2. Install the cylinder head cover sub-assembly RH within 3 minutes and tighten the bolts within 15 minutes after applying seal packing.


    A210024E01
  1. Install the cylinder head cover sub-assembly RH and a new seal washer with the 14 bolts.

    Torque:
    for bolt A:
    21 N*m{ 214 kgf*cm , 15 ft.*lbf }
    except bolt A:
    12 N*m{ 122 kgf*cm , 9 ft.*lbf }

    NOTICE:
    Do not start the engine for at least 2 hours after the installation.


6. INSTALL IGNITION COIL ASSEMBLY
  1. Install the 8 ignition coils with the 8 bolts.

    Torque:
    10 N*m{ 102 kgf*cm , 7 ft.*lbf }


7. CONNECT NO. 3 AIR TUBE
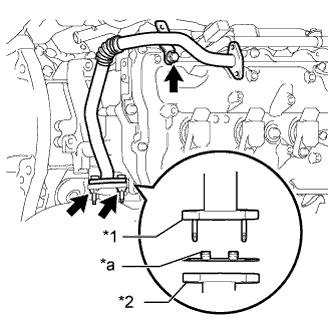
  1. Install a new gasket to the No. 3 air tube.


    A214882E02
  1. Connect the No. 3 air tube with the 2 nuts and bolt.

    Torque:
    10 N*m{ 102 kgf*cm , 7 ft.*lbf }

    Text in Illustration 
    *1
    No. 3 Air Tube
    *2
    Exhaust Manifold
    *a
    Claw

    NOTICE:
    Make sure the gasket's claws are not caught between the No. 3 air tube and exhaust manifold.

  1. Install the wire harness clamp bracket with the bolt to the cylinder head cover sub-assembly RH.

    Torque:
    8.0 N*m{ 82 kgf*cm , 71 in.*lbf }


8. CONNECT NO. 4 AIR TUBE
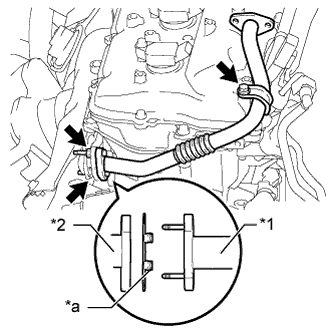
  1. Install a new gasket to the No. 4 air tube.


    A214883E02
  1. Connect the No. 4 air tube with the 2 nuts and bolt.

    Torque:
    10 N*m{ 102 kgf*cm , 7 ft.*lbf }

    Text in Illustration 
    *1
    No. 4 Air Tube
    *2
    Exhaust Manifold
    *a
    Claw

    NOTICE:
    Make sure the gasket's claws are not caught between the No. 4 air tube and exhaust manifold.

  1. Install the wire harness clamp bracket with the bolt to the cylinder head cover sub-assembly LH.

    Torque:
    8.0 N*m{ 82 kgf*cm , 71 in.*lbf }


9. INSTALL CRANKSHAFT PULLEY


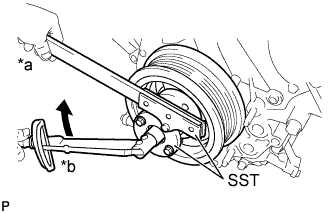
    A164230E07
  1. Align the key groove of the crankshaft pulley with the crankshaft pulley set key, and slide on the crankshaft pulley to install it.
    Text in Illustration 
    *a
    Hold
    *b
    Turn

  1. Using SST, install the crankshaft pulley set bolt.

    SST
    09213-70011  
    09330-00021  

    Torque:
    300 N*m{ 3059 kgf*cm , 221 ft.*lbf }


10. INSTALL NO. 1 IDLER PULLEY SUB-ASSEMBLY
  1. Install the No. 1 idler pulley sub-assembly to the timing chain cover sub-assembly with the bolt.

    Torque:
    43 N*m{ 438 kgf*cm , 32 ft.*lbf }


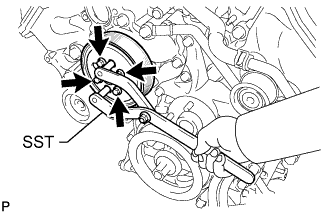
11. INSTALL WATER PUMP PULLEY
  1. Temporarily install the water pump pulley with the 4 bolts.


    A210018E02
  1. Using SST, hold the water pump pulley and tighten the 4 bolts.

    SST
    09960-10010   (09962-01000, 09963-01000)

    Torque:
    21 N*m{ 214 kgf*cm , 15 ft.*lbf }


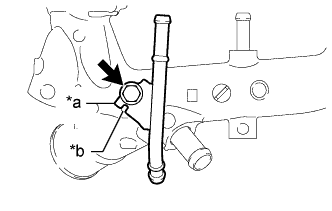
12. INSTALL NO. 3 WATER BY-PASS PIPE

HINT:
Perform this procedure only when replacement of the No. 3 water by-pass pipe is necessary.


    A308526E01
  1. Install the No. 3 water by-pass pipe to the front water by-pass joint with the bolt.

    Torque:
    10 N*m{ 102 kgf*cm , 7 ft.*lbf }

    Text in Illustration 
    *a
    Stopper
    *b
    Protrusion

    NOTICE:
    Align the notch of the stopper with the protrusion of the front water by-pass joint.


13. INSTALL FRONT WATER BY-PASS JOINT
  1. Install 2 new gaskets and the front water by-pass joint to the cylinder head with the 4 nuts.

    Torque:
    21 N*m{ 214 kgf*cm , 15 ft.*lbf }

  1. Install the No. 2 water by-pass hose to the front water by-pass joint, and slide the clamp to secure the hose.


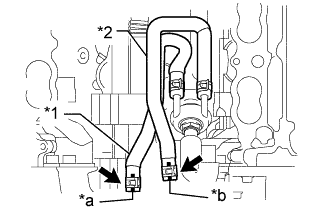
14. CONNECT NO. 10 WATER BY-PASS HOSE


    A308525E02
  1. Connect the No. 10 water by-pass hose to the front water by-pass joint, and slide the clamp to secure the hose.
    Text in Illustration 
    *1
    No. 9 Water By-pass Hose
    *2
    No. 10 Water By-pass Hose
    *a
    Paint Mark (Orange)
    *b
    Paint Mark (Yellow)


15. CONNECT NO. 9 WATER BY-PASS HOSE
  1. Connect the No. 9 water by-pass hose to the front water by-pass joint, and slide the clamp to secure the hose.


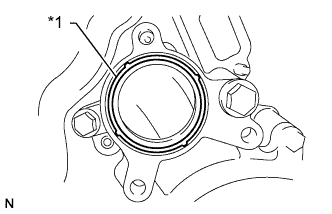
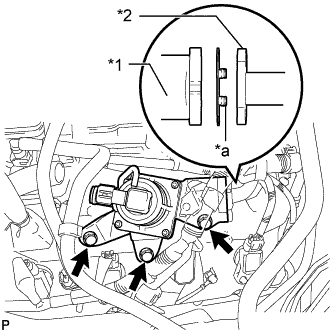
16. INSTALL WATER INLET HOUSING


    A162555E05
  1. Install a new gasket to the timing chain cover sub-assembly.
    Text in Illustration 
    *1
    Gasket

  1. Install the water inlet housing with the 3 bolts.

    Torque:
    21 N*m{ 214 kgf*cm , 15 ft.*lbf }


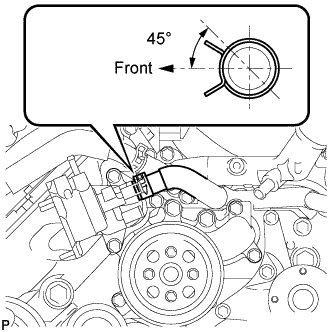
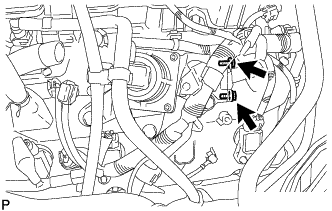
17. CONNECT NO. 5 WATER BY-PASS HOSE


    A215870E01
  1. Connect the No. 5 water by-pass hose.

    HINT:
    The direction of hose clamp is indicated in the illustration.


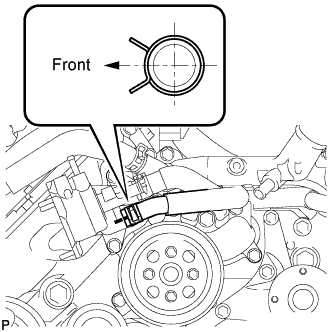
18. CONNECT NO. 8 WATER BY-PASS HOSE


    A215868E01
  1. Connect the No. 8 water by-pass hose.

    HINT:
    The direction of hose clamp is indicated in the illustration.


19. INSTALL WATER BY-PASS PIPE SUB-ASSEMBLY
  1. Connect the No. 2 water by-pass hose to the water by-pass pipe sub-assembly, and slide the clamp to secure the hose.

  1. Install the water by-pass pipe sub-assembly to the cylinder head cover sub-assembly RH with the 2 bolts.

    Torque:
    10 N*m{ 102 kgf*cm , 7 ft.*lbf }


20. INSTALL AIR TUBE SUB-ASSEMBLY RH
  1. Install the air tube sub-assembly RH to the cylinder head cover sub-assembly RH with the 2 bolts.

    Torque:
    10 N*m{ 102 kgf*cm , 7 ft.*lbf }


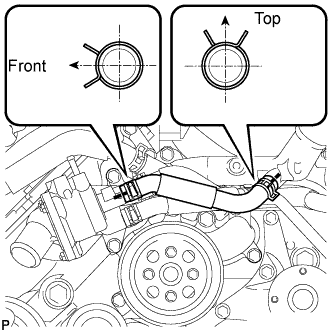
21. INSTALL NO. 1 WATER BY-PASS HOSE


    A215866E01
  1. Install the No. 1 water by-pass hose.

    HINT:
    The direction of hose clamp is indicated in the illustration.


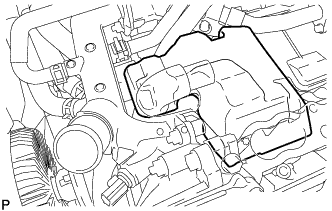
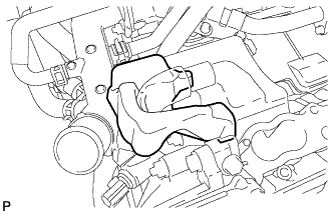
22. INSTALL NO. 3 ENGINE COVER


    A309475
  1. Install the No. 3 engine cover.


23. INSTALL NO. 4 ENGINE COVER


    A214270
  1. Install the No. 4 engine cover.


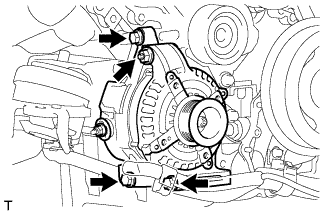
24. INSTALL GENERATOR ASSEMBLY


    A216790
  1. Install the generator with the 3 bolts and nut.

    Torque:
    43 N*m{ 438 kgf*cm , 32 ft.*lbf }


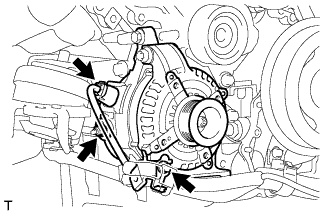
    A215539
  1. Install the harness bracket to the generator with the bolt.

    Torque:
    31 N*m{ 316 kgf*cm , 23 ft.*lbf }

  1. Connect the generator connector.

  1. Connect the generator wire with the nut.

    Torque:
    9.8 N*m{ 100 kgf*cm , 87 in.*lbf }

  1. Install the terminal cap.


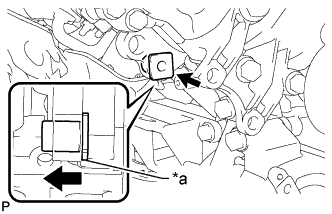
25. CONNECT VANE PUMP ASSEMBLY


A163333E05
  1. Connect the vane pump assembly to the timing chain cover sub-assembly with the 2 bolts.

    Torque:
    28 N*m{ 286 kgf*cm , 21 ft.*lbf }

    Text in Illustration 
    *a
    Spacer

    HINT:
    Before performing the following procedures, move the spacer until the vane pump assembly can be installed.


26. INSTALL ENGINE OIL LEVEL DIPSTICK GUIDE
  1. Apply a light coat of engine oil to a new O-ring.

  1. Install the O-ring to the dipstick guide.


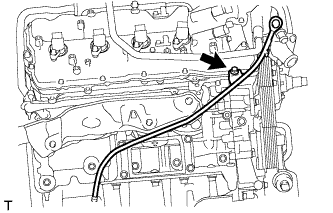
    A216301
  1. Install the dipstick guide with the bolt.

    Torque:
    10 N*m{ 102 kgf*cm , 7 ft.*lbf }

  1. Install the dipstick.


27. INSTALL OIL FILTER BRACKET
  1. Apply a light coat of engine oil to 2 new O-rings.

  1. Install the 2 O-rings to the timing chain cover sub-assembly.

  1. Install the oil filter bracket to the timing chain cover sub-assembly with the 2 nuts and 2 bolts.

    Torque:
    35 N*m{ 357 kgf*cm , 26 ft.*lbf }


28. INSTALL OIL PRESSURE SENDER GAUGE ASSEMBLY


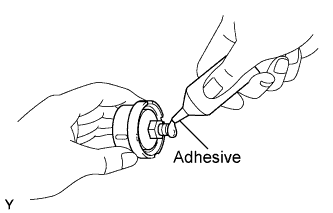
    A118764E02
  1. Apply adhesive to 2 or 3 threads of the oil pressure sender gauge.

    Adhesive:
    Toyota Genuine Adhesive 1344, Three Bond 1344 or equivalent


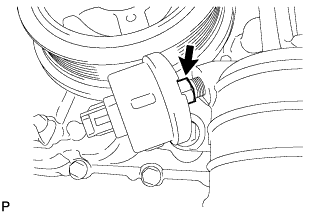
    A162467
  1. Install the oil pressure sender gauge.

    Torque:
    15 N*m{ 153 kgf*cm , 11 ft.*lbf }

    NOTICE:
    Do not start the engine within 1 hour after installation.


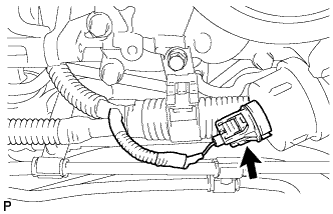
    A163657
  1. Connect the sender gauge connector.


29. INSTALL OIL FILTER ELEMENT
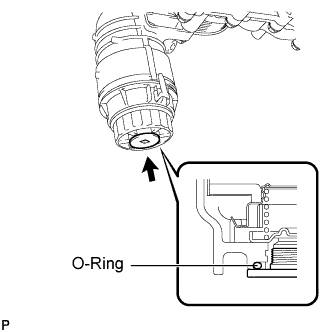
  1. Clean the inside of the oil filter cap, its threads and its O-ring groove.


    A284602E01
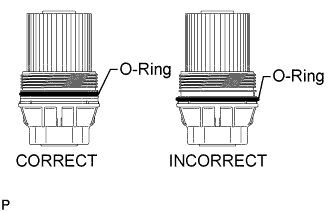
  1. Apply a small amount of engine oil to a new O-ring and install it to the oil filter cap.

    NOTICE:
    1. Be sure to install the O-ring in the proper location, otherwise oil may leak.
    2. Do not twist the O-ring.

  1. Set a new oil filter element to the oil filter cap.

  1. Remove any dirt or foreign matter from the installation surface of the engine.

  1. Apply a small amount of engine oil to the O-ring again and temporarily install the oil filter cap.


    A284604E01
  1. Using SST, tighten the oil filter cap.

    SST
    09228-06501  

    Torque:
    25 N*m{ 255 kgf*cm , 18 ft.*lbf }

    NOTICE:
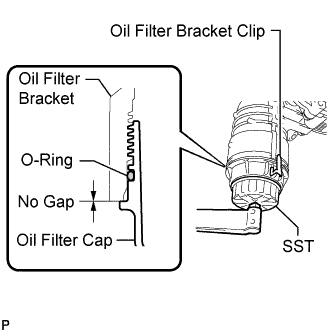
    1. When tightening the oil filter cap, do not remove the oil filter bracket clip.
    2. Make sure that the oil filter is installed securely as shown in the illustration.
    3. Be careful that the O-ring does not get caught between any surrounding parts.
    4. After tightening the oil filter cap, make sure that there is no gap and that the O-ring is not protruding.


    A162466E01
  1. Apply a small amount of engine oil to a new drain plug O-ring, and install it to the oil filter cap.

    NOTICE:
    Before installing the O-ring, remove any dirt or foreign matter from the installation surface of the oil filter cap.

  1. Install the oil filter drain plug.

    Torque:
    13 N*m{ 127 kgf*cm , 9 ft.*lbf }

    NOTICE:
    Be careful that the O-ring does not get caught between any surrounding parts.


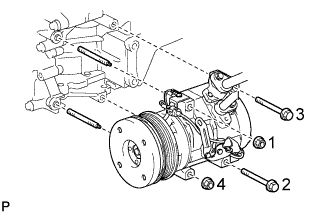
30. CONNECT COOLER COMPRESSOR ASSEMBLY


    A163332E01
  1. Connect the cooler compressor assembly with the 2 stud bolts.

    Torque:
    10 N*m{ 102 kgf*cm , 7 ft.*lbf }

  1. Install the 2 bolts and 2 nuts.

    Torque:
    25 N*m{ 250 kgf*cm , 18 ft.*lbf }

    NOTICE:
    Tighten the bolts and nuts in the order shown in the illustration to connect the cooler compressor assembly.


31. CONNECT HEATER HOSE AND NO. 1 WATER BY-PASS PIPE
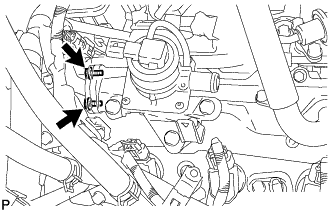
  1. Connect the No. 1 water by-pass pipe with the 2 bolts to the cylinder head cover sub-assembly RH.

    Torque:
    18 N*m{ 184 kgf*cm , 13 ft.*lbf }

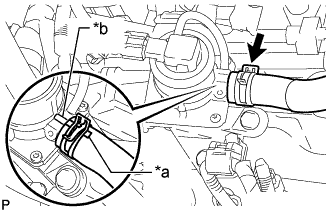
  1. Connect the heater hose to the water by-pass pipe sub-assembly, and slide the clamp to secure the hose.


32. CONNECT NO. 3 AIR INJECTION SYSTEM HOSE
  1. Connect the No. 3 air injection system hose to the air tube sub-assembly RH, and slide the clamp to secure the hose.


33. CONNECT ENGINE WIRE
  1. Connect the wire harness clamp bracket to the timing chain cover sub-assembly with the bolt.

    Torque:
    8.0 N*m{ 82 kgf*cm , 71 in.*lbf }

  1. Engine Room RH Side:

    1. Connect the 9 clamps.

    2. Connect the 2 air pump connectors.

    3. Install the ground wire RH with the bolt.

      Torque:
      8.0 N*m{ 82 kgf*cm , 71 in.*lbf }

    4. Connect the noise filter connector.

    5. Connect the 2 VVT sensor connectors.

    6. Connect the injector connector.

    7. Connect the 4 ignition coil connectors.

    8. Connect the 2 camshaft timing oil control valve connectors.

    9. Connect the power steering oil pressure switch connector and solenoid valve connector.

    10. for 4WD:
      Connect the clamp and junction connector.

  1. Engine Room LH Side:

    1. Connect the cooler compressor connector.

    2. Connect the 6 clamps.

    3. Connect the camshaft position sensor connector.

    4. Connect the 2 camshaft timing oil control valve connectors.

    5. Connect the engine coolant temperature sensor connector.

    6. Install the ground wire LH with the bolt.

      Torque:
      8.0 N*m{ 82 kgf*cm , 71 in.*lbf }

    7. Connect the noise filter connector.

    8. Connect the 2 VVT sensor connectors.

    9. Connect the 4 ignition coil connectors.

    10. Connect the injector connector.

    11. Connect the 2 wire harness clamps.

    12. Connect the 4 air injection control driver connectors.

    13. Connect the 2 connectors and attach the 2 clamps to the engine room junction block.

    14. Install the engine room relay block cover.


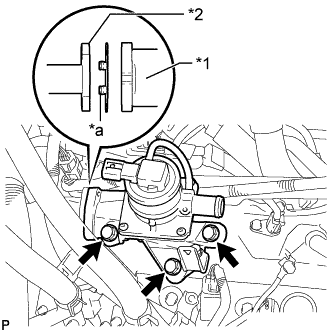
34. INSTALL AIR SWITCHING VALVE ASSEMBLY (for Bank 2)


    A307658E02
  1. Install a new gasket and the air switching valve assembly with the 3 bolts.

    Torque:
    24 N*m{ 245 kgf*cm , 18 ft.*lbf }

    Text in Illustration 
    *1
    Air Switching Valve Assembly
    *2
    No. 3 Air Tube
    *a
    Claw

    NOTICE:
    Make sure the gasket's claws are not caught between the air switching valve assembly and No. 3 air tube.


    A307656
  1. Install the 2 bolts.

    Torque:
    10 N*m{ 102 kgf*cm , 7 ft.*lbf }

  1. Attach the wire harness clamp to the air switching valve assembly and connect the air switching valve assembly connector.


35. CONNECT NO. 1 AIR HOSE


    A307659E02
  1. Align the paint mark with the projection and connect the No. 1 air hose, and slide the clamp to secure the hose.
    Text in Illustration 
    *a
    Paint Mark
    *b
    Projection

    HINT:
    Make sure the direction of the hose clamp is as shown in the illustration.


36. INSTALL AIR SWITCHING VALVE ASSEMBLY (for Bank 1)


    A307651E02
  1. Install a new gasket and the air switching valve assembly with the 3 bolts.

    Torque:
    24 N*m{ 245 kgf*cm , 18 ft.*lbf }

    Text in Illustration 
    *1
    Air Switching Valve Assembly
    *2
    No. 4 Air Tube
    *a
    Claw

    NOTICE:
    Make sure the gasket's claws are not caught between the air switching valve assembly and No. 4 air tube.


    A307649
  1. Install the 2 bolts.

    Torque:
    10 N*m{ 102 kgf*cm , 7 ft.*lbf }

  1. Connect the wire harness clamp bracket to the cylinder head cover sub-assembly LH with the bolt.

    Torque:
    8.0 N*m{ 82 kgf*cm , 71 in.*lbf }


37. INSTALL INTAKE MANIFOLD
(Click here)


38. INSTALL RADIATOR ASSEMBLY
(Click here)


39. ADD ENGINE OIL
  1. Add fresh oil.

    Standard Oil Grade:
    Oil Grade
    Oil Viscosity (SAE)
    ILSAC GF-5 multigrade engine oil
    0W-20

    Standard Oil Capacity:
    Item
    Specified Condition
    Drain and refill without oil filter change
    7.1 liters (7.5 US qts, 6.2 Imp. qts)
    Drain and refill with oil filter change
    7.5 liters (7.9 US qts, 6.6 Imp. qts)
    Dry fill
    9.3 liters (9.8 US qts, 8.2 Imp. qts)

  1. Install the oil filler cap.


40. ADD ENGINE COOLANT
  1. Add engine coolant.

    Standard capacity:
    12.1 liters (12.8 US qts, 10.6 Imp. qts)

    NOTICE:
    Do not substitute plain water for engine coolant.

    HINT:
    TOYOTA vehicles are filled with TOYOTA SLLC at the factory. In order to avoid damage to the engine cooling system and other technical problems, only use TOYOTA SLLC or similar high quality ethylene glycol based non-silicate, non-amine, non-nitrite, non-borate coolant with long-life hybrid organic acid technology (coolant with long-life hybrid organic acid technology is a combination of low phosphates and organic acids).


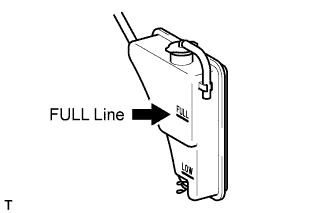
    A151850E05
  1. Slowly pour coolant into the radiator reservoir until it reaches the FULL line.

  1. Install the reservoir cap.

  1. Press the inlet and outlet radiator hoses several times by hand, and then check the coolant level. If the coolant level is low, add coolant.

  1. Install the radiator cap.

  1. Start the engine and warm it up until the thermostat opens.

    HINT:
    The thermostat opening timing can be confirmed by pressing the radiator inlet hose by hand, and checking when the engine coolant starts to flow inside the hose.

  1. Maintain the engine speed at 2000 to 2500 rpm.

    NOTICE:
    1. Make sure that the radiator reservoir still has some coolant in it.
    2. Pay attention to the needle of the water temperature meter. Make sure that the needle does not show an abnormally high temperature.
    3. If there is not enough coolant, the engine may burn out or overheat.
    4. Immediately after starting the engine, if the radiator reservoir does not have any coolant, perform the following: 1) stop the engine, 2) wait until the coolant has cooled down, and 3) add coolant until the coolant is filled to the FULL line.
    5. Run the engine at 2000 rpm until the coolant level has stabilized.

  1. Press the inlet and outlet radiator hoses several times by hand to bleed air.
    CAUTION:
    1. Wear protective gloves.
    2. Be careful as the radiator hoses are hot.
    3. Keep your hands away from the fan.

  1. Stop the engine, and wait until the engine coolant cools down to ambient temperature.

    CAUTION:
    Do not remove the radiator cap while the engine and radiator are still hot. Pressurized, hot engine coolant and steam may be released and cause serious burns.


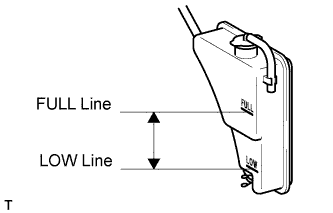
    A161780E01
  1. Check that the coolant level is between the FULL and LOW lines.
    If the coolant level is below the LOW line, repeat all of the procedures above.
    If the coolant level is above the FULL line, drain coolant so that the coolant level is between the FULL and LOW lines.


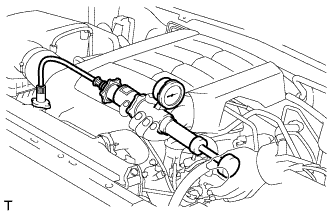
41. CONNECT CABLE TO NEGATIVE BATTERY TERMINAL


42. INSPECT FOR OIL LEAK
  1. Start the engine. Make sure that there are no oil leaks from the area that was worked on.


43. INSPECT FOR COOLANT LEAK


A215893

CAUTION:
Do not remove the radiator cap while the engine and radiator are still hot. Pressurized, hot engine coolant and steam may be released and cause serious burns.

  1. Fill the radiator with coolant and attach a radiator cap tester.

  1. Warm up the engine.

  1. Using the radiator cap tester, increase the pressure inside the radiator to 118 kPa (1.2 kgf/cm2, 17 psi), and check that the pressure does not drop.
    If the pressure drops, check the hoses, radiator and water pump for leaks. If no external leaks are found, check the heater core, cylinder block and head.


44. CHECK ENGINE OIL LEVEL
  1. Warm up the engine, then stop the engine and wait for 5 minutes.

  1. Check that the engine oil level is between the low level and full level marks on the dipstick.
    If low, check for leakage and add oil up to the full level mark.

    NOTICE:
    Do not fill engine oil above the full level mark.

    HINT:
    A certain amount of engine oil will be consumed while driving. In the following situations, oil consumption may increase, and engine oil may need to be refilled in between oil maintenance intervals.
    1. When the engine is new, for example directly after purchasing the vehicle or after replacing the engine.
    2. If low quality oil or oil of an inappropriate viscosity is used.
    3. When driving at high engine speed or with a heavy load, (when towing, or), when driving while accelerating or decelerating frequently.
    4. When leaving the idling for a long time, or when driving frequently through heavy traffic.
    When judging the amount of oil consumption, keep in mind that the oil may have become diluted, making it difficult to judge the true level accurately.