 |
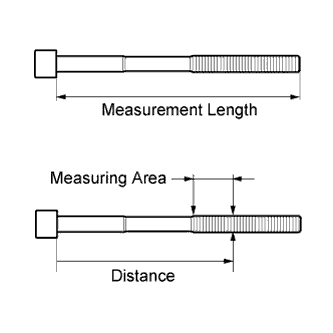
Using a vernier caliper, measure the length of the cylinder head bolt from the seat to the end.
- Standard length:
- 141.3 to 142.7 mm (5.56 to 5.62 in.)
- Maximum length:
- 143.7 mm (5.66 in.)
CYLINDER HEAD GASKET (for Bank 2) > INSTALLATION |
| 1. INSPECT CYLINDER HEAD SET BOLT |
|
Using a vernier caliper, measure the length of the cylinder head bolt from the seat to the end.
Using a vernier caliper, measure the diameter of the elongated thread at the measuring area.
| 2. INSPECT CYLINDER HEAD SUB-ASSEMBLY RH |
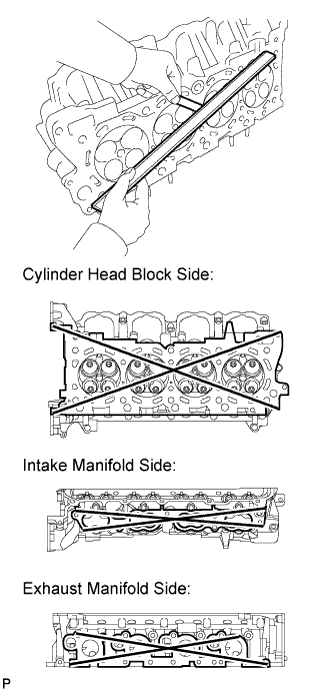 |
Using a precision straightedge and feeler gauge, measure the warpage of the contact surfaces of the cylinder block and manifold.
| Item | Specified Condition |
| Cylinder head block side | 0.05 mm (0.00197 in.) |
| Intake manifold side | 0.08 mm (0.00315 in.) |
| Exhaust manifold side | 0.05 mm (0.00197 in.) |
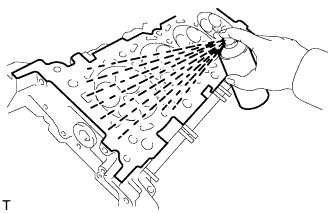 |
Using a dye penetrant, check the intake ports, exhaust ports and cylinder surface for cracks.
If cracked, replace the cylinder head.
| 3. INSTALL CYLINDER HEAD GASKET RH |
Check the piston protrusions for each cylinder.
Clean the cylinder block with solvent.
Set the piston of the cylinder to be measured to slightly ATDC.
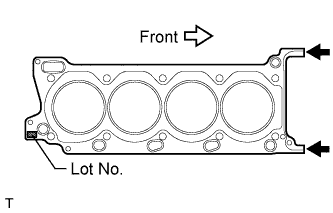 |
Place the cylinder head gasket on the cylinder block surface with the front face of the Lot No. stamp upward.
| 4. INSTALL CYLINDER HEAD SUB-ASSEMBLY RH |
Place the cylinder head on the cylinder block.
Apply a light coat of engine oil to the threads and under the heads of the cylinder head bolts.
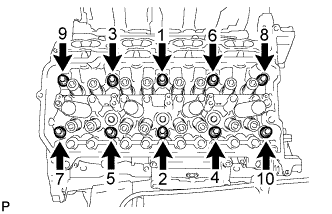 |
Step 1:
Using a 10 mm bi-hexagon wrench, install and uniformly tighten the 10 cylinder head bolts with the plate washers in several steps, in the sequence shown in the illustration.
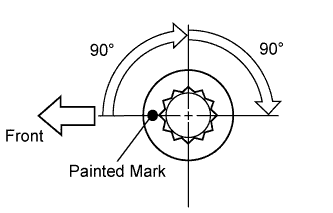 |
Step 2:
Mark each cylinder head bolt head with paint as shown in the illustration.
Tighten the cylinder head bolts another 90° in the sequence shown in step 1.
Step 3:
Tighten the cylinder head bolts an additional 90° in the sequence shown in step 1.
Check that the painting marks are now facing rearward.
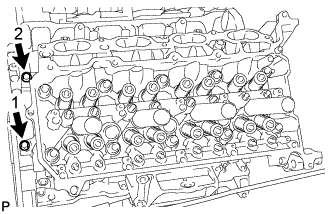 |
Install and uniformly tighten the 2 bolts in the sequence shown in the illustration.
| 5. INSTALL VALVE STEM CAP |
Apply a light coat of engine oil to the valve stem caps.
Install the 16 valve stem caps to the cylinder head.
| 6. INSTALL VALVE LASH ADJUSTER ASSEMBLY |
Inspect the valve lash adjuster .
Install the 16 valve lash adjusters to the cylinder head.
| 7. INSTALL NO. 1 VALVE ROCKER ARM SUB-ASSEMBLY |
Apply engine oil to the lash adjuster tips and valve stem cap ends.
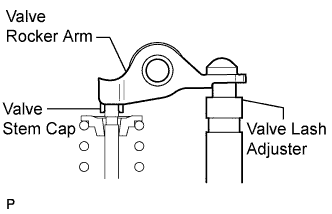 |
Install the valve rocker arms as shown in the illustration.
| 8. INSTALL CAMSHAFTS (for Bank 2) |
Install the camshafts (Click here).
| 9. INSTALL EXHAUST MANIFOLD SUB-ASSEMBLY RH |
Install the exhaust manifold RH (Click here).