 |
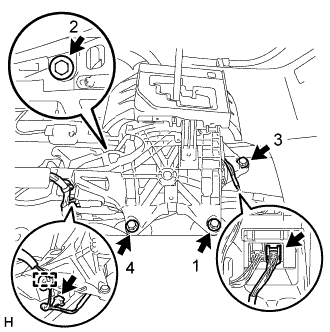
Temporarily install the transmission floor shift assembly to the body with the 4 bolts.
SHIFT LEVER ASSEMBLY (for Floor Shift Type) > INSTALLATION |
| 1. INSTALL TRANSMISSION FLOOR SHIFT ASSEMBLY |
|
Temporarily install the transmission floor shift assembly to the body with the 4 bolts.
Fully tighten the 4 bolts in the order shown in the illustration.
Connect the clamp and 2 connectors.
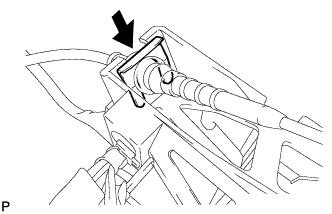 |
Install the cable outer of the transmission control cable assembly to the shift lever retainer, and then install a new clip.
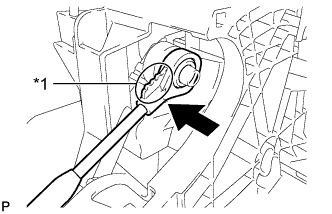 |
Connect the control cable end to the shift lever assembly.
| *1 | Ridged |
| 2. INSTALL NO. 1 CONSOLE BOX DUCT (w/ Rear Air Duct) |
Install the No. 1 console box duct with the 2 clips.
| 3. ADJUST SHIFT LEVER POSITION |
Move the shift lever to N.
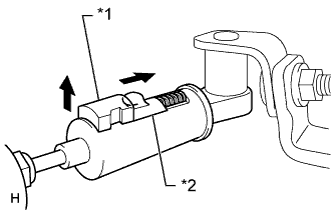 |
Fold back the transmission control cable adjust case cover. Then while sliding the slider toward the cable end side, press out the lock piece from the back side to release the lock.
| *1 | Lock Piece |
| *2 | Slider |
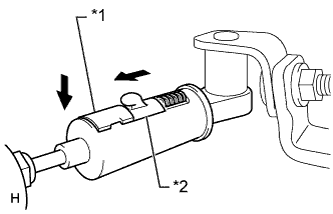 |
Check that the spring of the adjust case is applying enough tension to the shift control cable. Then press in the lock piece to set the lock.
| *1 | Lock Piece |
| *2 | Slider |
Return the cover of the adjust case to its original position.
Inspect the shift lever operation after the adjustment.
| 4. INSPECT SHIFT LEVER POSITION |
When moving the shift lever from P to R with the ignition switch ON and brake pedal depressed, make sure that it moves smoothly and correctly into position.
Start the engine and make sure that the vehicle moves forward after moving the shift lever from N to D and moves rearward after moving the shift lever to R.
If the operation cannot be performed as specified, inspect the park/neutral position switch assembly and check the shift lever assembly installation condition.
| 5. INSTALL CONSOLE BOX ASSEMBLY |