 |
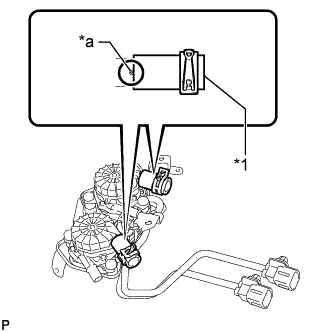
Install the 2 No. 1 air injection system hoses to the 2 air pump assemblies.
| *1 | No. 1 Air Injection System Hose |
| *a | Stopper |
- HINT:
- Insert the hoses until the hose ends contact the stoppers as shown in the illustration.
AIR PUMP > INSTALLATION |
| 1. INSTALL AIR PUMP ASSEMBLY |
Connect the 6 air pump insulators to the 2 air pump assemblies and install the 2 air pump assemblies to the air pump bracket.
Attach the 2 wire harness clamps to the air pump bracket.
| 2. INSTALL NO. 1 AIR INJECTION SYSTEM HOSE |
|
Install the 2 No. 1 air injection system hoses to the 2 air pump assemblies.
| *1 | No. 1 Air Injection System Hose |
| *a | Stopper |
| 3. INSTALL AIR PUMP INLET |
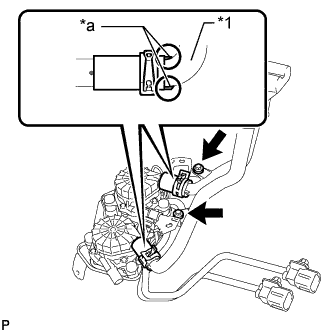 |
Connect the air pump inlet to the 2 No. 1 air injection system hoses to install it, and then slide the 2 clamps onto the hoses.
| *1 | Air Pump Inlet |
| *a | Stopper |
Install the 2 bolts.
| 4. INSTALL AIR PUMP ASSEMBLY WITH BRACKET |
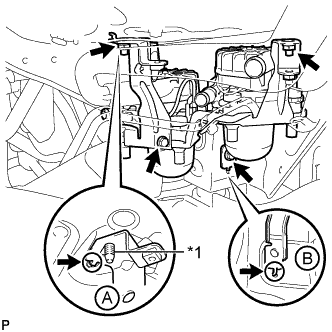 |
Install the air pump assembly with bracket to the vehicle.
| *1 | Stud Bolt |
Insert the bracket tab into the slot and insert the stud bolt into the bracket hole as shown in illustration A. Then slide the bracket.
Insert the bracket tab into the slot shown in illustration B.
Install the 2 bolts and 2 nuts.
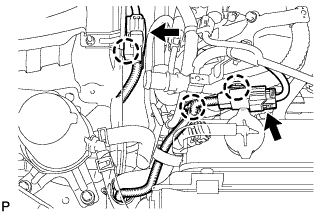 |
Connect the 2 air pump connectors and attach the 3 wire harness claws.
| 5. INSTALL NO. 3 AIR INJECTION SYSTEM HOSE |
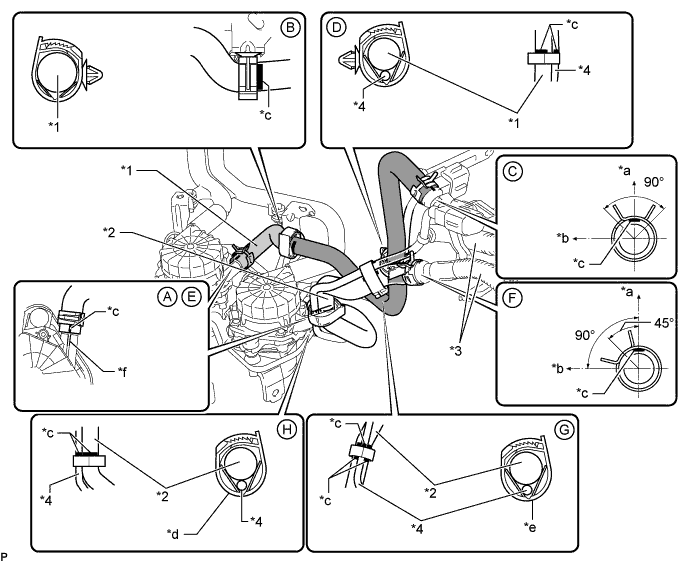
| *1 | No. 3 Air Injection System Hose | *2 | No. 2 Air Injection System Hose |
| *3 | Air Tube | *4 | Wire Harness |
| *a | Upper | *b | Front |
| *c | Paint Mark | *d | Black Colored Clamp |
| *e | White Colored Clamp | *f | Rib |
Connect the No. 3 air injection system hose, and slide the clamp to secure the hose so that its paint mark aligns with the air pump's rib as shown in the illustration labeled A.
Attach the clamp to the No. 3 air injection system hose shown in the illustration labeled B.
Connect the No. 3 air injection system hose to the air tube, and slide the clamp to secure the hose shown in the illustration labeled C.
Attach the clamp to the No. 3 air injection system hose and wire harness shown in the illustration labeled D.
| 6. INSTALL NO. 2 AIR INJECTION SYSTEM HOSE |
Connect the No. 2 air injection system hose, and slide the clamp to secure the hose so that its paint mark aligns with the air pump's rib as shown in the illustration labeled E.
Connect the No. 2 air injection system hose to the air tube, and slide the clamp to secure the hose shown in the illustration labeled F.
Attach the white colored clamp to the No. 2 air injection system hose and wire harness shown in the illustration labeled G.
Attach the black colored clamp to the No. 2 air injection system hose and wire harness shown in the illustration labeled H.
| 7. CONNECT FRONT FENDER APRON SEAL RH |
Connect the front fender apron seal RH to the body panel with the 2 clips.
| 8. CONNECT FRONT FENDER LINER RH |