Inspect the A.D.D. actuator (differential vacuum actuator assembly).
Remove the A.D.D. actuator (differential vacuum actuator assembly) (Click here).
Check the Free to Lock switch. Connect lines via a relay as shown in the illustration, then check that the differential vacuum actuator assembly fork moves from the Free to Lock position.
- NOTICE:
- Make sure to perform this inspection with the differential vacuum actuator assembly removed from the vehicle. If this inspection is performed with the differential vacuum actuator assembly installed to the vehicle, the differential vacuum actuator assembly will be damaged.
- When inspecting the differential vacuum actuator assembly, make sure to operate it with the lines connected via a relay. If the lines are not connected via a relay and battery voltage is directly applied to the differential vacuum actuator assembly, the differential vacuum actuator assembly will be damaged.
- HINT:
- When inspecting the operation described above, use the BACK P/W NO. 2 relay.
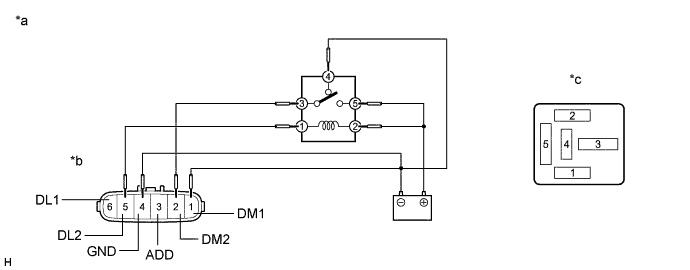
Text in Illustration *a Component without harness connector
(A.D.D. Actuator (Differential Vacuum Actuator Assembly))*b Free to Lock *c BACK P/W NO. 2 Relay - - - After the Free to Lock switch is complete, inspect the A.D.D. (differential vacuum actuator assembly) detection switch and limit switch.
- Standard resistance:
Tester Connection Condition Condition 3 (ADD) - 4 (GND) After Free to Lock switch is complete Below 1 Ω 5 (DL2) - 4 (GND) After Free to Lock switch is complete 100 kΩ or higher 6 (DL1) - 4 (GND) After Free to Lock switch is complete Below 1 Ω
Check the Lock to Free switch. Connect lines via a relay as shown in the illustration, then check that the differential vacuum actuator assembly fork moves from the Lock to Free position.
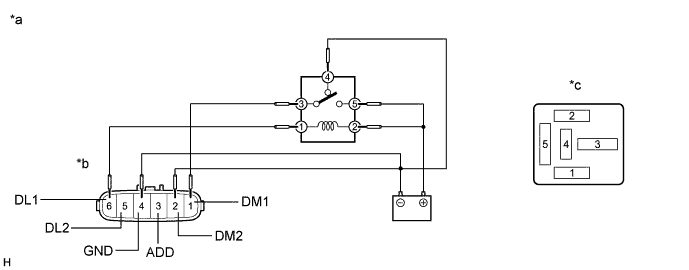
Text in Illustration *a Component without harness connector
(A.D.D. Actuator (Differential Vacuum Actuator Assembly))*b Free to Lock *c BACK P/W NO. 2 Relay - - - After the Lock to Free switch is complete, inspect the A.D.D. (differential vacuum actuator assembly) detection switch and limit switch.
- Standard resistance:
Tester Connection Condition Condition 3 (ADD) - 4 (GND) After Lock to Free switch is complete 100 kΩ or higher 5 (DL2) - 4 (GND) After Lock to Free switch is complete Below 1 Ω 6 (DL1) - 4 (GND) After Lock to Free switch is complete 100 kΩ or higher
- After the Lock to Free switch is complete, inspect the A.D.D. (differential vacuum actuator assembly) detection switch and limit switch.