BODY WELD POINT FIT STANDARD / ADJUSTMENT METHOD ADJUSTMENT
INSPECT HOOD SUB-ASSEMBLY
Check that the clearance measurements of areas A to D are within the standard range.
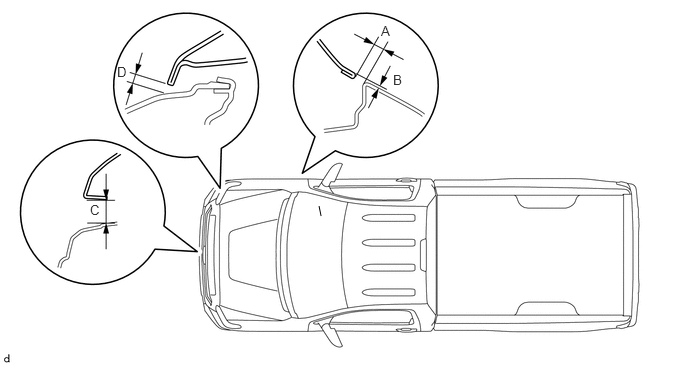
- Standard Clearance:
Area Specified Condition A 3.7 to 6.7 mm (0.146 to 0.264 in.) B -1.5 to 1.5 mm (-0.0591 to 0.0591 in.) C
(Reference)25.25 to 28.25 mm (0.995 to 1.113 in.) D
(Reference)5.6 to 8.6 mm (0.220 to 0.339 in.)
- HINT:
-
Centering bolts are used to mount the hood hinge and hood lock. The hood and hood lock cannot be adjusted with the centering bolts on. Substitute the centering bolts with standard bolts (with washers) when making adjustments.
ADJUST HOOD SUB-ASSEMBLY
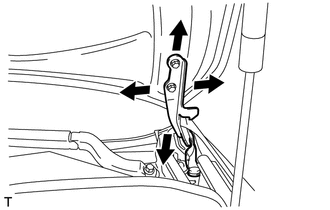
Adjust the hood sub-assembly position.
Loosen the 4 hinge bolts.
Move the hood sub-assembly and adjust the clearance between the hood sub-assembly and front fender.
Tighten the 4 hinge bolts after the adjustment.
- Torque:
- 13 N*m (133 kgf*cm, 10 ft.*lbf)
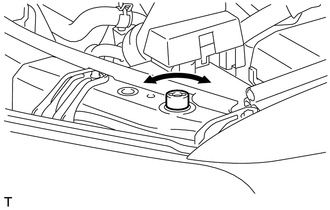
Adjust the cushion rubber so that the height of the hood sub-assembly and fender are aligned.
- HINT:
-
Raise or lower the hood sub-assembly front end by turning the cushion rubber.
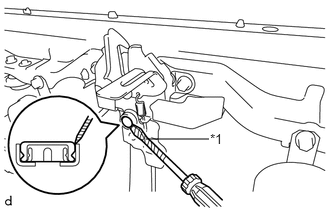
Adjust the hood lock assembly.
Using a screwdriver, remove the hood lock nut cap as shown in the illustration.
- HINT:
-
Tape the screwdriver tip before use.
| *1 | Protective Tape |
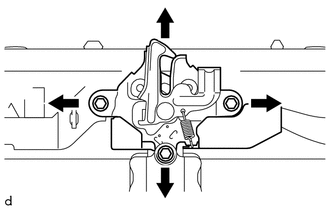
Loosen the 2 bolts and hood lock bolt.
Adjust the hood lock assembly position so that the striker can enter it smoothly.
Tighten the bolts after the adjustment.
- Torque:
- 8.0 N*m (82 kgf*cm, 71 in.*lbf)
Install a new hood lock nut cap.
FRONT DOOR PANEL SUB-ASSEMBLY LH (for Double Cab)
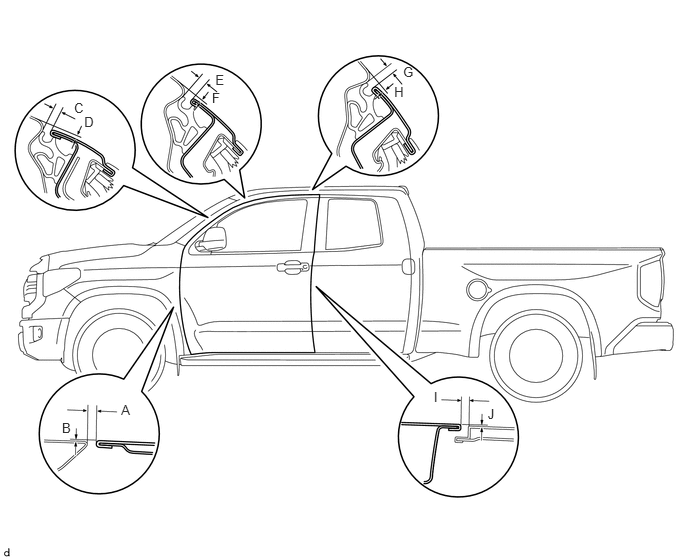
- Standard measurement:
Area Specified Condition Area Specified Condition A 3.7 to 6.7 mm (0.146 to 0.264 in.) F 2.7 to 5.7 mm (0.106 to 0.224 in.) B -1.5 to 1.5 mm (-0.0591 to 0.0591 in.) G 3.2 to 6.2 mm (0.126 to 0.244 in.) C 3.5 to 6.5 mm (0.138 to 0.256 in.) H 2.8 to 5.8 mm (0.110 to 0.229 in.) D 2.2 to 5.2 mm (0.0866 to 0.205 in.) I 4.7 to 7.7 mm (0.185 to 0.303 in.) E 3.2 to 6.2 mm (0.126 to 0.244 in.) J -1.5 to 1.5 mm (-0.0591 to 0.0591 in.)
- HINT:
- ·
Use the same procedures for the RH side and LH side.
·The procedures listed below are for the LH side.
·Centering bolts are used to mount the door hinge to the vehicle body and door. The door cannot be adjusted with the centering bolts on. Substitute the centering bolts with standard bolts (w/ washers) when making adjustments.
ADJUST FRONT DOOR (for Double Cab)
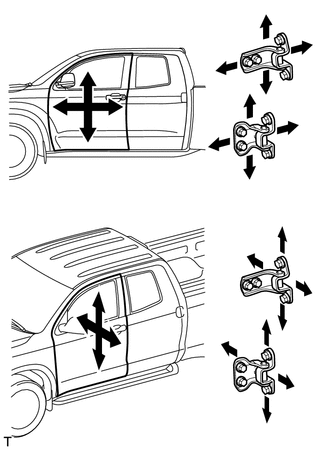
Disconnect the cable from the negative (-) battery terminal.
- CAUTION:
-
Wait at least 90 seconds after disconnecting the cable from the negative (-) battery terminal to prevent airbag and seat belt pretensioner activation.
- NOTICE:
- ·
Some systems need to be initialized after the cable is reconnected.
·After the ignition switch is turned OFF, the navigation system requires approximately 90 seconds to record various types of memory and settings. As a result, after turning the ignition switch OFF, wait 90 seconds or more before disconnecting the cable from the negative (-) battery terminal.
Using SST, loosen the body's hinge bolts and adjust the door's position.
- SST
- 09812-00010
Using SST, tighten the body's hinge bolts after the adjustment.
- Torque:
- 29 N*m (296 kgf*cm, 21 ft.*lbf)
Loosen the door's hinge bolts and adjust the door's position.
Tighten the door's hinge bolts after the adjustment.
- Torque:
- 29 N*m (296 kgf*cm, 21 ft.*lbf)
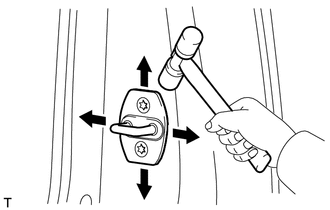
Adjust the striker position by slightly loosening the striker mounting screws with a T40 "TORX" socket and hitting the striker with a plastic-faced hammer.
Using a T40 "TORX" socket, tighten the striker mounting screws after the adjustment.
- Torque:
- 23 N*m (235 kgf*cm, 17 ft.*lbf)
Connect the cable to the negative (-) battery terminal.
- NOTICE:
-
Some systems need to be initialized after the cable is reconnected.
Inspect the SRS warning light.
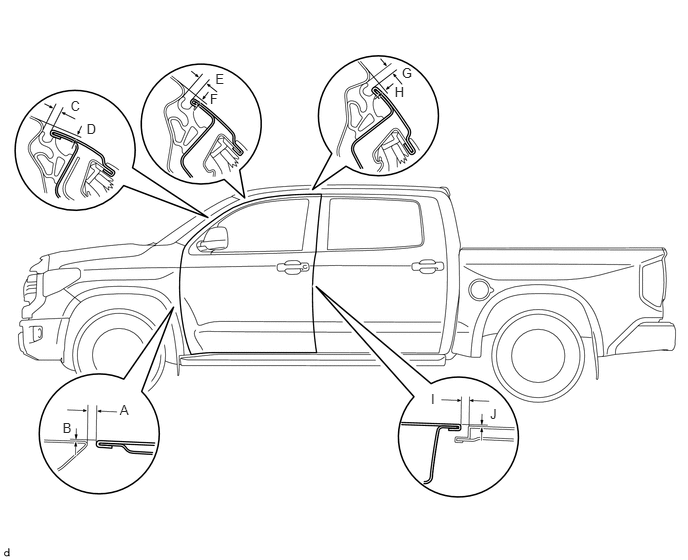
INSPECT FRONT DOOR PANEL SUB-ASSEMBLY LH (for CrewMax)
Check that the clearance measurements of areas A to J are within the standard range.
- Standard measurement:
Area Specified Condition Area Specified Condition A 3.7 to 6.7 mm (0.146 to 0.264 in.) F 0.8 to 3.8 mm (0.0315 to 0.150 in.) B -1.5 to 1.5 mm (-0.0591 to 0.0591 in.) G 3.7 to 6.7 mm (0.146 to 0.264 in.) C 3.7 to 6.7 mm (0.146 to 0.264 in.) H 0.8 to 3.8 mm (0.0315 to 0.150 in.) D 0.9 to 3.9 mm (0.0354 to 0.154 in.) I 4.7 to 7.7 mm (0.185 to 0.303 in.) E 3.7 to 6.7 mm (0.146 to 0.264 in.) J -1.5 to 1.5 mm (-0.0591 to 0.0591 in.)
- HINT:
- ·
Use the same procedures for the RH side and LH side.
·The procedures listed below are for the LH side.
·Centering bolts are used to mount the door hinge to the vehicle body and door. The door cannot be adjusted with the centering bolts on. Substitute the centering bolts with standard bolts (w/ washers) when making adjustments.
ADJUST FRONT DOOR (for CrewMax)
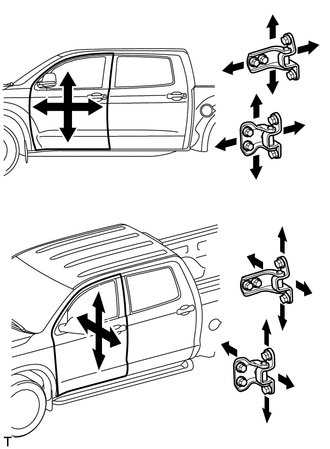
Disconnect the cable from the negative (-) battery terminal.
- CAUTION:
-
Wait at least 90 seconds after disconnecting the cable from the negative (-) battery terminal to prevent airbag and seat belt pretensioner activation.
- NOTICE:
- ·
Some systems need to be initialized after the cable is reconnected.
·After the ignition switch is turned OFF, the navigation system requires approximately 90 seconds to record various types of memory and settings. As a result, after turning the ignition switch OFF, wait 90 seconds or more before disconnecting the cable from the negative (-) battery terminal.
Using SST, loosen the body's hinge bolts and adjust the door's position.
- SST
- 09812-00010
Using SST, tighten the body's hinge bolts after the adjustment.
- Torque:
- 29 N*m (296 kgf*cm, 21 ft.*lbf)
Loosen the door's hinge bolts and adjust the door's position.
Tighten the door's hinge bolts after the adjustment.
- Torque:
- 29 N*m (296 kgf*cm, 21 ft.*lbf)
Adjust the striker position by slightly loosening the striker mounting screws with a T40 "TORX" socket and hitting the striker with a plastic-faced hammer.
Using a T40 "TORX" socket, tighten the striker mounting screws after the adjustment.
- Torque:
- 23 N*m (235 kgf*cm, 17 ft.*lbf)
Connect the cable to the negative (-) battery terminal.
- NOTICE:
-
Some systems need to be initialized after the cable is reconnected.
Inspect the SRS warning light.
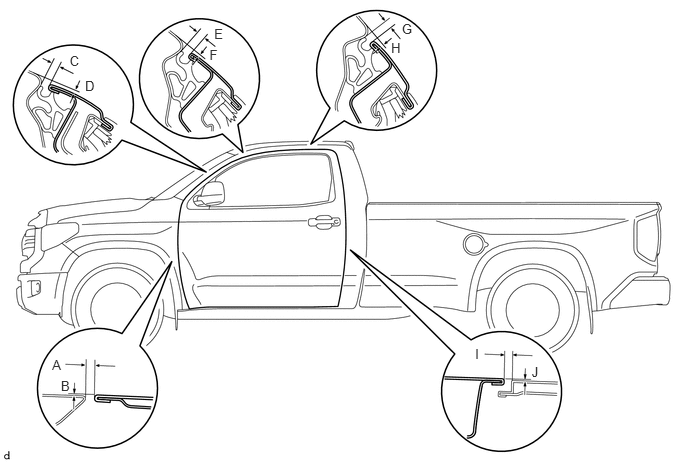
INSPECT FRONT DOOR PANEL SUB-ASSEMBLY LH (for Regular Cab)
Check that the clearance measurements of areas A to J are within the standard range.
- Standard measurement:
Area Specified Condition Area Specified Condition A 3.7 to 6.7 mm (0.146 to 0.264 in.) F 2.7 to 5.7 mm (0.106 to 0.224 in.) B -1.5 to 1.5 mm (-0.0591 to 0.0591 in.) G 3.1 to 6.1 mm (0.122 to 0.240 in.) C 3.5 to 6.5 mm (0.138 to 0.256 in.) H 2.9 to 5.9 mm (0.114 to 0.232 in.) D 2.2 to 5.2 mm (0.0866 to 0.205 in.) I 3.7 to 6.7 mm (0.146 to 0.264 in.) E 3.2 to 6.2 mm (0.126 to 0.244 in.) J -1.5 to 1.5 mm (-0.0591 to 0.0591 in.)
- HINT:
- ·
Use the same procedures for the RH side and LH side.
·The procedures listed below are for the LH side.
·Centering bolts are used to mount the door hinge to the vehicle body and door. The door cannot be adjusted with the centering bolts on. Substitute the centering bolts with standard bolts (w/ washers) when making adjustments.
ADJUST FRONT DOOR (for Regular Cab)
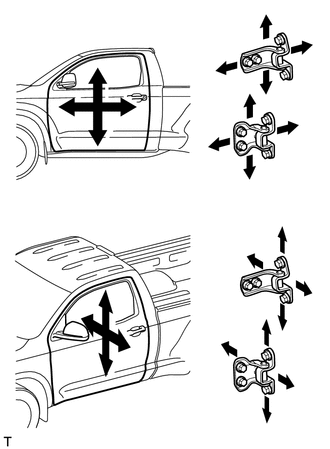
Disconnect the cable from the negative (-) battery terminal.
- CAUTION:
-
Wait at least 90 seconds after disconnecting the cable from the negative (-) battery terminal to prevent airbag and seat belt pretensioner activation.
- NOTICE:
-
Some systems need to be initialized after the cable is reconnected.
Using SST, loosen the body's hinge bolts and adjust the door's position.
- SST
- 09812-00010
Using SST, tighten the body's hinge bolts after the adjustment.
- Torque:
- 29 N*m (296 kgf*cm, 21 ft.*lbf)
Loosen the door's hinge bolts and adjust the door's position.
Tighten the door's hinge bolts after the adjustment.
- Torque:
- 29 N*m (296 kgf*cm, 21 ft.*lbf)
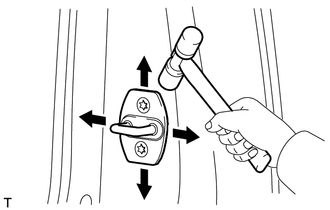
Adjust the striker position by slightly loosening the striker mounting screws with a T40 "TORX" socket and hitting the striker with a plastic-faced hammer.
Using a T40 "TORX" socket, tighten the striker mounting screws after the adjustment.
- Torque:
- 23 N*m (235 kgf*cm, 17 ft.*lbf)
Connect the cable to the negative (-) battery terminal.
- NOTICE:
-
Some systems need to be initialized after the cable is reconnected.
Inspect the SRS warning light.
INSPECT REAR DOOR PANEL SUB-ASSEMBLY LH (for Double Cab)
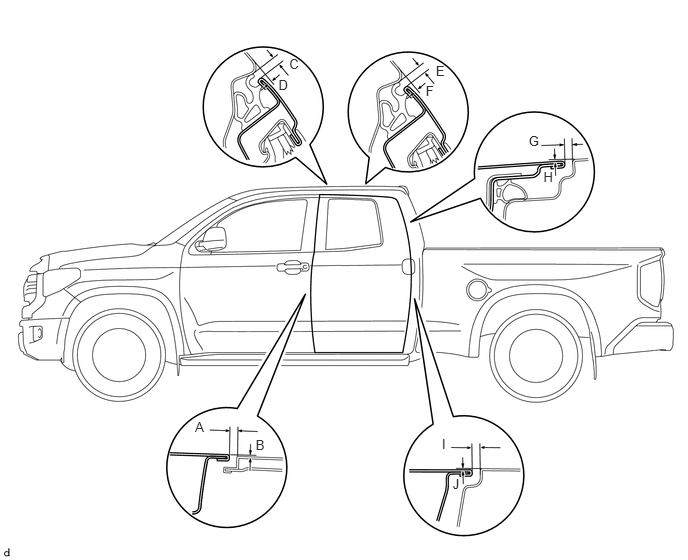
Check that the clearance measurements of areas A to J are within the standard range.
- Standard measurement:
Area Specified Condition Area Specified Condition A 4.7 to 7.7 mm (0.185 to 0.303 in.) F 2.5 to 5.5 mm (0.0984 to 0.217 in.) B -1.5 to 1.5 mm (-0.0591 to 0.0591 in.) G 3.5 to 6.5 mm (0.138 to 0.256 in.) C 3.2 to 6.2 mm (0.126 to 0.244 in.) H -1.4 to 1.6 mm (0.0551 to 0.0630 in.) D 2.7 to 5.7 mm (0.106 to 0.224 in.) I 4.0 to 7.0 mm (0.156 to 0.277 in.) E 3.2 to 6.2 mm (0.126 to 0.244 in.) J -1.1 to 1.9 mm (-0.0433 to 0.0748 in.)
- HINT:
- ·
Use the same procedures for the RH side and LH side.
·The procedures listed below are for the LH side.
·Centering bolts are used to mount the door hinge to the vehicle body and door. The door cannot be adjusted with the centering bolts on. Substitute the centering bolts with standard bolts (w/ washers) when making adjustments.
ADJUST REAR DOOR (for Double Cab)
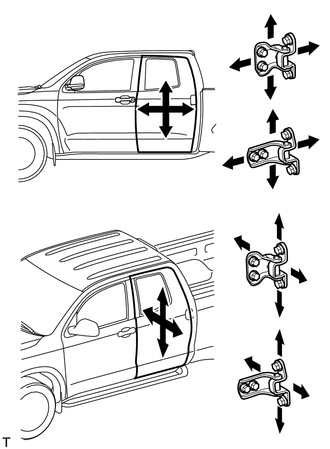
Disconnect the cable from the negative (-) battery terminal.
- CAUTION:
-
Wait at least 90 seconds after disconnecting the cable from the negative (-) battery terminal to prevent airbag and seat belt pretensioner activation.
- NOTICE:
- ·
Some systems need to be initialized after the cable is reconnected.
·After the ignition switch is turned OFF, the navigation system requires approximately 90 seconds to record various types of memory and settings. As a result, after turning the ignition switch OFF, wait 90 seconds or more before disconnecting the cable from the negative (-) battery terminal.
Loosen the body's hinge bolts and adjust the door's position.
Tighten the body's hinge bolts after the adjustment.
- Torque:
- 29 N*m (296 kgf*cm, 21 ft.*lbf)
Loosen the door's hinge bolts and adjust the door's position.
Tighten the door's hinge bolts after the adjustment.
- Torque:
- 29 N*m (296 kgf*cm, 21 ft.*lbf)
Using a screwdriver, detach the 4 claws and remove the cover.
- HINT:
-
Tape the screwdriver tip before use.
Adjust the striker position by slightly loosening the striker mounting screws with a T40 "TORX" socket and hitting the striker with a plastic-faced hammer.
Using a T40 "TORX" socket, tighten the striker mounting screws after the adjustment.
- Torque:
- 23 N*m (235 kgf*cm, 17 ft.*lbf)
Connect the cable to the negative (-) battery terminal.
- NOTICE:
-
Some systems need to be initialized after the cable is reconnected.
Inspect the SRS warning light.
INSPECT REAR DOOR PANEL SUB-ASSEMBLY LH (for CrewMax)
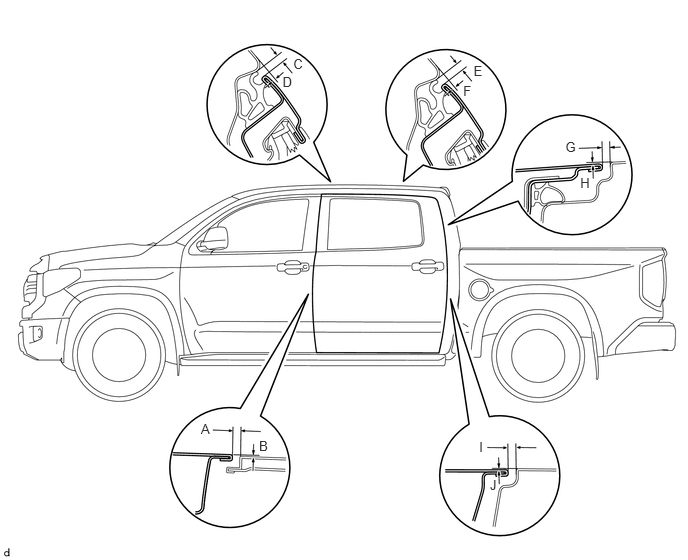
Check that the clearance measurements of areas A to J are within the standard range.
- Standard measurement:
Area Specified Condition Area Specified Condition A 4.7 to 7.7 mm (0.185 to 0.303 in.) F 0.7 to 3.7 mm (0.0276 to 0.146 in.) B -1.5 to 1.5 mm (-0.0591 to 0.0591 in.) G 3.7 to 6.7 mm (0.146 to 0.264 in.) C 3.7 to 6.7 mm (0.146 to 0.264 in.) H -1.5 to 1.5 mm (-0.0591 to 0.0591 in.) D 0.8 to 3.8 mm (0.0315 to 0.150 in.) I 3.7 to 6.7 mm (0.146 to 0.264 in.) E 3.7 to 6.7 mm (0.146 to 0.264 in.) J -1.5 to 1.5 mm (-0.0591 to 0.0591 in.)
- HINT:
- ·
Use the same procedures for the RH side and LH side.
·The procedures listed below are for the LH side.
·Centering bolts are used to mount the door hinge to the vehicle body and door. The door cannot be adjusted with the centering bolts on. Substitute the centering bolts with standard bolts (w/ washers) when making adjustments.
ADJUST REAR DOOR (for CrewMax)
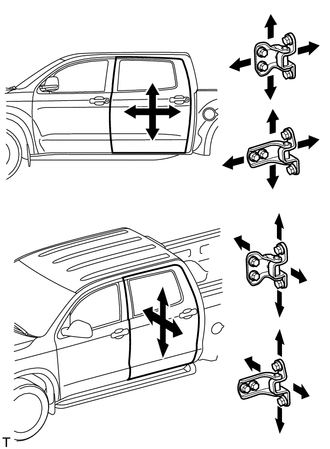
Disconnect the cable from the negative (-) battery terminal.
- CAUTION:
-
Wait at least 90 seconds after disconnecting the cable from the negative (-) battery terminal to prevent airbag and seat belt pretensioner activation.
- NOTICE:
- ·
Some systems need to be initialized after the cable is reconnected.
·After the ignition switch is turned OFF, the navigation system requires approximately 90 seconds to record various types of memory and settings. As a result, after turning the ignition switch OFF, wait 90 seconds or more before disconnecting the cable from the negative (-) battery terminal.
Loosen the body's hinge bolts and adjust the door's position.
Tighten the body's hinge bolts after the adjustment.
- Torque:
- 29 N*m (296 kgf*cm, 21 ft.*lbf)
Loosen the door's hinge bolts and adjust the door's position.
Tighten the door's hinge bolts after the adjustment.
- Torque:
- 29 N*m (296 kgf*cm, 21 ft.*lbf)
Using a screwdriver, detach the 4 claws and remove the cover.
- HINT:
-
Tape the screwdriver tip before use.
Adjust the striker position by slightly loosening the striker mounting screws with a T40 "TORX" socket and hitting the striker with a plastic-faced hammer.
Using a T40 "TORX" socket, tighten the striker mounting screws after the adjustment.
- Torque:
- 23 N*m (235 kgf*cm, 17 ft.*lbf)
Connect the cable to the negative (-) battery terminal.
- NOTICE:
-
Some systems need to be initialized after the cable is reconnected.
Inspect the SRS warning light.