RM27M0U
_58
Vehicle Interior
_049133
LIGHTING
_0234251
AUTOMATIC LIGHT CONTROL SENSOR
G
LIGHTING AUTOMATIC LIGHT CONTROL SENSOR ON-VEHICLE INSPECTION
PROCEDURE

 89120A
1.INSPECT AUTOMATIC LIGHT CONTROL SENSOR
1.927,1.521 2.521,1.323
true
1.938,1.75 2.5,1.854
true
1.521,1.76 0.896,1.854
true
0.073,0 0.354,0.25
0.281,0.25
10
false
*a
0.458,1.792 0.979,2.083
0.521,0.292
10
false
CLTB
2.552,1.219 3.073,1.51
0.521,0.292
10
false
CLTE
2.531,1.781 3.073,2.073
0.542,0.292
10
false
CLTS
a.
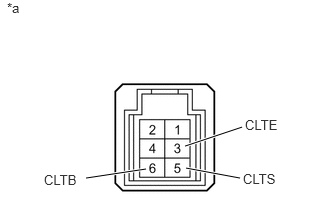
Measure the voltage according to the value(s) in the table below.
- Standard Voltage:
Tester Connection Switch Condition Specified Condition 6 (CLTB) - 3 (CLTE) Ignition switch ON 11 to 14 V
b.
Measure the resistance according to the value(s) in the table below.
- Standard Resistance:
Tester Connection Switch Condition Specified Condition 3 (CLTE) - Body ground Always Below 1 Ω
c.
Reconnect the automatic light control sensor connector.
d.
2.926,0.925 3.256,1.074
0.330,0.149
10
GND
1.819,1.29 1.944,1.439
0.125,0.149
10
A
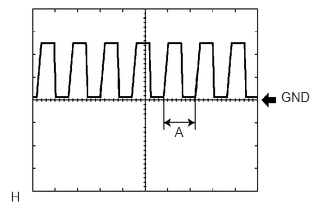
Check the waveform of the automatic light control sensor connector.
- Waveform:
Tester Connection Tool Setting Switch Condition Specified Condition 3 (CLTE) - 5 (CLTS) 5 V/DIV., 5 msec./ DIV. Ignition switch ON, headlight dimmer switch on AUTO Correct waveform is as shown
- HINT:
-
If the ambient light becomes brighter, width A becomes narrower.
-
If the result is not as specified, there may be a malfunction in the automatic light control sensor.
Text in Illustration *a Component with harness connected
(Automatic Light Control Sensor)