EXTERIOR FRONT BUMPER INSTALLATION
PROCEDURE

 52538
1.INSTALL FRONT BUMPER END RETAINER LH
Install the front bumper end retainer LH with the 3 nuts.
- Torque:
- 5.4 N*m (55 kgf*cm, 48 in.*lbf)
52537
2.INSTALL FRONT BUMPER END RETAINER RH
- HINT:
-
Use the same procedure described for the LH side.
52116A
3.INSTALL FRONT BUMPER SIDE SUPPORT LH
Attach the clip to install the front bumper side support LH.
Install the clip.
Install the screw.
52115A
4.INSTALL FRONT BUMPER SIDE SUPPORT RH
- HINT:
-
Use the same procedure described for the LH side.
52026B
5.INSTALL FRONT BUMPER NO. 2 EXTENSION SUB-ASSEMBLY LH
Install the front bumper No. 2 extension sub-assembly LH with the 4 nuts.
- Torque:
- 58 N*m (591 kgf*cm, 43 ft.*lbf)
52025B
6.INSTALL FRONT BUMPER NO. 2 EXTENSION SUB-ASSEMBLY RH
- HINT:
-
Use the same procedure described for the LH side.
52131A
7.INSTALL FRONT BUMPER REINFORCEMENT
Install the front bumper reinforcement with the 6 nuts.
- Torque:
- 71 N*m (724 kgf*cm, 52 ft.*lbf)
52142B
8.INSTALL FRONT BUMPER ARM LH
Install the front bumper arm LH with the 3 nuts.
- Torque:
- 58 N*m (591 kgf*cm, 43 ft.*lbf)
Attach the clamp.
52141C
9.INSTALL FRONT BUMPER ARM RH
- HINT:
-
Use the same procedure described for the LH side.
53883F
10.INSTALL FRONT FENDER MAIN SEAL LH
Install the front fender main seal LH.
53882H
11.INSTALL FRONT FENDER MAIN SEAL RH
- HINT:
-
Use the same procedure described for the LH side.
52119A
12.INSTALL FRONT BUMPER COVER
w/ Fog Light:
Connect the fog light connectors.
w/ Intuitive Parking Assist System:
Connect the ultrasonic sensor connectors.
Attach the 4 clamps to connect the wire harness.
Install the front bumper cover with the 4 bolts.
- Torque:
- 32 N*m (326 kgf*cm, 24 ft.*lbf)
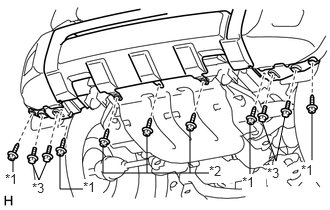
Install the 4 screws labeled A and 3 screws labeled B.
- Torque:
- for screw B : 3.0 N*m (31 kgf*cm, 27 in.*lbf)
| *1 | Screw A |
| *2 | Screw B |
| *3 | Bolt |
Install the 4 bolts.
- Torque:
- for bolt : 32 N*m (326 kgf*cm, 24 ft.*lbf)
for Steel Type Bumper:
Install the 2 screws.
- HINT:
-
Use the same procedure for the RH and LH sides.
for Resin Type Bumper:
Install the 2 screws.
- HINT:
-
Use the same procedure for the RH and LH sides.
52521
13.INSTALL FRONT BUMPER CENTER UPPER RETAINER
Install the front bumper center upper retainer with the 6 nuts.
- Torque:
- 5.4 N*m (55 kgf*cm, 48 in.*lbf)
53932B
14.INSTALL FRONT END PANEL LH
Attach the 3 claws to install the front end panel LH.
Install the 2 screws and 2 clips.
53931B
15.INSTALL FRONT END PANEL RH
- HINT:
-
Use the same procedure described for the LH side.
53101
16.INSTALL RADIATOR GRILLE SUB-ASSEMBLY
for Standard:
(See page Vehicle Interior>EXTERIOR>RADIATOR GRILLE>INSTALLATION)
w/ Off Road Package:
(See page Vehicle Interior>EXTERIOR>RADIATOR GRILLE(w/ Off Road Package)>INSTALLATION)