RM3700E
_59
Vehicle Exterior
_093282
EXTERIOR PANELS / TRIM
_0440183
WHEEL OPENING MOULDING(for Front)
A
EXTERIOR PANELS / TRIM WHEEL OPENING MOULDING(for Front) REMOVAL
CAUTION / NOTICE / HINT
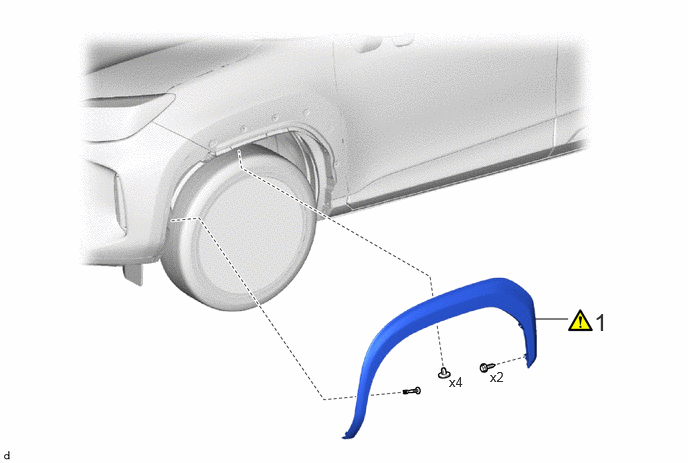
COMPONENTS (REMOVAL)
5.573,3.323 5.917,3.323
false
6.188,3.208 6.469,3.563
0.281,0.354
18
false
1
5.104,3.844 5.323,4
0.219,0.156
10
false
x2
4.677,3.896 4.896,4.052
0.219,0.156
10
false
x4
| Procedure | Part Name Code | 
|

|

|
|
|---|---|---|---|---|---|
| 1 | FRONT FENDER MOULDING SUB-ASSEMBLY | 75602A | ( ) |
- | - |
CAUTION / NOTICE / HINT
- HINT:
- ·
Use the same procedure for the RH side and LH side.
·The following procedure is for the LH side.
PROCEDURE

 75602A
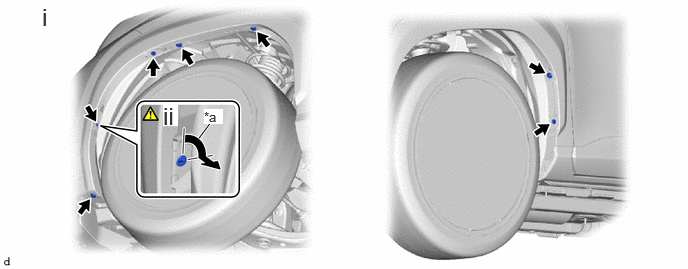
1.REMOVE FRONT FENDER MOULDING SUB-ASSEMBLY
a.
2.073,1.438 2.198,1.271
true
2.125,1.135 2.323,1.292
0.198,0.156
10
true
*a
0.438,0.031 0.688,0.448
0.25,0.417
18
false
i
1.698,1.063 1.854,1.313
0.156,0.25
18
true
ii
| *a | 90° | - | - |
i.
Remove the 2 screws and 4 clips.
ii.
Using a screwdriver, turn the pin 90 degrees and remove the pin hold clip.
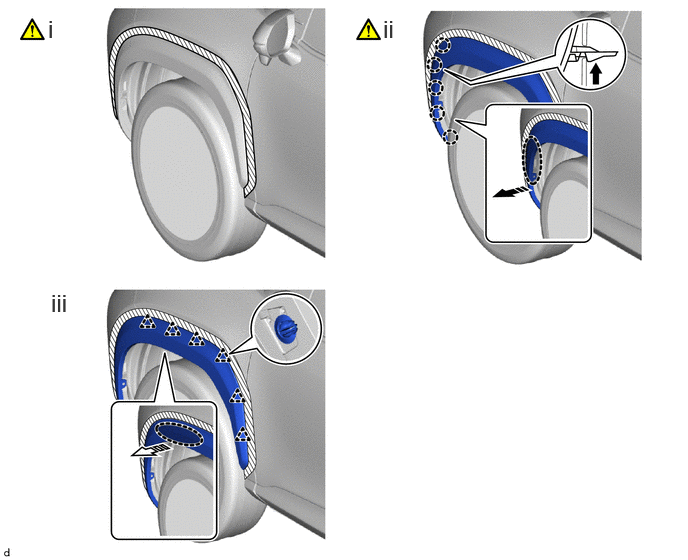
b.
0.5,0.156 0.719,0.458
0.219,0.302
18
false
i
3.99,0.156 4.208,0.458
0.219,0.302
18
false
ii
0.531,3.01 0.75,3.313
0.219,0.302
18
false
iii

|
Place Hand Here | 
|
Remove in this Direction (1) |

|
Remove in this Direction (2) | - | - |
i.
Apply protective tape around the front fender moulding sub-assembly.
ii.
Pull back the edge of the front fender liner and disengage the claws by pushing the area indicated by the arrow in the illustration with a finger.
- NOTICE:
- ·
Do not apply excessive force when pulling back the front fender liner.
·To avoid damaging the claws, do not forcibly pull the front fender moulding sub-assembly.
iii.
Disengage the clips to remove the front fender moulding sub-assembly as shown in the illustration.