M15A-FKS ENGINE MECHANICAL CYLINDER BLOCK INSPECTION
PROCEDURE

 1.INSPECT CYLINDER BLOCK FOR WARPAGE
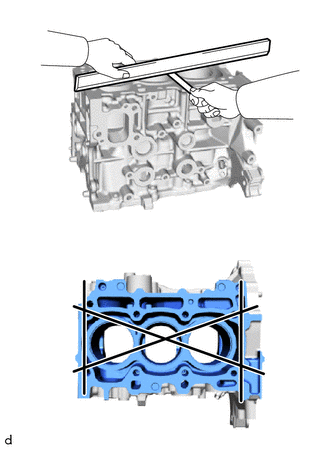
Using a precision straightedge and feeler gauge, check the surface which contacts the cylinder head gasket for warpage.
- Maximum Warpage:
Specified Condition 0.05 mm
0.00197 in.
- HINT:
-
If the warpage is more than the maximum, replace the cylinder block sub-assembly.
2.INSPECT CYLINDER BORE
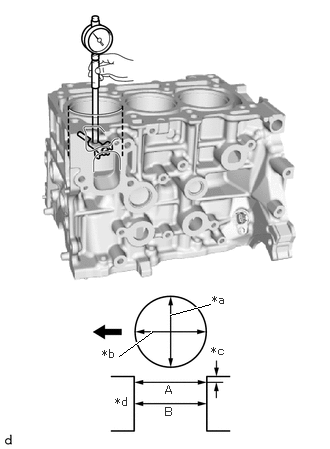
| *a | Thrust Direction |
| *b | Axial Direction |
| *c | 10 mm (0.394 in.) |
| *d | Center |

|
Front of Engine |
Using a cylinder gauge, measure the cylinder bore diameter at the positions (A) and (B) in the thrust and axial directions.
- Reference Diameter (New Parts):
Maximum Diameter Specified Condition 80.633 mm
3.17452 in.80.500 to 80.513 mm
3.16929 to 3.16980 in.
- HINT:
-
If the average diameter of 4 positions is more than the maximum, replace the cylinder block sub-assembly.
3.INSPECT CONNECTING ROD THRUST CLEARANCE
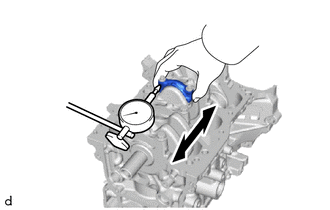
Using a dial indicator, measure the thrust clearance while moving the connecting rod sub-assembly back and forth.
- Standard Thrust Clearance:
Maximum Thrust Clearance Specified Condition 0.512 mm
0.02016 in.0.160 to 0.512 mm
0.00630 to 0.02016 in.
- HINT:
-
If the thrust clearance is more than the maximum, replace the connecting rod. If necessary, replace the crankshaft.
4.INSPECT CONNECTING ROD OIL CLEARANCE
Pre-procedure1
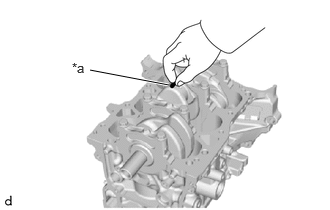
| *a | Plastigage |
Lay a strip of Plastigage on the crank pin.
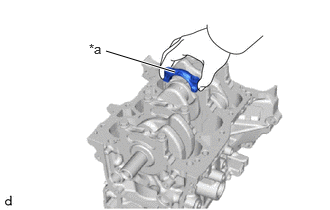
| *a | Front Mark |
Check that the front mark of the connecting rod cap is facing the correct direction, and install the connecting rod cap to the connecting rod.
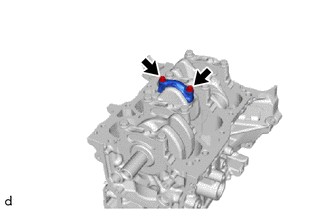
Apply a light coat of engine oil to the threads and under the heads of the 2 connecting rod bolts.
Using an E12 "TORX" socket wrench, install and alternately tighten the 2 connecting rod bolts in several steps.
- Torque:
- 38 N*m (387 kgf*cm, 28 ft.*lbf)
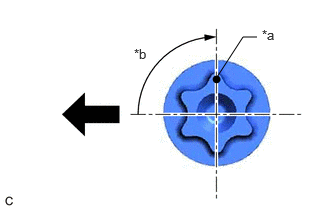
| *a | Paint Mark |
| *b | 90° |
|
|
Front of Engine |
Mark the front of each connecting rod bolt with paint.
Tighten the connecting rod bolts 90° as shown in the illustration.
- NOTICE:
-
Do not turn the crankshaft during the measurement.
Remove the 2 connecting rod bolts and connecting rod cap.
- HINT:
-
Keep the connecting rod bearing and connecting rod cap together.
Procedure1
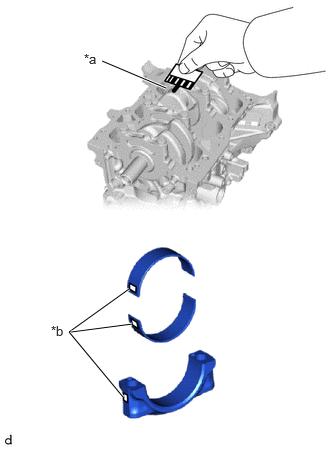
| *a | Plastigage |
| *b | 1, 2 or 3 Mark |
Measure the Plastigage at its widest point.
- Standard Oil Clearance:
Maximum Oil Clearance Specified Condition 0.065 mm
0.00256 in.0.032 to 0.065 mm
0.00126 to 0.00256 in.
- HINT:
- ·
If the oil clearance is more than the maximum, replace the connecting rod bearings. If necessary, replace the crankshaft.
·If replacing a connecting rod bearing, select a new one with the same number as marked on the connecting rod cap. There are 3 sizes of standard connecting rod bearings, marked "1", "2" or "3" accordingly.
- Standard Connecting Rod Big End Inside Diameter:
Mark Specified Condition 1 51.000 to 51.008 mm (2.00787 to 2.00818 in.) 2 51.008 to 51.016 mm (2.00818 to 2.00850 in.) 3 51.016 to 51.024 mm (2.00850 to 2.00881 in.)
- Standard Connecting Rod Bearing Center Wall Thickness:
Mark Specified Condition 1 1.483 to 1.487 mm (0.058386 to 0.058543 in.) 2 1.487 to 1.491 mm (0.058543 to 0.058701 in.) 3 1.491 to 1.495 mm (0.058701 to 0.058858 in.)
- Standard Crank Pin Diameter:
47.992 to 48.000 mm (1.88945 to 1.88976 in.)
- NOTICE:
-
Remove the Plastigage completely after the measurement.
Performe the inspection above for each cylinder.
Post-procedure1
None
5.INSPECT PISTON
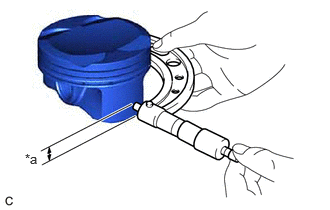
| *a | Distance |
Using a micrometer, measure the piston diameter at a right angle to the piston center line where the distance from the bottom of the piston is as specified.
- Distance:
9.0 mm (0.354 in.)
- Standard Piston Diameter (New Parts):
Specified Condition 80.472 to 80.502 mm
3.1682 to 3.1694 in.
- HINT:
-
If the diameter is less than the minimum, replace the piston and piston pin as a set.
6.INSPECT PISTON OIL CLEARANCE
Subtract the piston diameter measurement from the cylinder bore diameter measurement.
- Reference Oil Clearance (New Parts):
Maximum Oil Clearance Specified Condition 0.081 mm
0.00319 in.0.030 to 0.053 mm
0.00118 to 0.00209 in.
- HINT:
-
If the piston oil clearance is more than the maximum, replace all the pistons with piston pins. If necessary, replace the cylinder block sub-assembly.
7.INSPECT RING GROOVE CLEARANCE
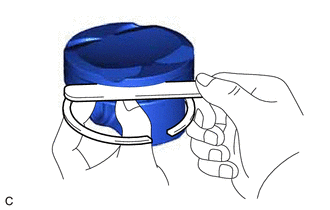
Using a feeler gauge, measure the clearance between a new piston ring set and the wall of the ring groove.
- Standard Ring Groove Clearance:
Item Specified Condition No. 1 compression ring 0.020 to 0.060 mm
0.000787 to 0.002362 in.No. 2 compression ring 0.020 to 0.060 mm
0.000787 to 0.002362 in.Oil ring 0.070 to 0.110 mm
0.002756 to 0.004331 in.
- HINT:
-
If the groove clearance is not as specified, replace the piston and piston pin as a set.
8.INSPECT PISTON RING END GAP
Pre-procedure1
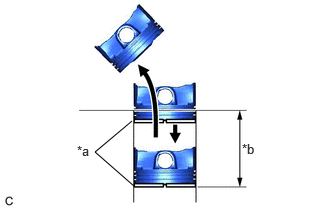
| *a | Piston Ring |
| *b | 70 mm |
Insert the piston ring into the cylinder bore.
Using a piston, push in the piston ring a little beyond the bottom of the ring travel, 70 mm (2.76 in.) from the top of the cylinder block sub-assembly.
Procedure1
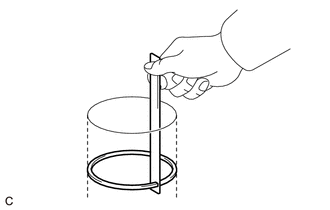
Using a feeler gauge, measure the end gap.
- Standard End Gap:
Item Maximum End Gap Specified Condition No. 1 compression ring 0.475 mm
0.0187 in.0.200 to 0.225 mm
0.00787 to 0.00886 in.No. 2 compression ring 0.875 mm
0.0345 in.0.575 to 0.625 mm
0.02264 to 0.02461 in.Oil ring 0.6 mm
0.0236 in.0.100 to 0.350 mm
0.00394 to 0.01378 in.
- HINT:
-
If the end gap is more than the maximum, replace the piston ring set. If the end gap is more than the maximum even with a new piston ring set, replace the cylinder block sub-assembly.
Post-procedure1
None
9.INSPECT PISTON PIN OIL CLEARANCE
- HINT:
-
When replacing the piston and piston pin with supply parts, there are a number of piston diameter sizes to choose from, but there is only one size of piston pin diameter.
Pre-procedure1
Confirm each mark on the piston, piston pin and connecting rod.
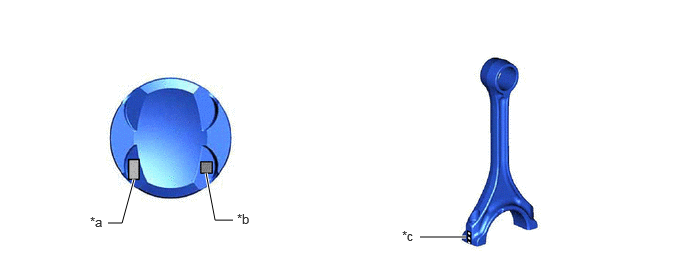
| *a | Front Mark | *b | Piston Pin Hole Inside Diameter Mark |
| *c | Connecting Rod Small End Bush Inside Diameter Mark | - | - |
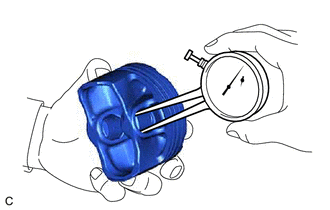
Using a caliper gauge, measure the inside diameter of the piston pin hole.
- Standard Piston Pin Hole Inside Diameter:
19.009 to 19.018 mm (0.748 to 0.749 in.)
Mark Specified Condition A 19.009 to 19.012 mm
0.7484 to 0.7485 in.B 19.012 to 19.015 mm
0.7485 to 0.7486 in.C 19.015 to 19.018 mm
0.7486 to 0.7487 in.
- HINT:
-
If the diameter is not as specified, replace the piston and piston pin as a set.
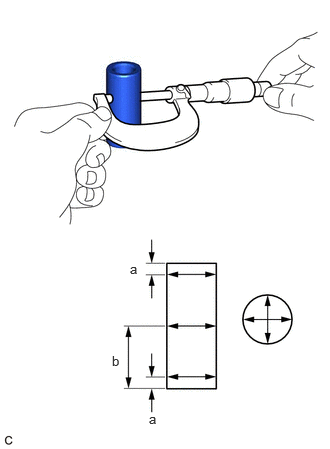
Using a micrometer, measure the piston pin diameter.
- Standard Piston Pin Diameter:
19.004 to 19.013 mm (0.74819 to 0.74854 in.)
Mark Specified Condition A 19.004 to 19.007 mm
0.74819 to 0.74831 in.B 19.007 to 19.010 mm
0.74831 to 0.74842 in.C 19.010 to 19.013 mm
0.74842 to 0.74854 in.
- HINT:
-
If the diameter is not as specified, replace the piston and piston pin as a set.
- Measurement Position:
Measurement Position Piston Pin Position a 5.0 mm (0.197 in.) from side edge b 23.0 mm (0.906 in.) from side edge
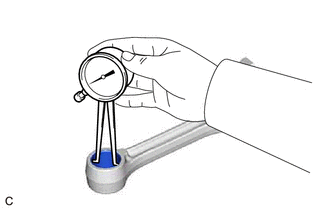
Using a caliper gauge, measure the inside diameter of the connecting rod small end bush.
- Standard Connecting Rod Small End Bush Inside Diameter:
Mark Specified Condition A 19.012 to 19.015 mm
0.74850 to 0.74862 in.B 19.015 to 19.018 mm
0.74862 to 0.74874 in.C 19.018 to 19.021 mm
0.74874 to 0.74886 in.
- HINT:
-
If the inside diameter is not as specified, replace the connecting rod sub-assembly.
Procedure1
Subtract the piston pin diameter measurement from the piston pin hole inside diameter measurement.
- Standard Oil Clearance:
Maximum Oil Clearance Specified Condition 0.015 mm
0.000591 in.0.002 to 0.008 mm
0.0000787 to 0.0003150 in.
- HINT:
-
If the oil clearance is more than the maximum, replace the piston and piston pin as a set.
Procedure2
Subtract the piston pin diameter measurement from the connecting rod small end bush inside diameter measurement.
- Standard Oil Clearance:
Maximum Oil Clearance Specified Condition 0.021 mm
0.000827 in.0.005 to 0.011 mm
0.000197 to 0.000433 in.
- HINT:
-
If the oil clearance is more than the maximum, replace the connecting rod sub-assembly. If necessary, replace the connecting rod sub-assembly and piston pin as a set.
Post-procedure1
None
10.INSPECT CONNECTING ROD
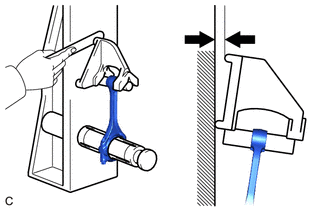
Using a connecting rod aligner and feeler gauge, check the connecting rod alignment.
Check for misalignment.
- Maximum Misalignment:
Specified Condition 0.05 mm (0.00197 in.) per 100 mm (3.94 in.)
If the misalignment is more than the maximum, replace the connecting rod.
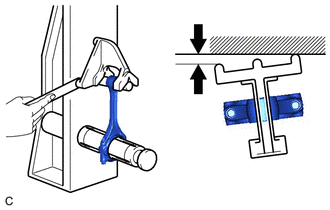
Check for twist.
- Maximum Twist:
Specified Condition 0.15 mm (0.00591 in.) per 100 mm (3.94 in.)
If the twist is more than the maximum, replace the connecting rod.
11.INSPECT CRANKSHAFT THRUST CLEARANCE
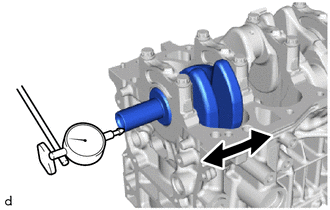
Using a dial indicator, measure the crankshaft thrust clearance while prying the crankshaft back and forth with a screwdriver.
- Standard Thrust Clearance:
Maximum Thrust Clearance Specified Condition 0.27 mm
0.0106 in.0.07 to 0.27 mm
0.00276 to 0.01063 in.
- HINT:
-
If the thrust clearance is more than the maximum, replace the crankshaft thrust washers as a set. If necessary, replace the crankshaft.
- Standard Thrust Washer Thickness:
2.42 to 2.47 mm (0.0953 to 0.0972 in.)
13411
12.INSPECT CRANKSHAFT
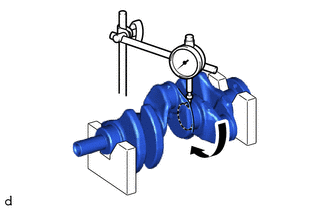
Inspect for runout.
Clean the crank journal.
Place the crankshaft on V-blocks.
Using a dial indicator and V-blocks, measure the runout as shown in the illustration.
- Maximum Runout:
Specified Condition 0.03 mm
0.00118 in.
- HINT:
-
If the runout is more than the maximum, replace the crankshaft.
Inspect the main journals.
Using a micrometer, measure the diameter of each main journal.
- Standard Main Journal Diameter:
Specified Condition 51.988 to 52.000 mm
2.04677 to 2.04724 in.
- HINT:
-
If the diameter is not as specified, check the crankshaft oil clearance. If necessary, replace the crankshaft.
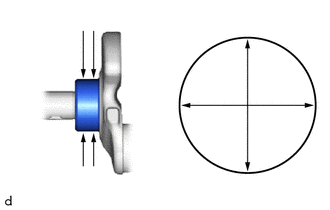
Check each main journal for taper and out-of-round as shown in the illustration.
- Maximum Taper and Out-of-round:
Specified Condition 0.003 mm
0.000118 in.
- HINT:
-
If the taper or out-of-round is more than the maximum, replace the crankshaft.
Inspect the crank pins.
Using a micrometer, measure the diameter of each crank pin.
- Standard Crank Pin Diameter:
Specified Condition 47.992 to 48.000 mm
1.88945 to 1.88976 in.
- HINT:
-
If the diameter is not as specified, check the connecting rod oil clearance. If necessary, replace the crankshaft.
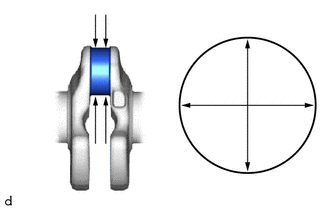
Inspect each crank pin for taper and out-of-round as shown in the illustration.
- Maximum Taper and Out-of-round:
Specified Condition 0.003 mm
0.000118 in.
- HINT:
-
If the taper or out-of-round is more than the maximum, replace the crankshaft.
13.INSPECT CRANKSHAFT OIL CLEARANCE
Pre-procedure1
Install the crankshaft bearings.
Install the crankshaft thrust washers.
Place the crankshaft on the cylinder block sub-assembly.
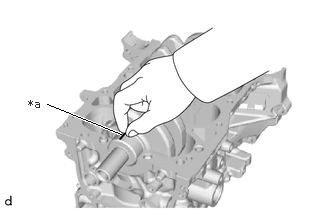
| *a | Plastigage |
Lay a strip of Plastigage across each journal.
Install the crankshaft bearing caps.
- NOTICE:
-
Do not turn the crankshaft.
Remove the crankshaft bearing caps.
Procedure1
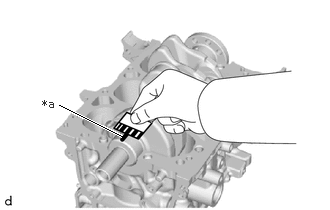
| *a | Plastigage |
Measure the Plastigage at its widest point.
- Standard Oil Clearance:
Item Maximum Oil Clearance Specified Condition No. 2, 3 journal 0.053 mm
0.00209 in.0.029 to 0.053 mm
0.00114 to 0.00209 in.No. 1, 4 journal 0.041 mm
0.00161 in.0.017 to 0.041 mm
0.000669 to 0.001614 in.
- NOTICE:
-
Remove the Plastigage completely after the measurement.
If the oil clearance is more than the maximum, replace the crankshaft bearing. If necessary, replace the crankshaft.
- HINT:
-
If replacing a crankshaft bearing, select a new one with the same number. If the number of the crankshaft bearing cannot be determined, calculate the correct crankshaft bearing number by adding together the numbers imprinted on the cylinder block sub-assembly and crankshaft. Then refer to the following table for the appropriate crankshaft bearing number. There are 4 sizes of standard bearings, marked "1", "2", "3" or "4" accordingly.
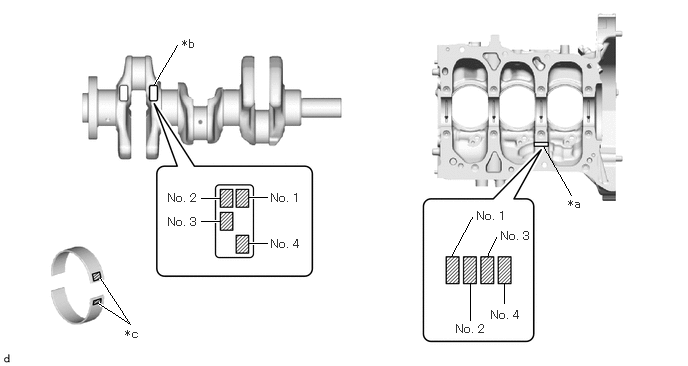 1.604,0.875 1.844,0.469 true 1.042,2.896 1.354,3.375 1.354,3.375 1.021,3.156 true 5.948,2.031 5.656,1.521 false 5.25,3.156 5.25,2.958 false 4.896,3.333 4.896,2.948 false 4.698,2.667 4.917,2.26 false 5.073,2.667 5.167,2.469 false 2.781,2.052 2.594,2.052 true 2.781,2.531 2.594,2.531 true 2.281,2.302 2.094,2.302 true 2.281,2.063 2.094,2.063 true 5.917,2.052 6.229,2.208 0.313,0.156 10 false *a 1.896,0.385 2.208,0.542 0.313,0.156 10 false *b 1.302,3.406 1.615,3.563 0.313,0.156 10 false *c 2.823,1.99 3.219,2.188 0.396,0.198 10 false No. 1 1.75,1.99 2.146,2.188 0.396,0.198 10 false No. 2 1.75,2.24 2.146,2.438 0.396,0.198 10 false No. 3 2.823,2.469 3.219,2.667 0.396,0.198 10 false No. 4 4.75,3.354 5.146,3.552 0.396,0.198 10 false No. 2 5.219,2.385 5.615,2.583 0.396,0.198 10 false No. 3 4.969,2.177 5.365,2.375 0.396,0.198 10 false No. 1 5.115,3.208 5.51,3.406 0.396,0.198 10 false No. 4
*a Cylinder Block Number Mark (A) *b Crankshaft Number Mark (B) *c Diameter Mark - -
EXAMPLE
for No. 2, 3 journal:
Cylinder block sub-assembly (A) "3" + Crankshaft (B) "4" = Total "7"
Select the crankshaft bearing marked "3".
for No. 1, 4 journal:
Cylinder block sub-assembly (A) "3" + Crankshaft (B) "4" = Total "7".
Select the crankshaft bearing marked "4".
- Crankshaft Bearing Chart (for No. 2, 3 journal):
(A) + (B) Use Crankshaft Bearing 0 to 2 1 3 to 5 2 6 to 8 3 9 to 11 4
- Crankshaft Bearing Chart (for No. 1, 4 journal):
(A) + (B) Use Crankshaft Bearing 0 to 2 3 3 to 5 4 6 to 8 5 9 to 11 6
- Standard Cylinder Block Journal Inside Diameter (A):
Mark Specified Condition 0 56.000 to 56.003 mm (2.20472 to 2.20484 in.) 1 56.003 to 56.005 mm (2.20484 to 2.20492 in.) 2 56.005 to 56.007 mm (2.20492 to 2.20500 in.) 3 56.007 to 56.010 mm (2.20500 to 2.20511 in.) 4 56.010 to 56.012 mm (2.20511 to 2.20519 in.) 5 56.012 to 56.014 mm (2.20519 to 2.20527 in.) 6 56.014 to 56.016 mm (2.20527 to 2.20535 in.)
- Standard Crankshaft Main Journal Diameter (B):
Mark Specified Condition 0 51.998 to 52.000 mm (2.04716 to 2.04724 in.) 1 51.996 to 51.998 mm (2.04708 to 2.04716 in.) 2 51.994 to 51.996 mm (2.04700 to 2.04708 in.) 3 51.992 to 51.994 mm (2.04693 to 2.04700 in.) 4 51.990 to 51.992 mm (2.04685 to 2.04693 in.) 5 51.988 to 51.990 mm (2.04677 to 2.04685 in.)
- Standard Crankshaft Bearing Center Wall Thickness:
Mark Specified Condition 1 1.985 to 1.988 mm (0.07815 to 0.07827 in.) 2 1.988 to 1.991 mm (0.07827 to 0.07839 in.) 3 1.991 to 1.994 mm (0.07839 to 0.07850 in.) 4 1.994 to 1.997 mm (0.07850 to 0.07862 in.) 5 1.997 to 2.000 mm (0.07862 to 0.07874 in.) 6 2.000 to 2.003 mm (0.07874 to 0.07886 in.)
Post-procedure1
Perform the inspection for each journal.
11416
14.INSPECT CRANKSHAFT BEARING CAP SET BOLT
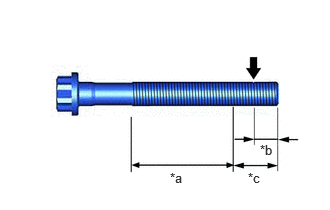
| *a | Measurement Area (B) |
| *b | 5.0 mm (0.197 in.) |
| *c | 10 mm (0.394 in.) |
|
|
Measurement Location (A) |
Using a vernier caliper, measure the outer diameter at position (A) shown in the illustration.
- Standard Diameter:
Specified Condition 10.73 to 10.97 mm
0.422 to 0.432 in.
Using a vernier caliper, measure the outer diameter within range (B) shown in the illustration at several locations.
- HINT:
- ·
Perform the measurement within range (B) at several locations.
·If the threads of the crankshaft bearing cap set bolt are damaged, replace the bolt with a new one.
Calculate the difference between the measurement at position (A) and position (B).
- Minimum Diameter:
Specified Condition 0.3 mm
0.0118 in.
- HINT:
- ·
Outer Diameter Difference = Position (A) Outer Diameter - Position (B) Outer Diameter (Smallest Value)
·If the outer diameter is below the minimum, the engine may be damaged.
Therefore, replace the crankshaft bearing cap set bolt with a new one.
13265
15.INSPECT CONNECTING ROD BOLT
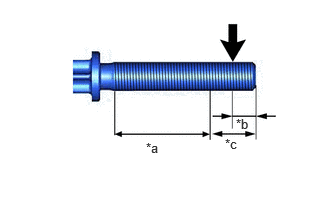
| *a | Measurement Area (B) |
| *b | 5.0 mm (0.197 in.) |
| *c | 10 mm (0.394 in.) |
|
|
Measurement Location (A) |
Using a vernier caliper, measure the outer diameter at position (A) shown in the illustration.
- Standard Diameter:
Specified Condition 8.36 to 8.5 mm
0.329 to 0.335 in.
Using a vernier caliper, measure the outer diameter within range (B) shown in the illustration at several locations.
- HINT:
- ·
Perform the measurement within range (B) at several locations.
·If the threads of the connecting rod bolt are damaged, replace the bolt with a new one.
Calculate the difference between the measurement at position (A) and position (B).
- Minimum Diameter:
Specified Condition 0.5 mm
0.0197 in.
- HINT:
- ·
Outer Diameter Difference = Position (A) Outer Diameter - Position (B) Outer Diameter (Smallest Value)
·If the outer diameter is below the minimum, the engine may be damaged.
Therefore, replace the connecting rod bolt with a new one.
15708
16.INSPECT NO. 1 OIL NOZZLE SUB-ASSEMBLY
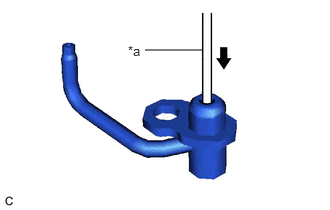
| *a | Pin |
Push the check valve with a pin to check that it is not stuck.
- HINT:
-
If the check valve is stuck, replace the No. 1 oil nozzle sub-assembly.
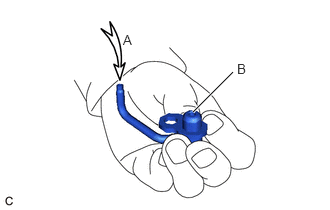
Apply air into (A). Check that air does not leak through (B).
- HINT:
-
If air leaks, clean or replace the No. 1 oil nozzle sub-assembly.
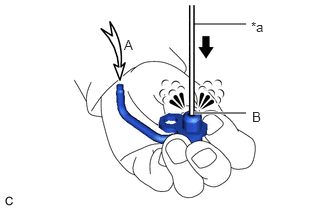
| *a | Pin |
Push the check valve with a pin while applying air into (A). Check that air passes through (B).
- HINT:
-
If air does not pass through (B), clean or replace the No. 1 oil nozzle sub-assembly.