Home › Engine / Hybrid System › M15A-FKS (ENGINE MECHANICAL) › CYLINDER BLOCK
RM3700E _51 Engine / Hybrid System _093330 M15A-FKS ENGINE MECHANICAL _0440542 CYLINDER BLOCK A

M15A-FKS ENGINE MECHANICAL  CYLINDER BLOCK  REASSEMBLY  


CAUTION / NOTICE / HINT
COMPONENTS (REASSEMBLY)
A461984N02
0.146,4.292 0.75,4.458 0.604,0.167 5.583,1.104 6.115,1.917 0.531,0.813 1.167,5.083 1.5,5.25 0.333,0.167 1.125,5.042 1.542,5.292 0.417,0.25 5.427,2.177 6.052,3.542 0.625,1.365 5.427,3.542 5.813,3.927 0.385,0.385 5.729,4.844 6.063,5.01 0.333,0.167 5.688,4.802 6.104,5.052 0.417,0.25 0.083,2.479 0.781,2.646 0.698,0.167 4.917,0.667 5.625,0.833 0.708,0.167 4.427,2.469 4.542,2.281 4.542,2.281 4.708,2.281 false 3.667,1.01 3.948,0.49 3.948,0.49 4.115,0.49 false 3.344,3.573 3.958,3.938 3.958,3.938 4.125,3.938 false 0.865,1.208 1.031,1.208 1.031,1.208 1.5,1.708 false 0.438,4.292 0.438,3.844 false 1.365,1.313 1.885,0.698 1.885,0.698 2.052,0.698 false 3.438,3.104 3.938,3.219 3.938,3.219 4.104,3.219 false 0.583,3.281 0.865,3.281 false 6.417,3.042 6.417,2.74 false 6.125,1.406 6.406,1.406 false 2.302,3.833 2.948,4.573 2.948,4.573 3.115,4.573 false 2.594,2.865 4.104,2.865 false 2.896,3.073 3.938,3.594 3.938,3.594 4.104,3.594 false 1.417,2.844 1.583,2.844 1.583,2.844 2.146,2.677 false 2.052,4.792 2.052,4.24 false 2.677,3.802 2.969,4.198 2.969,4.198 3.135,4.198 false 1.333,5.073 1.333,4.635 false 5.813,3.813 6.208,4.219 6.208,4.219 6.375,4.219 false 5.938,3.542 6.24,3.813 6.24,3.813 6.406,3.813 false 5.76,4.083 6.24,4.635 6.24,4.635 6.406,4.635 false 5.354,4.927 5.719,4.927 false 4.698,1.896 4.75,0.75 4.75,0.75 4.917,0.75 false 4.271,1.896 4.177,1.26 4.177,1.26 4.01,1.26 false 1.771,2.365 1.771,2.208 false 0.344,2.979 0.51,2.979 0.51,2.979 1.052,2.438 false 0.396,2.479 0.396,1.99 false 6.615,2.76 6.698,2.583 6.698,2.583 6.865,2.583 false 6.146,2.49 6.229,2.313 6.229,2.313 6.396,2.313 false 4.677,0.344 4.958,0.698 0.281,0.354 18 false 1 4.656,3.813 4.938,4.167 0.281,0.354 18 false 1 5.26,2.156 5.542,2.51 0.281,0.354 18 false 2 0.667,1.083 0.948,1.438 0.281,0.354 18 false 2 0.156,4.292 0.958,4.552 0.802,0.26 8 false 10 (102, 7) 2.635,0.542 2.917,0.896 0.281,0.354 18 false 2 1.458,1.26 1.771,1.458 0.313,0.198 10 false x2 3.75,0.979 4.063,1.177 0.313,0.198 10 false x2 3.385,3.458 3.698,3.656 0.313,0.198 10 false x8 4.458,2.531 4.771,2.729 0.313,0.198 10 false x2 3.417,3.146 3.729,3.344 0.313,0.198 10 false x2 4.677,3.125 4.958,3.479 0.281,0.354 18 false 2 0.542,3.74 0.854,3.938 0.313,0.198 10 false x3 0.573,3.323 0.885,3.521 0.313,0.198 10 false x3 1.26,3.167 1.542,3.521 0.281,0.354 18 false 3 6.479,3.052 6.76,3.406 0.281,0.354 18 false 4 6.479,2.563 6.792,2.76 0.313,0.198 10 false x3 6.208,2.427 6.521,2.625 0.313,0.198 10 false x3 6.813,2.719 7.125,2.917 0.313,0.198 10 false x3 6.75,1.292 7.031,1.646 0.281,0.354 18 false 5 6.177,1.802 6.594,2.021 0.417,0.219 10 false x3 2.365,3.729 2.677,3.927 0.313,0.198 10 false x4 3.5,4.063 3.781,4.417 0.281,0.354 18 false 7 4.469,2.781 4.75,3.135 0.281,0.354 18 false 6 2.406,2.885 2.719,3.083 0.313,0.198 10 false x4 4.5,3.479 4.781,3.833 0.281,0.354 18 false 8 1.24,2.729 1.521,3.083 0.281,0.354 18 false 8 3.51,4.479 3.792,4.833 0.281,0.354 18 false 6 2.115,4.781 2.396,5.135 0.281,0.354 18 false 9 2.344,4.177 2.656,4.375 0.313,0.198 10 false x4 1.208,5.094 1.833,5.344 0.625,0.25 10 false *T1 1.417,4.458 1.729,4.656 0.313,0.198 10 false x8 6.75,4.125 7.156,4.5 0.406,0.375 18 false 10 6.74,3.729 7.083,4.083 0.344,0.354 18 false 11 6.74,4.563 7.156,4.917 0.417,0.354 18 false 12 5.771,4.844 6.396,5.094 0.625,0.25 10 false *T2 5.99,0.625 6.667,0.917 0.677,0.292 18 false 13 3.844,1.208 4,1.406 0.156,0.198 10 false ● 1.708,2.417 1.865,2.615 0.156,0.198 10 false ● 0.052,2.865 0.438,3.208 0.385,0.344 18 false 14 1.844,2.063 2.156,2.26 0.313,0.198 10 false x3 0.5,1.792 0.813,1.99 0.313,0.198 10 false x5 5.385,4.969 5.698,5.167 0.313,0.198 10 false x6 0.115,2.479 0.99,2.792 0.875,0.313 8 false 21 (214, 15) 4.938,0.667 5.781,0.917 0.844,0.25 8 false 44 (449, 32) 5.854,3.677 6.167,3.875 0.313,0.198 10 false x3 5.813,3.979 6.125,4.177 0.313,0.198 10 false x3 6.094,3.354 6.406,3.552 0.313,0.198 10 false x3 1.542,1.729 1.854,1.927 0.313,0.198 10 false x2 4.5,0.406 4.656,0.604 0.156,0.198 10 false ● 2.438,0.635 2.594,0.833 0.156,0.198 10 false ● 0.469,1.156 0.625,1.354 0.156,0.198 10 false ● 4.5,3.188 4.656,3.385 0.156,0.198 10 false ● 4.479,3.885 4.635,4.083 0.156,0.198 10 false ● 5.083,2.24 5.24,2.438 0.156,0.198 10 false ● 6.927,2.51 7.083,2.708 0.156,0.198 10 false ● 6.458,2.26 6.615,2.458 0.156,0.198 10 false ●

Procedure Part Name Code
Z101186

Z101188

Z101187

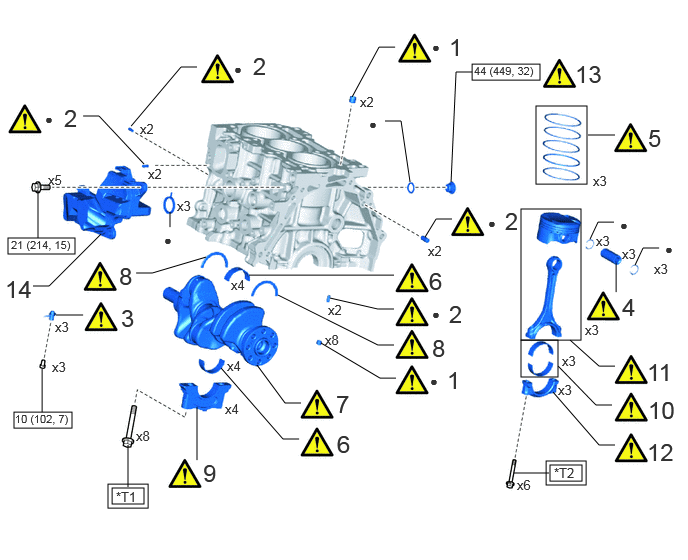
1 RING PIN - (Click here) - -
2 STRAIGHT PIN - (Click here) - -
3 NO. 1 OIL NOZZLE SUB-ASSEMBLY 15708 (Click here) - -
4 PISTON PIN - (Click here) - -
5 PISTON RING SET 13011 (Click here) - -
6 CRANKSHAFT BEARING 11711 (Click here) - -
7 CRANKSHAFT 13411 (Click here) - -
8 CRANKSHAFT THRUST WASHER 11791 (Click here) - -
9 CRANKSHAFT BEARING CAP - (Click here) - -
10 CONNECTING ROD BEARING - (Click here) - -
11 PISTON WITH CONNECTING ROD - (Click here) - -
12 CONNECTING ROD CAP - (Click here) - -
13 CYLINDER BLOCK WITH HEAD STRAIGHT SCREW PLUG 11432R (Click here) - -
14 NO. 1 VENTILATION CASE 12211 - - -

V111893

Tightening torque for "Major areas involving basic vehicle performance such as moving/turning/stopping" : N*m (kgf*cm, ft.*lbf)
V100146

N*m (kgf*cm, ft.*lbf): Specified torque
● Non-reusable part - -
*T1 1st: 61 (622, 45)
2nd: Turn 90°
*T2 1st: 38 (387, 28)
2nd: Turn 90°

PROCEDURE

Hide 1.INSTALL RING PIN

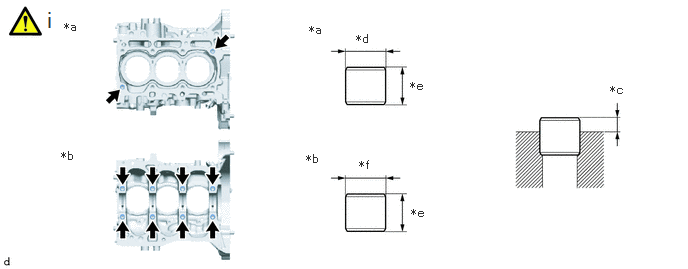
a.
A459135C01
0.667,0.208 0.979,0.365 0.313,0.156 10 false *a 0.635,1.552 0.948,1.708 0.313,0.156 10 false *b 6.354,0.865 6.667,1.021 0.313,0.156 10 false *c 3.708,0.333 4.021,0.49 0.313,0.156 10 false *d 4.271,0.823 4.583,0.979 0.313,0.156 10 false *e 4.281,2.146 4.594,2.302 0.313,0.156 10 false *e 3.74,1.646 4.052,1.802 0.313,0.156 10 false *f 3.219,0.24 3.531,0.438 0.313,0.198 10 false *a 3.188,1.583 3.5,1.74 0.313,0.156 10 false *b 0.469,0.073 0.75,0.427 0.281,0.354 18 false i
*a Top Side *b Bottom Side
*c Protrusion Height *d 13 mm (0.512 in.)
*e 12 mm (0.472 in.) *f 14 mm (0.551 in.)


i.

Using a plastic hammer, install 10 new ring pins.

Standard Protrusion Height:

5.0 to 7.0 mm (0.197 to 0.276 in.)


Hide 2.INSTALL STRAIGHT PIN

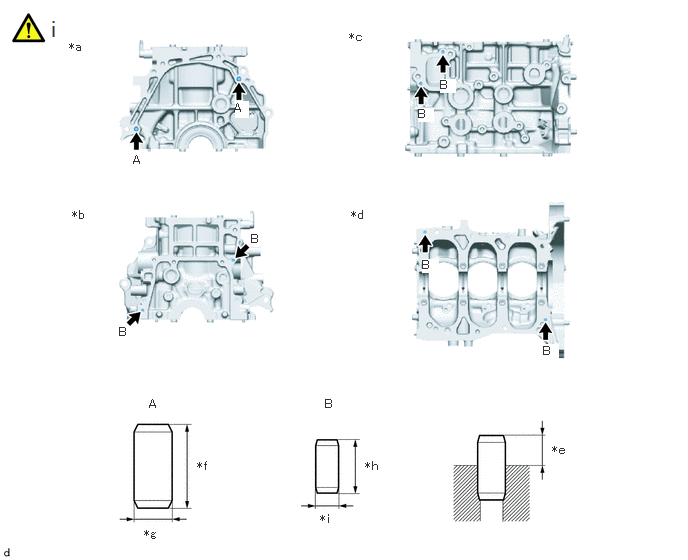
a.
A459136C01
0.719,0.417 1.031,0.573 0.313,0.156 10 false *a 0.75,2.167 1.063,2.323 0.313,0.156 10 false *b 3.635,0.313 3.948,0.469 0.313,0.156 10 false *c 3.656,2.167 3.969,2.323 0.313,0.156 10 false *d 5.75,4.615 6.063,4.771 0.313,0.156 10 false *e 2.052,4.781 2.365,4.938 0.313,0.156 10 false *f 1.5,5.49 1.813,5.646 0.313,0.156 10 false *g 3.802,4.781 4.115,4.938 0.313,0.156 10 false *h 3.333,5.333 3.646,5.49 0.313,0.156 10 false *i 1.385,1.594 1.698,1.75 0.313,0.156 10 false A 2.438,1.052 2.583,1.229 0.146,0.177 10 true A 1.24,3.385 1.552,3.542 0.313,0.156 10 false B 2.615,2.417 2.781,2.573 0.167,0.156 10 false B 4.583,0.813 4.75,0.969 0.167,0.156 10 true B 4.354,1.115 4.521,1.271 0.167,0.156 10 true B 4.396,2.688 4.563,2.844 0.167,0.156 10 true B 5.656,3.583 5.823,3.74 0.167,0.156 10 true B 0.51,0.167 0.792,0.521 0.281,0.354 18 false i 1.552,4.135 1.865,4.292 0.313,0.156 10 false A 3.385,4.135 3.698,4.292 0.313,0.156 10 false B
*a Rear Side *b Front Side
*c LH Side *d Bottom Side
*e Protrusion Height *f 22 mm (0.866 in.)
*g 10 mm (0.394 in.) *h 14 mm (0.551 in.)
*i 6.0 mm (0.236 in.) - -


i.

Using a plastic hammer, install 8 new straight pins.

Standard Protrusion Height:
Straight Pin Specified Condition
(A) 11.0 to 13.0 mm (0.433 to 0.512 in.)
(B) 5.0 to 7.0 mm (0.197 to 0.276 in.)


Hide 15708 3.INSTALL NO. 1 OIL NOZZLE SUB-ASSEMBLY
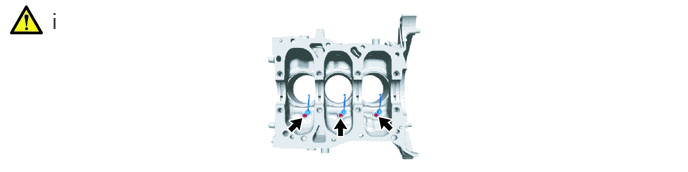
a.
A460699N01
0.521,0.083 0.802,0.438 0.281,0.354 18 false i

i.

Using a 5 mm hexagon wrench, install the 3 No. 1 oil nozzle sub-assemblies to the cylinder block sub-assembly with the 3 bolts.

Torque:
10 N*m (102 kgf*cm, 7 ft.*lbf)


Hide 4.INSTALL PISTON PIN

Z101186

HINT:

Perform inspection after repair after replacing the piston.

Click here(Click here)


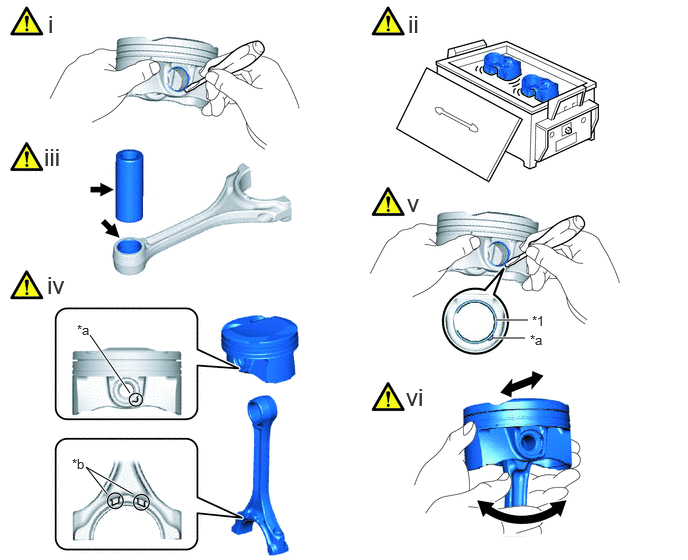
a.
A461481C03
1.354,4.094 0.938,3.49 true 1.385,5.146 0.896,4.865 0.896,4.865 1.115,5.146 true 5.469,3.521 5.135,3.521 true 5.5,3.333 5.167,3.333 true 0.802,3.354 1.115,3.552 0.313,0.198 10 false *a 0.75,4.75 1.063,4.948 0.313,0.198 10 false *b 5.521,3.458 5.833,3.656 0.313,0.198 10 false *a 5.542,3.26 5.854,3.458 0.313,0.198 10 false *1 0.5,0.104 0.781,0.458 0.281,0.354 18 false i 4.25,0.104 4.531,0.458 0.281,0.354 18 false ii 0.458,1.49 0.74,1.844 0.281,0.354 18 false iii 0.49,2.823 0.771,3.177 0.281,0.354 18 false iv 4.24,1.969 4.521,2.323 0.281,0.354 18 false v 4.229,3.99 4.51,4.344 0.281,0.354 18 false vi
*1 Piston Pin Hole Snap Ring - -
*a Cutout *b Front Mark


i.

Using a screwdriver, install a new piston pin hole snap ring to the piston pin hole on the rear side of the piston.

NOTICE:

Be sure that the end gap of the piston pin hole snap ring is not aligned with the cutout of the piston.


HINT:

Tape the screwdriver tip before use.


ii.

Gradually heat the piston to between 80 and 90°C (176 and 194°F).

CAUTION:

Be sure to wear protective gloves.


iii.

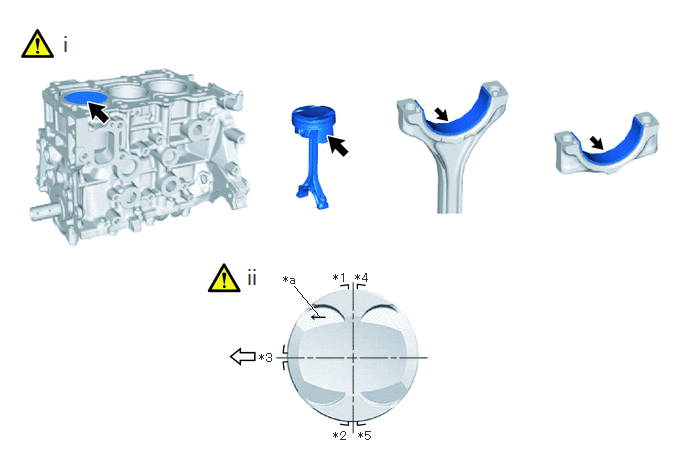
Apply a light coat of engine oil to the piston, piston pin and connecting rod.


iv.

Align the cutout of the piston and front mark of the connecting rod, insert the connecting rod into the piston, and then push in the piston pin with your thumb until the piston pin comes into contact with the piston pin hole snap ring.

NOTICE:

Do not change the combination of the pistons and piston pins.


v.

Using a screwdriver, install a new piston pin hole snap ring to the piston pin hole on the front side of the piston.

NOTICE:

Be sure that the end gap of the piston pin hole snap ring is not aligned with the cutout of the piston.


HINT:

Tape the screwdriver tip before use.


vi.

Check the fitting condition between the piston and piston pin.

1. Move the connecting rod back and forth on the piston pin. Check the fitting condition.

2. Rotate the piston back and forth on the piston pin. Check the fitting condition.

HINT:

If abnormal movement is felt, replace the piston and piston pin as a set.


Hide 13011 5.INSTALL PISTON RING SET

Z101186

HINT:

Perform inspection after repair after replacing the piston ring.

Click here(Click here)


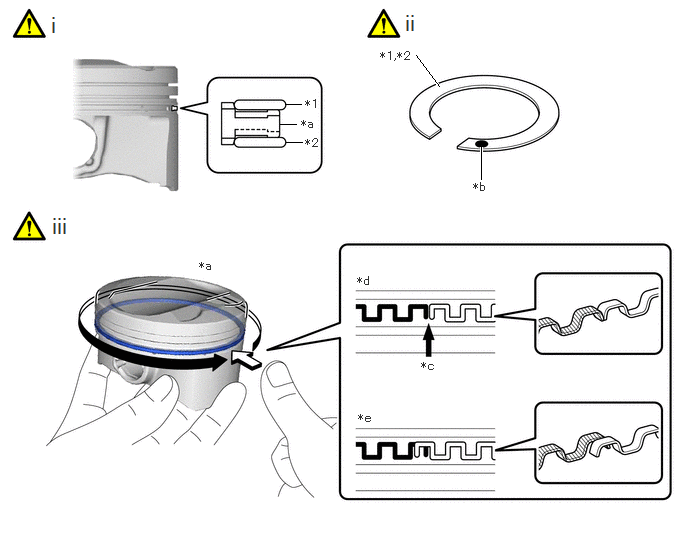
a.
A476608C02
2.969,1.083 3.135,1.083 false 2.917,1.292 3.083,1.292 false 2.979,1.479 3.146,1.479 false 5.01,1.531 5.01,1.865 true 4.333,0.573 4.573,0.896 true 3.177,1.01 3.49,1.167 0.313,0.156 10 false *1 3.135,1.219 3.448,1.375 0.313,0.156 10 false *a 3.177,1.417 3.49,1.573 0.313,0.156 10 false *2 3.958,0.51 4.406,0.719 0.448,0.208 10 false *1,*2 4.927,1.875 5.24,2.073 0.313,0.198 10 false *b 2.073,2.698 2.385,2.854 0.313,0.156 10 false *a 3.719,2.854 4.031,3.01 0.313,0.156 10 false *d 4.385,3.74 4.698,3.896 0.313,0.156 10 false *c 3.729,4.281 4.042,4.438 0.313,0.156 10 false *e 0.51,0.125 0.792,0.479 0.281,0.354 18 false i 4.198,0.104 4.479,0.458 0.281,0.354 18 false ii 0.521,2.219 0.802,2.573 0.281,0.354 18 false iii
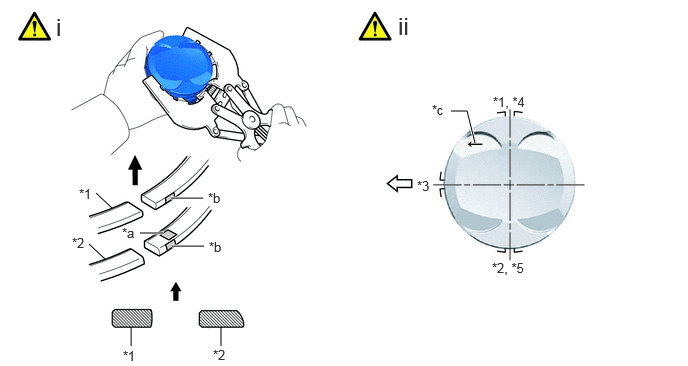
*1 Upper Side Rail *2 Lower Side Rail
*a Oil Ring Expander *b Code Mark (T)
*c Ring End *d Correct
*e Incorrect - -


i.

Install the oil ring expander by hand.


ii.

Install upper side rail and lower side rail to the piston.

NOTICE:

Install the upper side rail and lower side rail with the code mark (T) facing upward.


iii.

Check that the ends of the oil ring expander are not overlapping and that the upper side rail and lower side rail are securely installed into the groove.

NOTICE:
·

After installing the oil ring expander, upper side rail and lower side rail, press around the circumference with a finger to check that they are securely installed into the groove.

·

If the oil ring expander is not securely installed into the groove, check that the ends of the oil ring expander are not overlapping.

·

If the ends of the oil ring expander are overlapping, remove the upper side rail and lower side rail and realign the oil ring expander.


b.
A461479C03
1.167,2.167 1,2.01 false 1.094,2.698 0.927,2.542 false 2.125,2.563 1.792,2.563 true 1.708,2.427 1.458,2.427 true 2.115,2.063 1.781,2.063 true 1.365,3.604 1.365,3.406 false 2.302,3.604 2.302,3.406 false 4.948,1.49 4.865,1.156 4.865,1.156 4.698,1.156 true 0.823,1.938 1.135,2.094 0.313,0.156 10 false *1 0.75,2.448 1.063,2.604 0.313,0.156 10 false *2 2.167,1.979 2.479,2.135 0.313,0.156 10 false *b 4.344,1.854 4.656,2.01 0.313,0.156 10 false *3 5.135,0.979 5.635,1.177 0.5,0.198 10 false *1, *4 1.271,2.344 1.573,2.51 0.302,0.167 10 false *a 2.177,2.49 2.49,2.646 0.313,0.156 10 false *b 1.281,3.625 1.594,3.781 0.313,0.156 10 false *1 2.219,3.615 2.531,3.771 0.313,0.156 10 false *2 5.125,2.708 5.698,2.958 0.573,0.25 10 false *2, *5 4.5,1.063 4.813,1.219 0.313,0.156 10 false *c 0.583,0.135 0.865,0.49 0.281,0.354 18 false i 4.146,0.125 4.427,0.479 0.281,0.354 18 false ii
*1 No. 1 Compression Ring *2 No. 2 Compression Ring
*3 Oil Ring Expander *4 Upper Side Rail
*5 Lower Side Rail - -
*a Code Mark *b Paint Mark
*c Front Mark - -
V100135

Upward
V100136

Front of Engine


i.

Using a piston ring expander, install the No. 1 compression ring and No. 2 compression ring with the code mark positioned as shown in the illustration.

Piston Ring Mark:
Item Code Mark Paint Mark
No. 1 Compression Ring - White
No. 2 Compression Ring 2T Sky Blue


NOTICE:

Install the compression rings with the code marks facing upward.


ii.

Position the piston rings so that the ring ends are as shown in the illustration.


Hide 11711 6.INSTALL CRANKSHAFT BEARING

a.
A461480C01
6.208,4.375 6.052,4 6.052,4 5.885,4 false 2.25,4.948 2.563,5.146 0.313,0.198 10 false *a 2.823,4.958 3.135,5.156 0.313,0.198 10 false *b 5.708,3.917 6.021,4.115 0.313,0.198 10 false *c 6.094,4.771 6.406,4.969 0.313,0.198 10 false B 4.74,4.781 5.052,4.979 0.313,0.198 10 false A 0.552,0.115 0.833,0.469 0.281,0.354 18 false i 0.573,1.802 0.854,2.156 0.281,0.354 18 false ii 4.146,1.823 4.427,2.177 0.281,0.354 18 false iii 4.792,3.917 5.073,4.271 0.281,0.354 18 false iv
*a Correct *b Incorrect
*c Vernier Caliper - -


i.

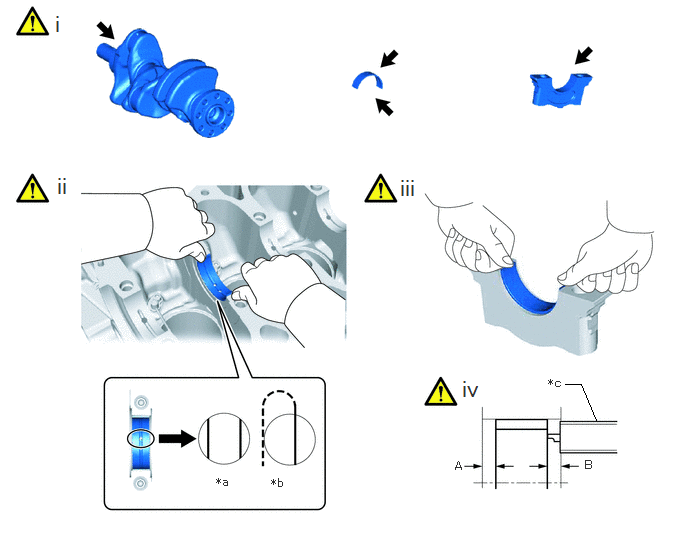
Clean the main journal and both surfaces of the No. 1 crankshaft bearings and No. 2 crankshaft bearings.


ii.

Install the 4 No. 1 crankshaft bearings to the cylinder block sub-assembly as shown in the illustration.

NOTICE:

Do not apply engine oil to the No. 1 crankshaft bearings or the contact surfaces.


HINT:

Both sides of the oil groove in the cylinder block sub-assembly should be visible through the oil feed holes in the No. 1 crankshaft bearing. The amount visible on each side of the holes should be equal.


iii.

Install the 4 No. 2 crankshaft bearings to the 4 crankshaft bearing caps.


iv.

Using a vernier caliper, measure the distance between the crankshaft bearing cap edge and No. 2 crankshaft bearing edge.

Difference between (A) and (B):

0 to 0.7 mm (0 to 0.0276 in.)


Hide 13411 7.INSTALL CRANKSHAFT

a.
A461958N01
0.458,0.073 0.74,0.427 0.281,0.354 18 false i 3.875,0.063 4.156,0.417 0.281,0.354 18 false ii

i.

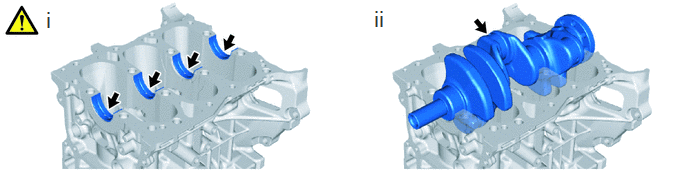
Apply engine oil to the crankshaft bearings.


ii.

Place the crankshaft on the cylinder block sub-assembly.


Hide 11791 8.INSTALL CRANKSHAFT THRUST WASHER
a.
A460698C01
3.292,0.885 3.146,0.448 3.146,0.448 3.667,1.146 true 2.896,0.344 3.125,0.51 0.229,0.167 10 true *a 1.813,0.083 2.094,0.438 0.281,0.354 18 false i 2.99,1.115 3.167,1.406 0.177,0.292 18 true ii
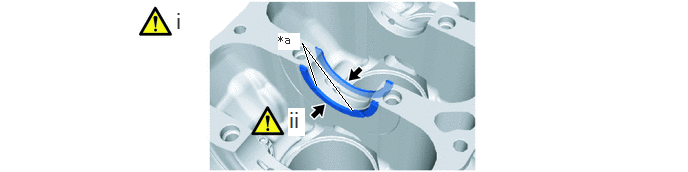
*a Oil Groove - -


i.

Install the 2 crankshaft thrust washers to the No. 3 journal position of the cylinder block sub-assembly with the oil grooves facing outward.


ii.

Apply engine oil to the crankshaft thrust washers.


Hide 9.INSTALL CRANKSHAFT BEARING CAP

a.
A461959C01
5.583,2.021 6.115,2.021 false 2.042,4.365 2.302,4.031 true 1.333,5.073 1.625,4.781 true 6.188,1.938 6.5,2.135 0.313,0.198 10 false *a 2.292,3.854 2.604,4.052 0.313,0.198 10 false *b 1.156,5.073 1.469,5.271 0.313,0.198 10 false *b 1.448,4.01 1.76,4.208 0.313,0.198 10 false *c 1,0.094 1.281,0.448 0.281,0.354 18 false i 4.406,0.094 4.688,0.448 0.281,0.354 18 false ii 4.344,2.49 4.625,2.844 0.281,0.354 18 false iii 0.969,1.885 1.25,2.24 0.281,0.354 18 false iv 1.417,5.25 1.698,5.604 0.281,0.354 18 false v 1.167,3.958 1.448,4.313 0.281,0.354 18 false vi 2.917,3.875 3.198,4.229 0.281,0.354 18 false vii 4.323,3.938 4.74,4.313 0.417,0.375 18 false viii
*a Front Mark *b Paint Mark
*c 90° - -
V100135

Front of Engine - -


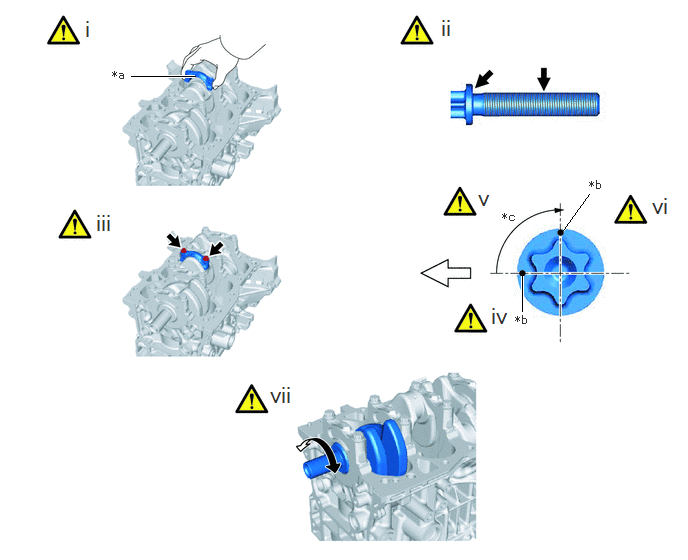
i.

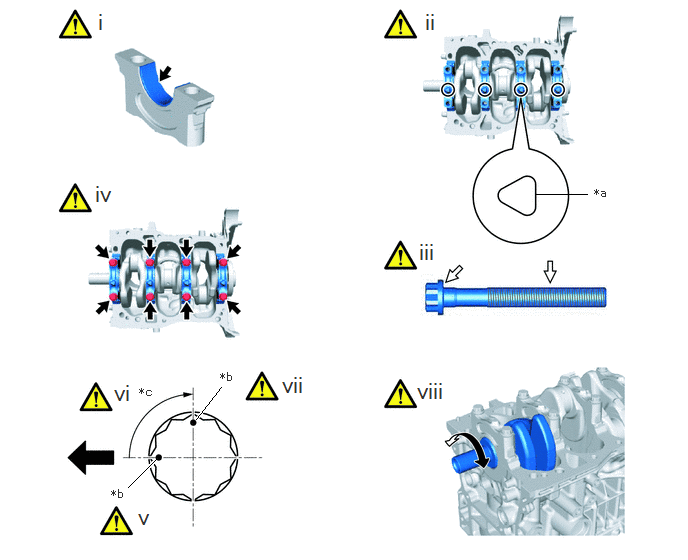
Apply engine oil to the crankshaft bearings.


ii.

Confirm the front marks and numbers, and install the 4 crankshaft bearing caps to the cylinder block sub-assembly with the front marks positioned as shown in the illustration.


iii.

Apply a light coat of engine oil to the threads and under the heads of the crankshaft bearing cap set bolts.


iv.

Uniformly install and tighten the 8 crankshaft bearing cap set bolts.

Torque:
61 N*m (622 kgf*cm, 45 ft.*lbf)


v.

Mark the front of the crankshaft bearing cap set bolts with paint.


vi.

Tighten the 8 crankshaft bearing cap set bolts 90° as shown in the illustration.


vii.

Check that the paint marks are now at a 90° angle to the front.


viii.

Check that the crankshaft turns smoothly.


Hide 10.INSTALL CONNECTING ROD BEARING

a.
A461960C02
0.573,3.354 0.99,2.938 false 4.052,3.354 4.469,2.938 false 0.75,0.083 1.031,0.438 0.281,0.354 18 false i 0.75,2.042 1.031,2.396 0.281,0.354 18 false ii 4.333,2.042 4.615,2.396 0.281,0.354 18 false ii 0.427,3.354 0.74,3.552 0.313,0.198 10 false *a 3.865,3.333 4.177,3.531 0.313,0.198 10 false *a 1.833,2.896 2.146,3.094 0.313,0.198 10 false A 2.833,2.906 3.146,3.104 0.313,0.198 10 false B 5.365,2.896 5.677,3.094 0.313,0.198 10 false A 6.333,2.896 6.656,3.073 0.323,0.177 10 false B
*a Vernier Caliper - -


i.

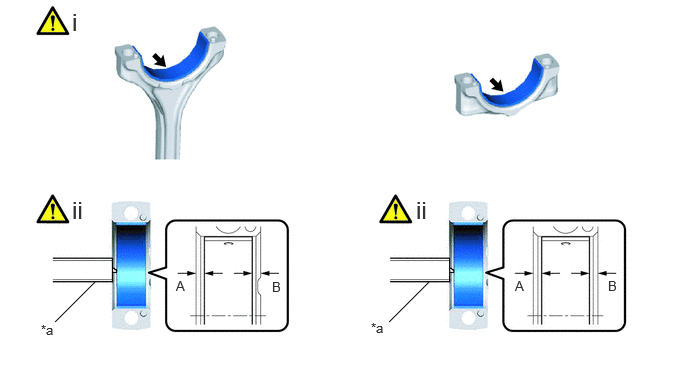
Install the 6 connecting rod bearings to the 3 connecting rods and 3 connecting rod caps.


ii.

Using a vernier caliper, measure the distance between the edges of the connecting rod and connecting rod bearing, and the edges of the connecting rod cap and connecting rod bearing.

Difference between (A) and (B):

0 to 0.7 mm (0 to 0.0276 in.)


NOTICE:

Do not apply engine oil to the connecting rod bearings or the contact surfaces.


Hide 11.INSTALL PISTON WITH CONNECTING ROD

a.
A461969C01
3.323,3.292 3.063,2.979 true 0.635,0.323 0.917,0.677 0.281,0.354 18 false i 2.552,2.75 2.833,3.104 0.281,0.354 18 false ii 3.469,2.823 3.781,3.021 0.313,0.198 10 false *1 3.698,2.823 4.01,3.021 0.313,0.198 10 false *4 2.698,3.656 3.01,3.854 0.313,0.198 10 false *3 3.469,4.469 3.781,4.667 0.313,0.198 10 false *2 3.729,4.469 4.042,4.667 0.313,0.198 10 false *5 2.948,2.844 3.26,3.042 0.313,0.198 10 false *a
*1 No. 1 Compression Ring *2 No. 2 Compression Ring
*3 Oil Ring Expander *4 Upper Side Rail
*5 Lower Side Rail - -
*a Front Mark - -
V100136

Front of Engine - -


i.

Apply engine oil to the cylinder walls, pistons, and surfaces of the connecting rod bearings.


ii.

Position the piston rings so that the ring ends are as shown in the illustration.


b.
A461970C01
3.708,3.292 3.344,3 true 1.958,0.333 2.271,0.531 0.313,0.198 10 false *a 4.323,1.375 4.635,1.573 0.313,0.198 10 false *b 3.646,0.448 3.958,0.646 0.313,0.198 10 false *c 3.646,1.875 3.958,2.073 0.313,0.198 10 false *d 3.167,2.875 3.479,3.073 0.313,0.198 10 false *e 0.74,0.135 1.021,0.49 0.281,0.354 18 false i 1.563,2.885 1.844,3.24 0.281,0.354 18 false ii
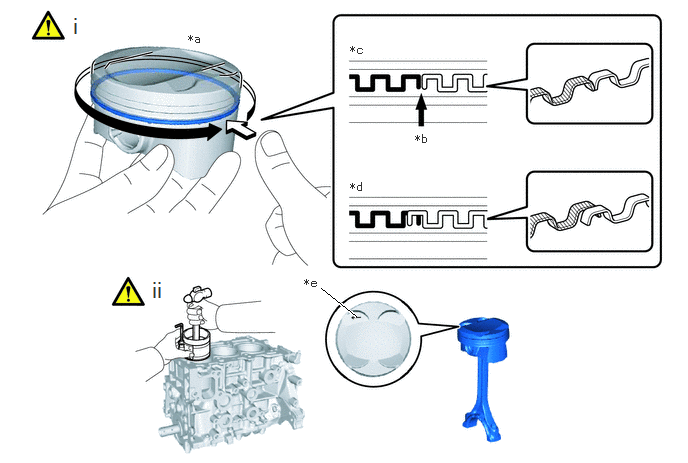
*a Press around the circumference *b Ring End
*c Correct *d Incorrect
*e Front Mark - -


i.

Confirm that the ends of the oil ring expander are not overlapping and that the upper side rail and lower side rail are securely installed into the groove.

NOTICE:
·

After installing the oil ring expander, upper side rail and lower side rail, press around the circumference with a finger to check that they are securely installed into the groove.

·

If the oil ring expander is not securely installed into the groove, check that the ends of the oil ring expander are not overlapping.

·

If the ends of the oil ring expander are overlapping, remove the upper side rail and lower side rail and realign the oil ring expander.


ii.

Using a piston ring compressor, push the correctly numbered piston with connecting rod into the cylinder with the front marks of each piston with connecting rod facing the front of the engine.

NOTICE:
·

When inserting the piston with connecting rod into the cylinder block sub-assembly, make sure the connecting rod does not contact the No. 1 oil nozzle sub-assembly.

·

Match each connecting rod cap to the correct connecting rod.


Hide 12.INSTALL CONNECTING ROD CAP

a.
A461977C01
1.365,0.792 2.031,0.792 true 5.438,3.24 5.438,2.875 true 5.865,2.396 6.135,2.021 true 0.865,0.167 1.146,0.521 0.281,0.354 18 false i 1.167,0.708 1.479,0.906 0.313,0.198 10 false *a 4.573,0.156 4.854,0.51 0.281,0.354 18 false ii 0.979,2.188 1.26,2.542 0.281,0.354 18 false iii 5.094,3.156 5.375,3.51 0.281,0.354 18 false iv 4.958,1.927 5.24,2.281 0.281,0.354 18 false v 5.365,3.26 5.677,3.458 0.313,0.198 10 false *b 6.135,1.854 6.448,2.052 0.313,0.198 10 false *b 5.229,2.188 5.542,2.385 0.313,0.198 10 false *c 6.771,2.01 7.052,2.365 0.281,0.354 18 false vi 2.792,3.979 3.073,4.333 0.281,0.354 18 false vii
*a Front Mark *b Paint Mark
*c 90° - -
V100136

Front of Engine - -


i.

Check that the front mark of the connecting rod cap is facing the correct direction.


ii.

Apply a light coat of engine oil to the threads and under the heads of the connecting rod bolts.


iii.

Using an E12 "TORX" socket wrench, alternately tighten the 2 connecting rod bolts in several steps.

Torque:
38 N*m (387 kgf*cm, 28 ft.*lbf)


iv.

Mark the front of the connecting rod bolts with paint.


v.

Tighten the connecting rod bolts 90° as shown in the illustration.


vi.

Check that the paint marks are now at a 90° angle to the front.


vii.

Check that the crankshaft turns smoothly.


Hide 11432R 13.INSTALL CYLINDER BLOCK WITH HEAD STRAIGHT SCREW PLUG
a.
A460696N01
0.5,0.083 0.781,0.438 0.281,0.354 18 false i

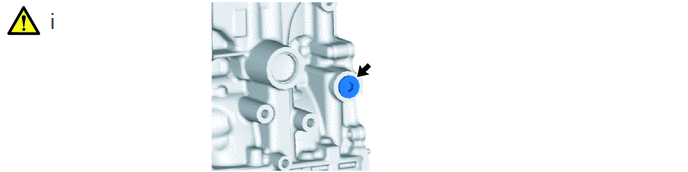
i.

Using a 10 mm hexagon wrench, install the cylinder block with head straight screw plug and a new gasket to the cylinder block sub-assembly.

Torque:
44 N*m (449 kgf*cm, 32 ft.*lbf)


Hide 12211 14.INSTALL NO. 1 VENTILATION CASE

Torque:
21 N*m (214 kgf*cm, 15 ft.*lbf)