K320 MULTIDRIVE / CVT CONTINUOUSLY VARIABLE TRANSAXLE SYSTEM Pattern Select Switch Power Mode Circuit
DESCRIPTION
The TCM memory contains programs for normal and PWR shift patterns.
By following the programs corresponding to signals from the combination switch assembly (drive mode switch), park/neutral position switch assembly and various other sensors, the TCM turns the shift solenoid valves on and off, and controls the transaxle gear ratio.
WIRING DIAGRAM
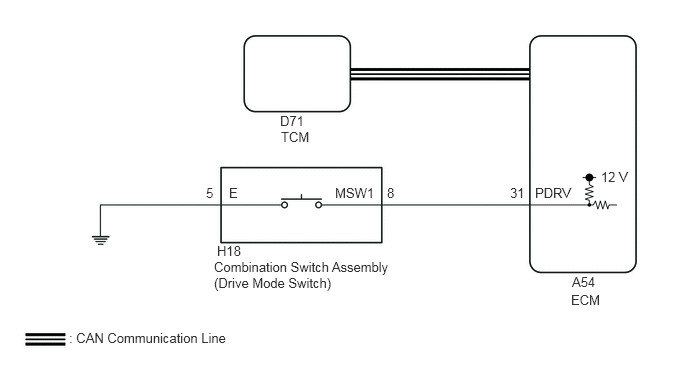
CAUTION / NOTICE / HINT
- NOTICE:
-
Perform registration and/or initialization when parts related to the continuously variable transaxle system are replaced.
-
Click hereDrivetrain>K320 (MULTIDRIVE / CVT)>CONTINUOUSLY VARIABLE TRANSAXLE SYSTEM>PRECAUTION
PROCEDURE
According to the display on the GTS, read the Data List.
- Powertrain > Engine > Data List
-
Tester Display Measurement Item Range Normal Condition Diagnostic Note Drive Mode Select Switch Combination switch assembly (drive mode switch) status ON or OFF ·ON: Combination switch assembly (drive mode switch) being pushed
·OFF: Combination switch assembly (drive mode switch) not being pushed
-
- Powertrain > Engine > Data List
-
Tester Display Drive Mode Select Switch - 50003 372 1233
- Result:
Result Proceed to Data List value is normal A Data List value is not normal B
A
B
NEXT
OK
NG
Disconnect the combination switch assembly (drive mode switch) connector.
Measure the resistance according to the value(s) in the table below.
- Standard Resistance:
Tester Connection Condition Specified Condition Click Location & Routing(H18)Location & Routingewd_type=routing;type=c;code=H18
Click Connector(H18)Instrument Panel>Instrument Panel Wire / Speaker Wire>Combination Switch Assemblyewd_type=component;type=c;code=H18;pinno=5
H18-5 (E) - Body ground Always Below 1 Ω
Connect the combination switch assembly (drive mode switch) connector.
- Result:
Proceed to OK NG
OK
NG
Disconnect the ECM connector.
Disconnect the combination switch assembly (drive mode switch) connector.
Measure the resistance according to the value(s) in the table below.
- Standard Resistance:
Tester Connection Condition Specified Condition Click Location & Routing(A54,H18)Location & Routingewd_type=routing;type=c,c;code=A54,H18
Click Connector(A54)Engine Compartment>Engine Room Main Wire>ECMewd_type=component;type=c;code=A54;pinno=31
Click Connector(H18)Instrument Panel>Instrument Panel Wire / Speaker Wire>Combination Switch Assemblyewd_type=component;type=c;code=H18;pinno=8
A54-31 (PDRV) - H18-8 (MSW1) Ignition switch off Below 1 Ω A54-31 (PDRV) or H18-8 (MSW1) - Body ground Ignition switch off 10 kΩ or higher
Connect the combination switch assembly (drive mode switch) connector.
Connect the ECM connector.
- Result:
Proceed to OK NG
OK
NG
NEXT